Help Topics
- EaseSuite
- Frequently Asked Questions / Troubleshooting
- General Application Features
- Stock Control and Replenishment
- Accounts Package Integration
- Quick Start Guides
- Mobile Guides
- Word Templates & Print Outs
- Concepts
- Hardware
- Workflow Case Studies
- Terminology
- Submitting Help Requests
- Feature Requests
- Web Shop Preparation Guide
Automatic Discounts
- Product Discounts
- Customer Discounts
- Combination Discounts Matching Customer and Product tags
- Termination and discount order
- Discount Tag Group
- Finding By Tag
- Further Notes
EaseSuite supports automatic discounts through the tagging of customers, products or both to make a discount. This article contains some examples.
Tags are simply categories you can create and name yourself and we support them on many different items for categorisation, but in this case we'll be focusing on customer and product tags. Tags are essentially used to group things together. Note if you only have one product or customer you want to discount, you'd still need to create a tag to associate with them.
1. Product Discounts
Say we want to give a group of products a 10% discount, this may be temporary or longer term.
First of all we want to create a tag for our discount. We'll call it "10% product discount". We do this in settings (Settings > General):
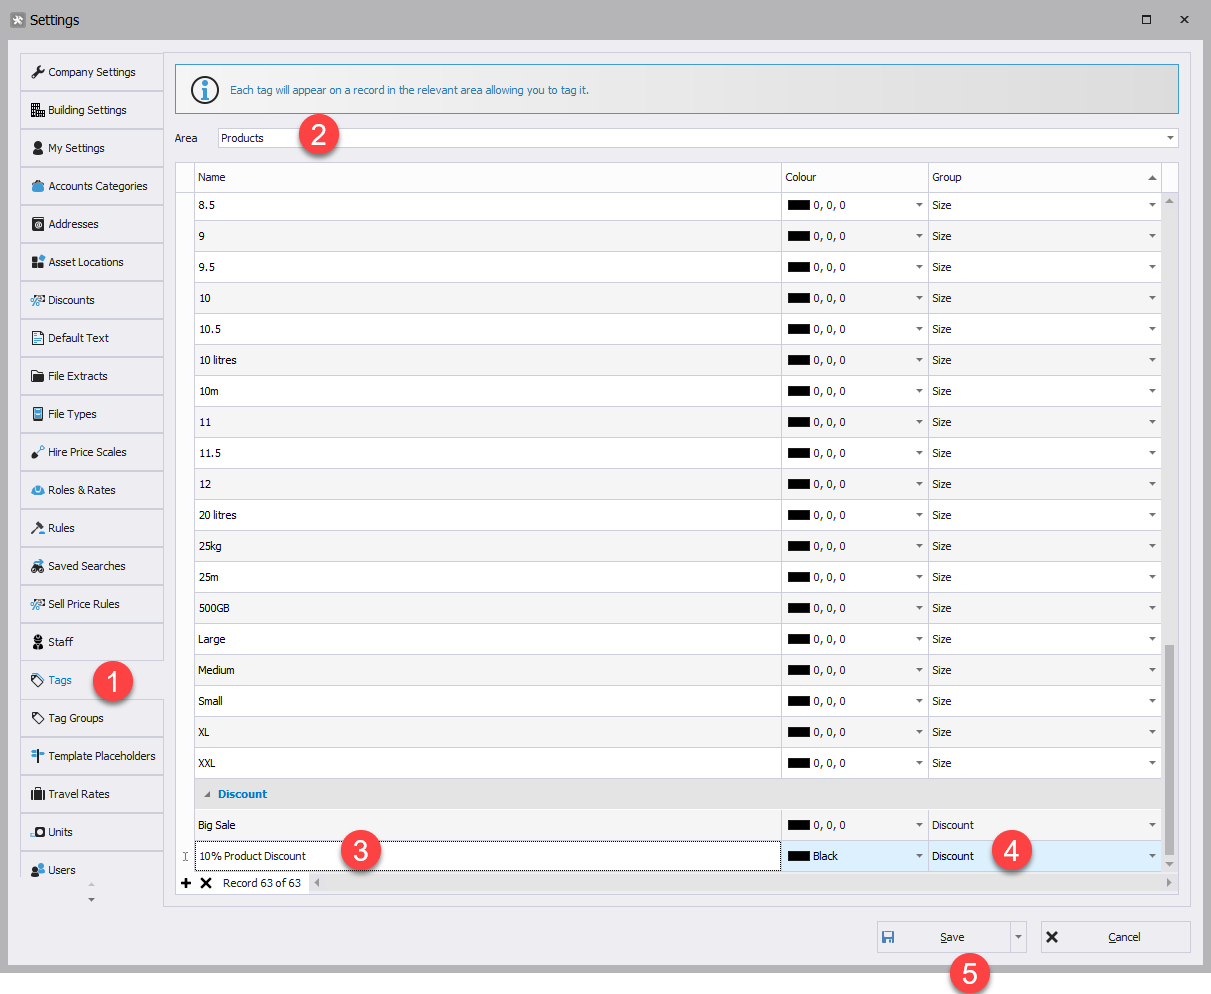
- Choose Tags on the left.
- Ensure "Products" is selected at top (a product tag we are adding, but later we will be back here for "Customers").
- Type the new tag name at the bottom, "10% Product Discount" in this example.
- We can optionally choose a tag group and you should have a tag group Discount, but if not see below to create one.
- Save will add our new tag.
Next we want to "enliven" this tag to apply a discount. Go back into settings and:
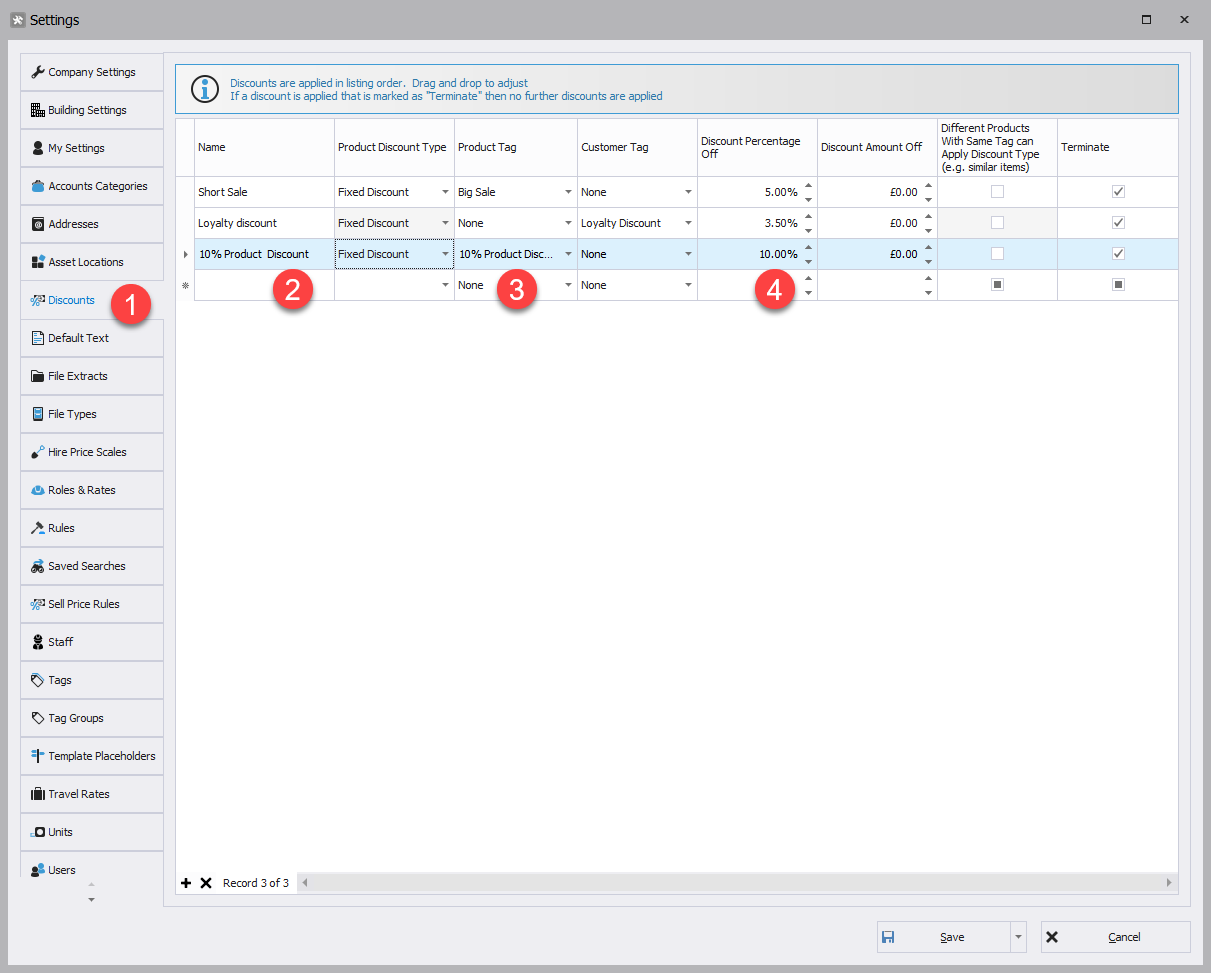
- Choose Discounts on the left
- Add a new discount, I've given it the name "10% Product Discount" again.
- Choose our product tag we created previously, "10% Product Discount"
- Type in the discount amount 10% and Save.
Next we want to associate some products to get our discount.
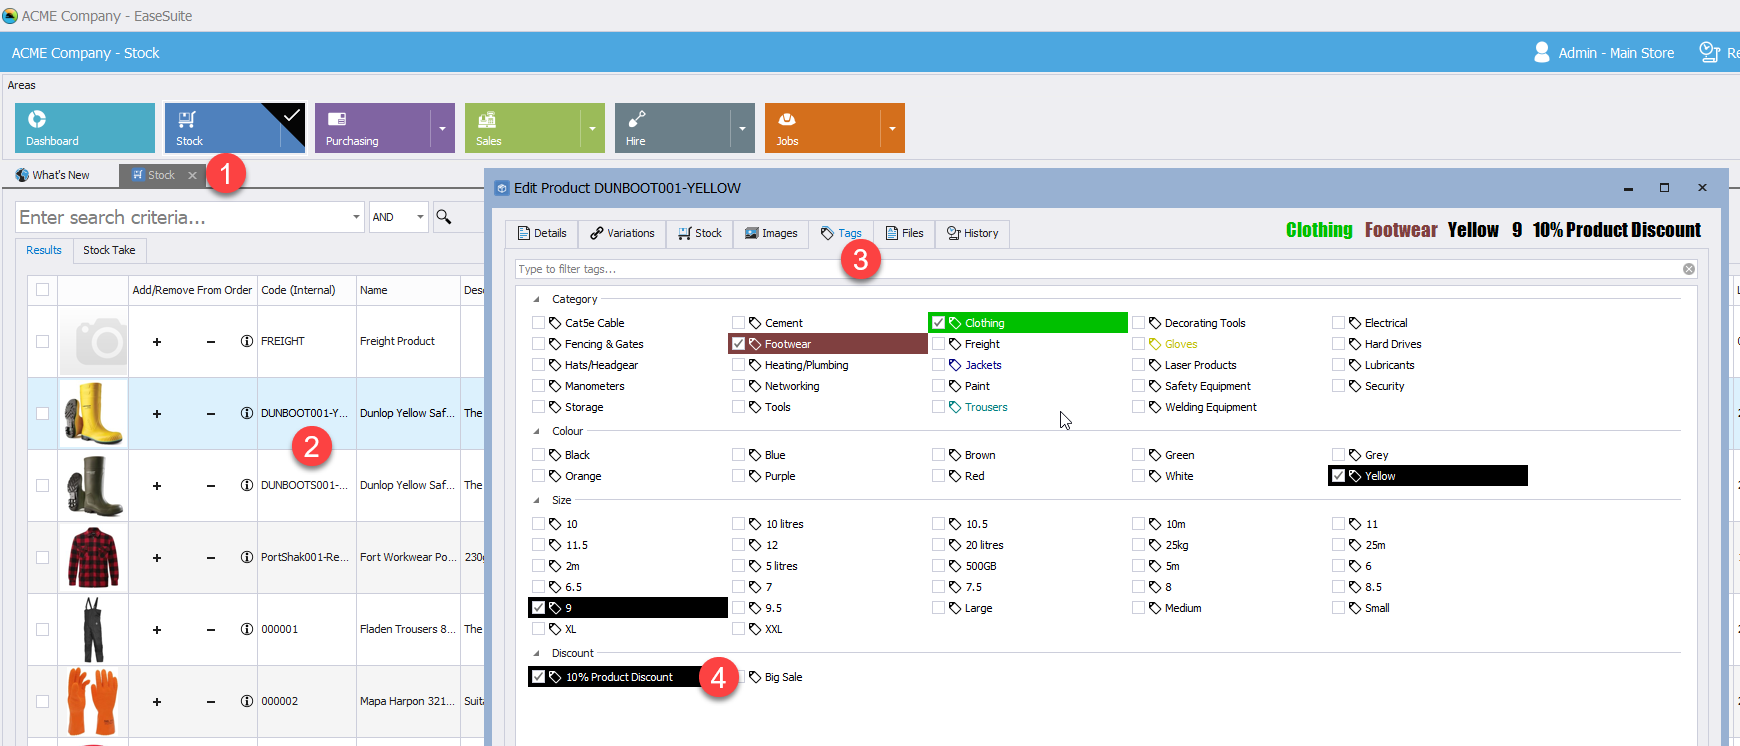
- From a Stock search, you can search out products.
- Double click the product you want to edit.
- Choose the Tags tab to view and select product tags for the product.
- Under Discount tag heading, choose the "10% Product Discount" to give this product that discount.
Repeat this for other products. To remove the product from the "10% Product Discount" tag group, simply do the same but untick the tag in 4 above.
To quickly associate (or disassociate) the discount tag to multiple products at once, we can also use Bulk Update:
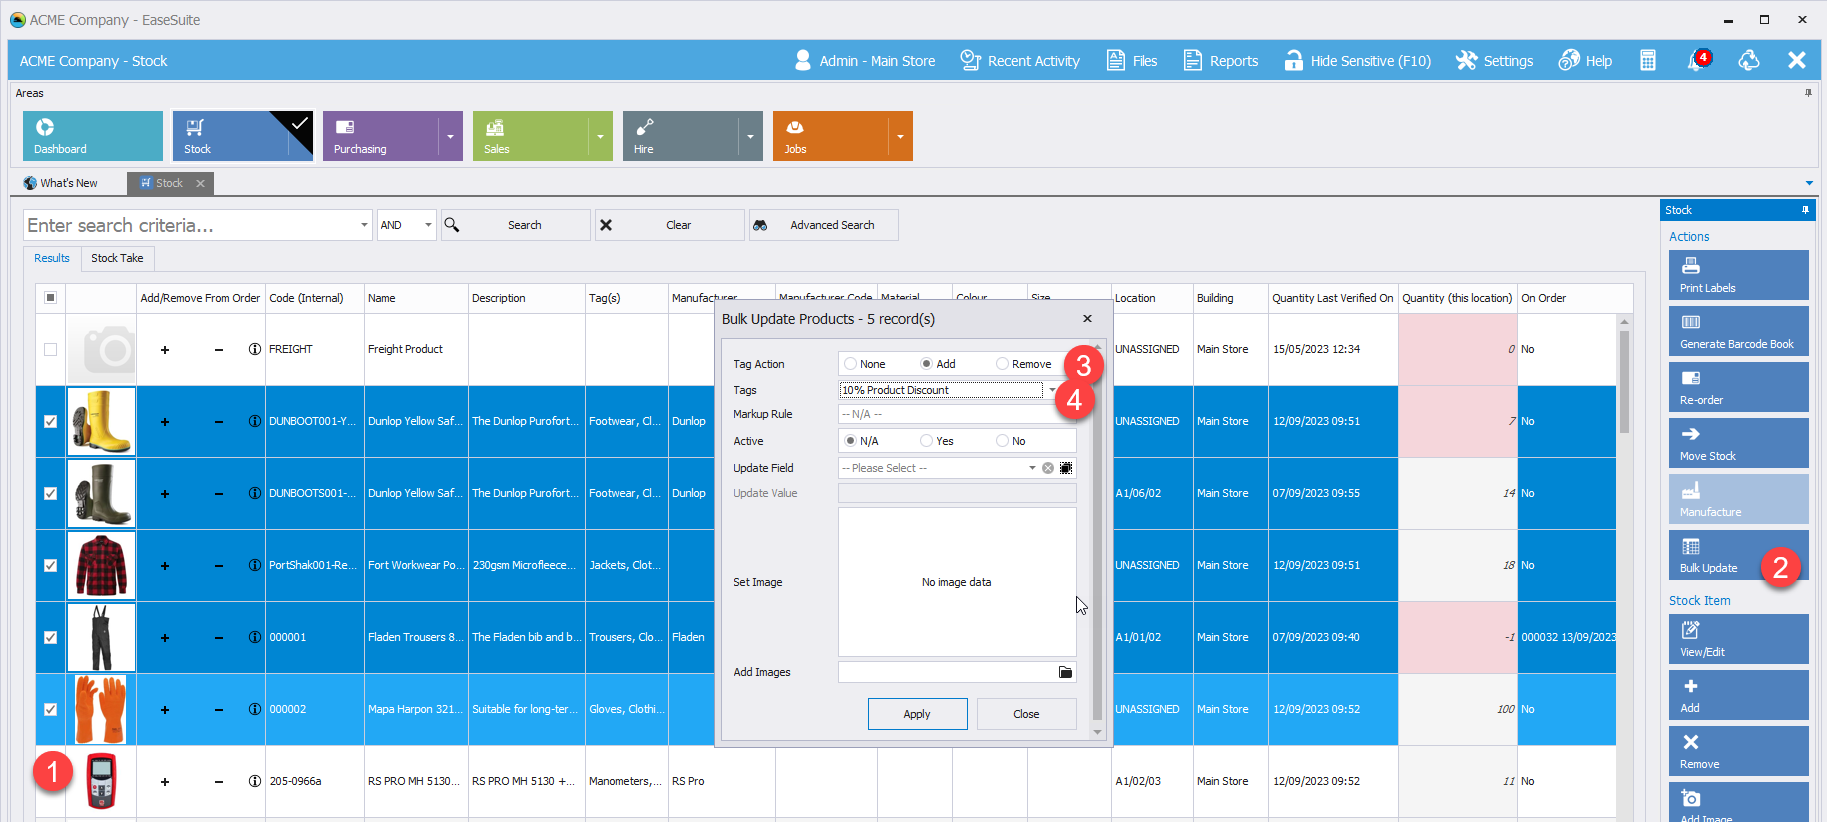
- In the Stock search, tick multiple items to select them.
- Choose Bulk Update on the right.
- Tag Action should be set to "Add".
- Choose our "10% Product Discount" then click Apply to apply it to the selected items.
If you wanted to bulk remove, set Tag Action to "Remove" in stage 3 instead, i.e. removing a temporary discount promotion (and you can search those out using find).
This example shows how to apply and un-apply a simple product discount to a group of products.
2. Customer Discounts
Say we want to give a group of customers a 10% discount, so this time it is by the customer rather than the product.
We do exactly the same as "Discount by product", except:
- When editing tags, choose "Customers" at step 2 (noted above).
- You can add a customer tag e.g. "Customer 10% discount" and apply that tag to Customer records instead.
- To enliven the customer tag, you add a discount the same way but leave the product tag at "None" and choose the customer tag you added "Customer 10% discount" instead.
- Give customers this tag the same way in the customer search (Sales > Customers) to apply a 10% discount when a specific customer is selected (it will apply across all products for those customers).
3. Combination Discounts Matching Customer and Product tags
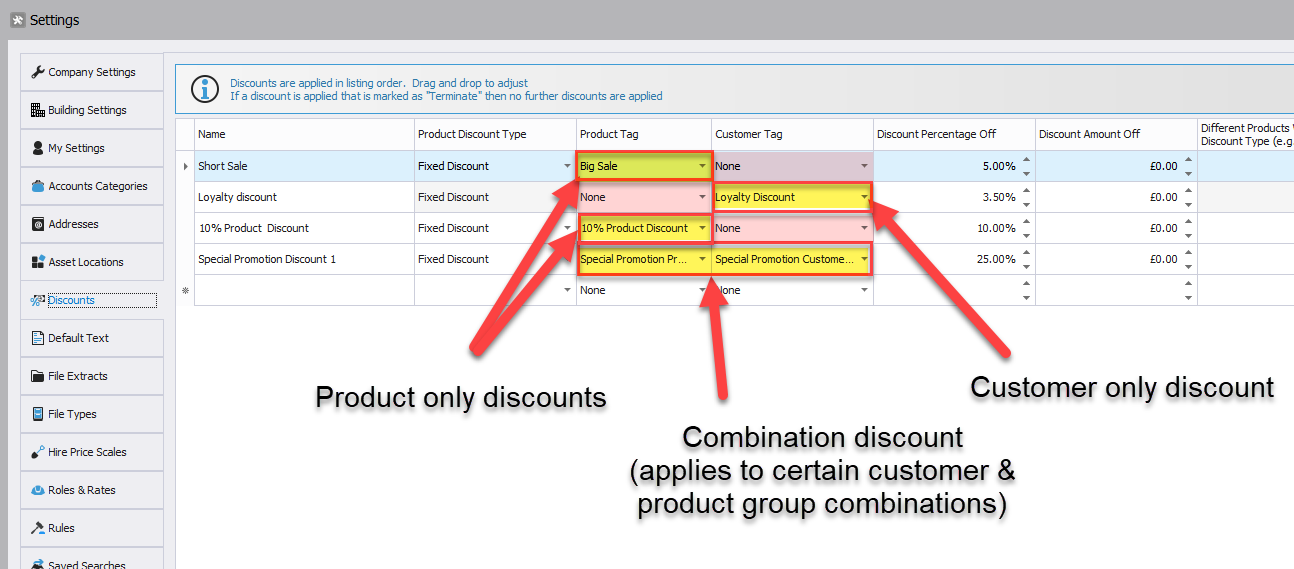
This is where things get more refined. Per above, we can create a product tag and put some products into it, and a customer tag and put some customers into it. But more complex discounts may call for the two to be matched to enable the discount as shown below:
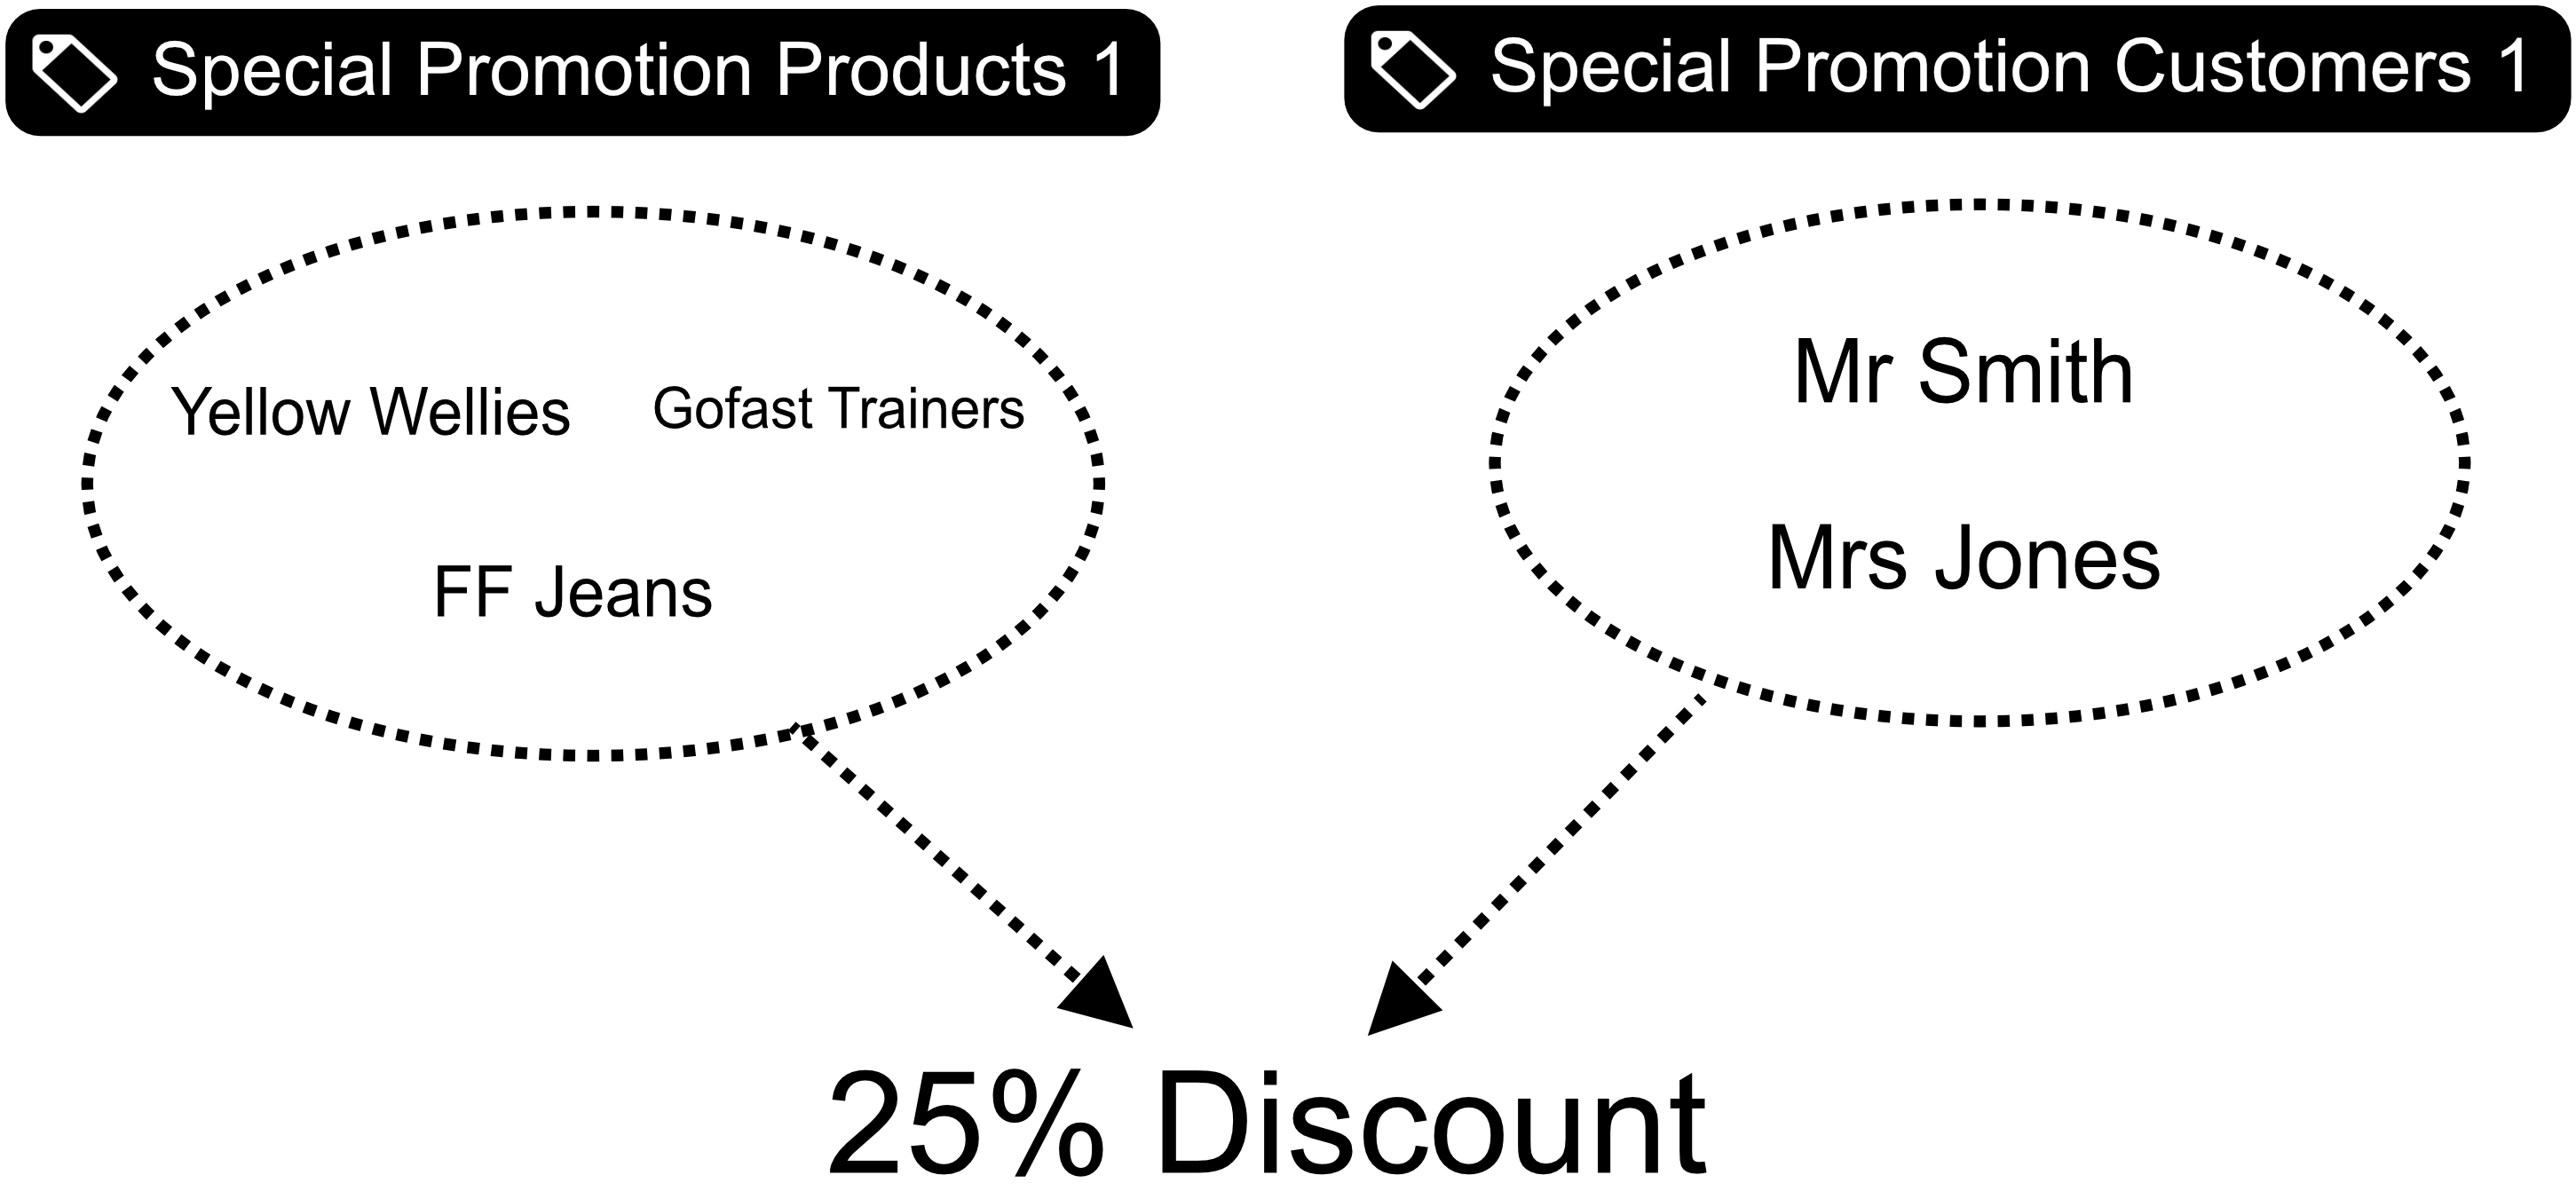
Here we have created two tags used to group products and customers. One is for products named "Special Promotion Products 1". and one for customers named "Special Promotion Customers 1".
We have put three products into our "Special Promotion Products 1" tag and two customers into our "Special Promotion Customers 1".
In Settings under Discounts, we this time match both tags by choosing both the product tag and the customer tag we created highlighted below. Only this combination of matching product and customer group will unlock our 25% discount.
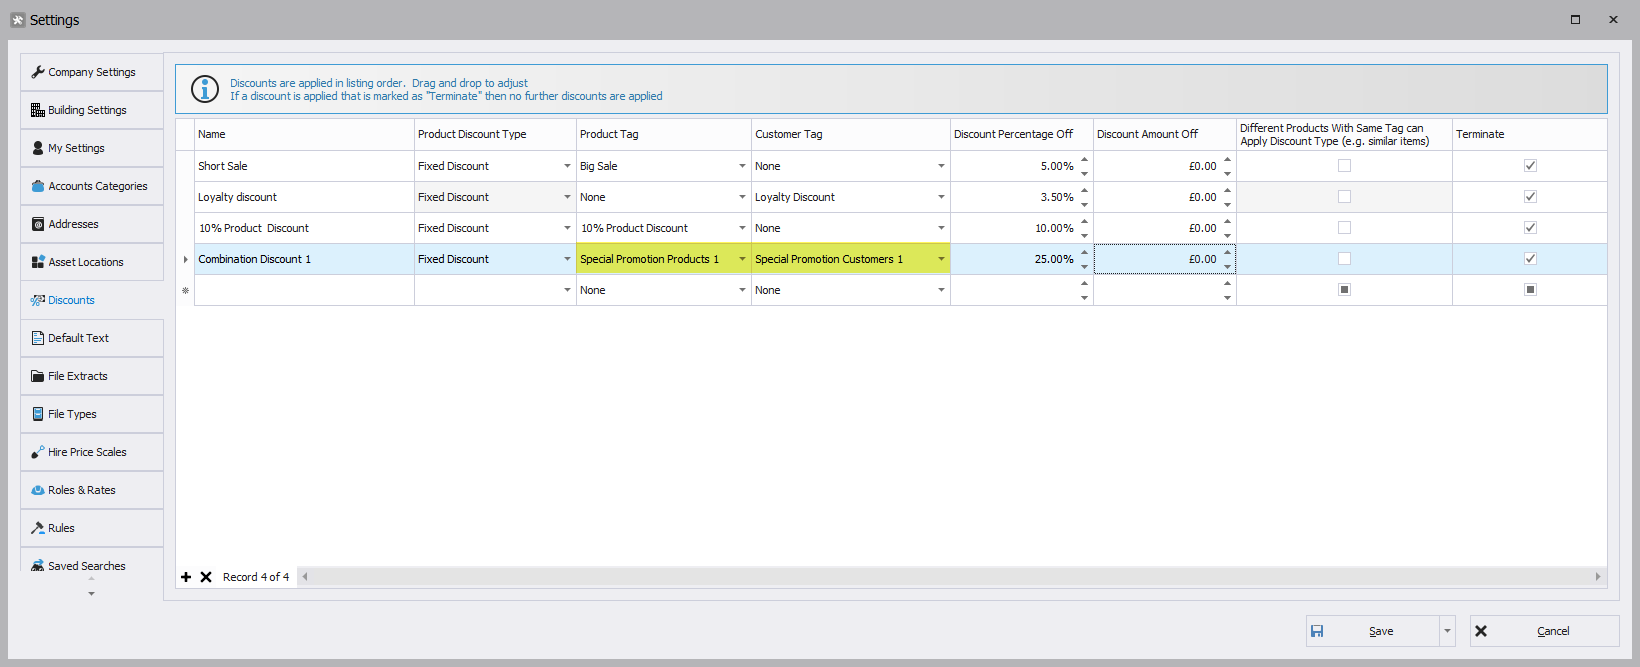
This allows for a vast amount of discount combinations and we could have several threads of discounting combinations done in this way to unlock in different scenarios.
4. Termination and discount order
You'll notice in the discount list above we have a "Terminate" tick box. Generally it safer to leave this on, but if it was off, this means discounts can cascade to apply multiple reductions at once. So for example you might get 10% off in one promotion then a further 20% by another (danger!). This is where terminate comes into play, by unticking it you open the possibility that if say a product or customer has multiple discount tags across them, multiple discounts could be applied for further reduction.
You can reorder discounts by clicking and dragging from the left to move a row up and down.
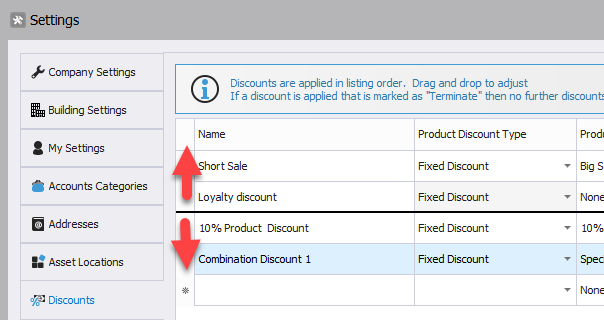
The way discounts are applied, they are moved through from top to bottom to match, and complete when one that matches has Terminate ticked. So if you have discounts that can cascade and do multiple reductions, the order in which they appear here and then stop can be important. For example, the maximum possible discount might be at the top then terminate if matched, meaning lower percentage discounts below would then not apply (and only apply if a previous one didn't match).
We've tried to keep this simple yet powerful, but it can need some forethought if multiple discounts can apply. Sometimes "dummy" preventative discounts are a way to prevent certain things from happening. For example, say a set of customers should never get any type of discount ever, you could create a discount at the top that is 0%, match a tag "Customer never gets discount", then have it terminate instantly. Because that one is at at the top and terminates, it sets 0% (does nothing) and exits, removing the possibility of any subsequent discounts below.
5. Discount Tag Group
Mentioned above, if you don't have a Discount tag group, we recommend going to Tag Groups in settings and:
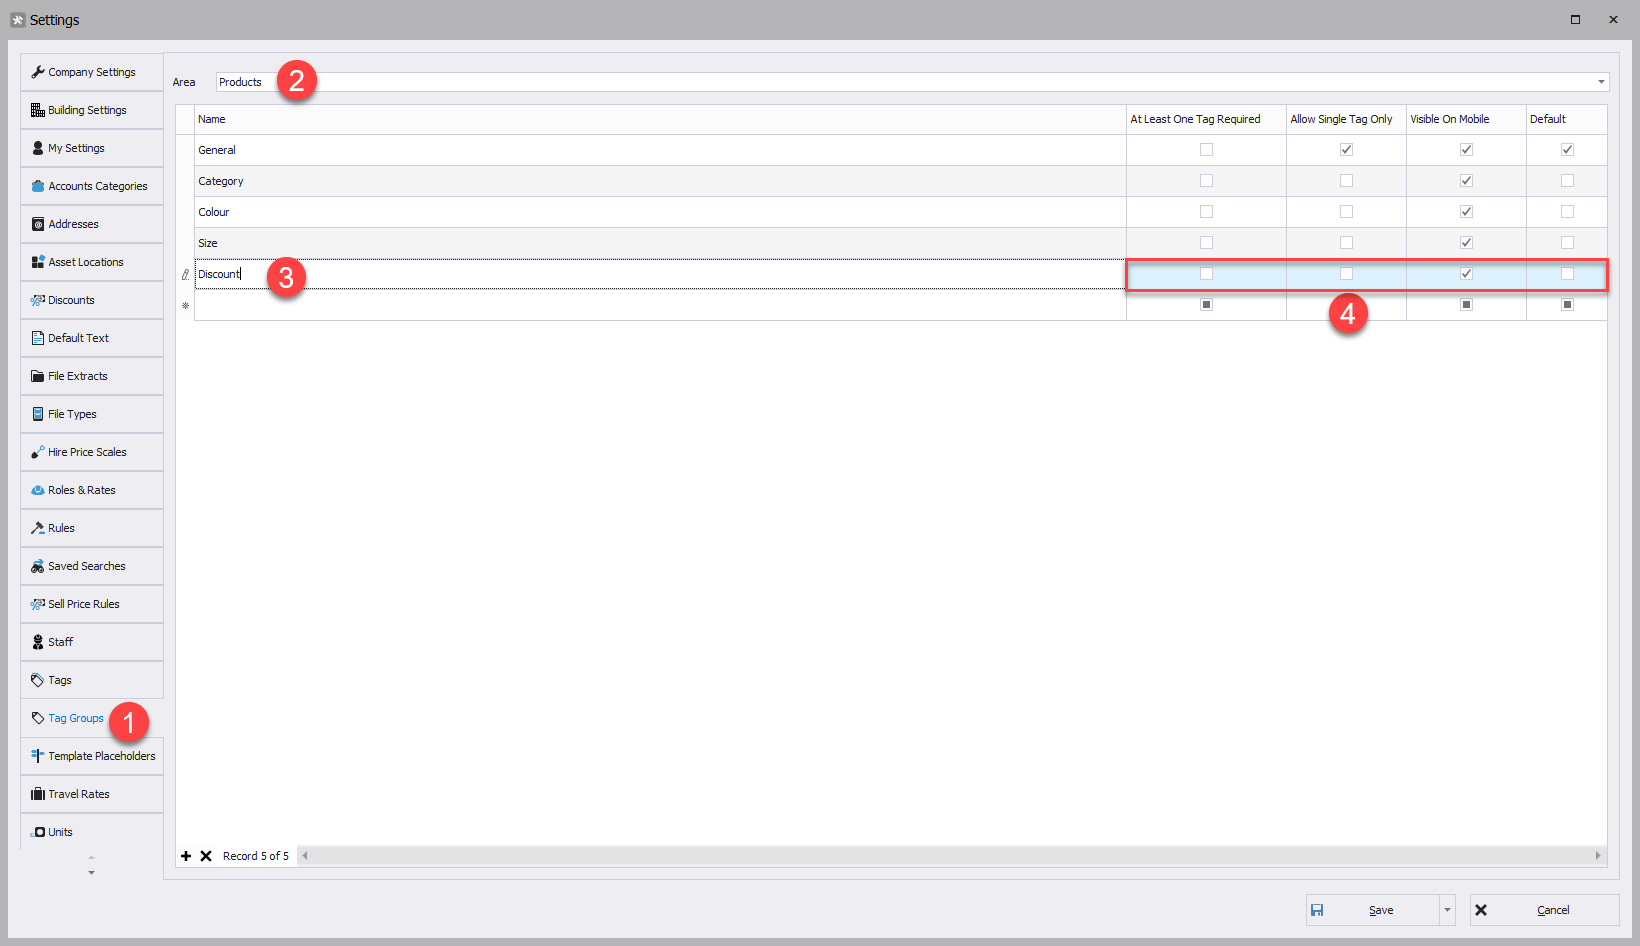
- Choose Tag Groups on the left.
- Ensure the desired area is selected, "Products" or "Customers" (it is worth adding one under both).
- Type in Discount
- Choose these characteristics (we want to allow multiple and not force one, so the first two ticks are off).
Save and this tag group will be available for selection and help split out tags under group headings.
6. Finding By Tag
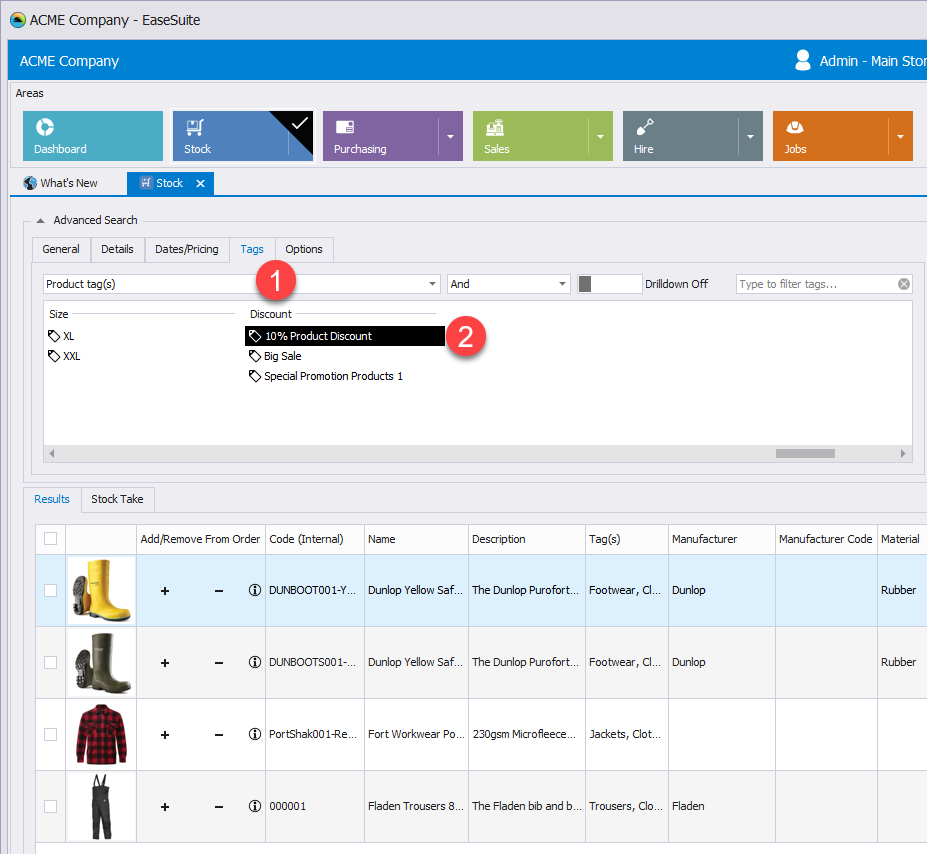
For the areas that support tags like Stock, under Advanced Search we have a Tags tab (1) and the ability to select a tag (2) to show which items have it. This lets you locate those items and for example Bulk Update (discussed above) could help remove them when a promotion is over.
7. Further Notes
- Discount Type in the Discounts tab can let you do e.g. "buy one get one free" type discounts. This can operate on a single product or over a tag group (see next).
- Different Products With Same Tag can Apply... this opens up "buy one get one free" across multiple products and not just one, i.e. you might have a shelve of various items that this promotion applies to.
- We can have a percentage amount off or a fixed amount off (noting it will never go into negative but may end up free if greater than the sell price!). Fixed discount amounts should generally be monitored with sell price fluctuations etc., that's where percentage is a bit safer.