Help Topics
- EaseSuite
- Frequently Asked Questions / Troubleshooting
- General Application Features
- Stock Control and Replenishment
- Accounts Package Integration
- Quick Start Guides
- Mobile Guides
- Word Templates & Print Outs
- Concepts
- Hardware
- Workflow Case Studies
- Terminology
- Submitting Help Requests
- Feature Requests
- Web Shop Preparation Guide
Assets Quick Start Guide
- Introduction
- Prerequisites
- Workflows
- Creating an Asset
- Adding Servicing and Testing Details
- Associating Related Assets
- Adding a Saved Search Reminder Notification for Services/Tests
1. Introduction
Assets are what we call instances of a stock product item. Whilst the stock product item describes the high level make and model details and how many are in stock for sale, assets break these down into individual instances with details such as serial/registration numbers, warranty details, condition for individual items.
Assets can be hired out by the system. They can be your assets or customer assets that are maintained by you and have details recorded against them and appear on jobs, basically a serviceable item.
Assets can be linked hierarchically, for example a vehicle has an engine, and an engine has a battery. All 3 of these can be individual assets for individual servicing purposes but linked together as part of an overall installation. Assets can be replaced by other assets and also discontinued, but their records kept around for historical reference.
Note only top level assets can be hired out, the vehicle in the example above, since you wouldn't hire just its engine out. Though if you transplanted an engine from one vehicle to another, this can be reflected and updated (the engine's parent vehicle asset would change, per below).
2. Prerequisites
- Assets require stock products to be present (Stock area) since they link back to them for some core details. One product (line) covers the make/model of a particular asset, and the asset records are the instance of that product for hire.
3. Workflows
- Creating an Asset
- Adding servicing and testing details
- Associating related assets
- Adding a saved search reminder notifications for services/tests
4. Creating an Asset
The Assets area is accessible by selecting Assets, found via the dropdown next to Stock or Hire in the main coloured tile bar area of the application.
For here you can add an Asset in the usual way (+ at bottom of list or from right).
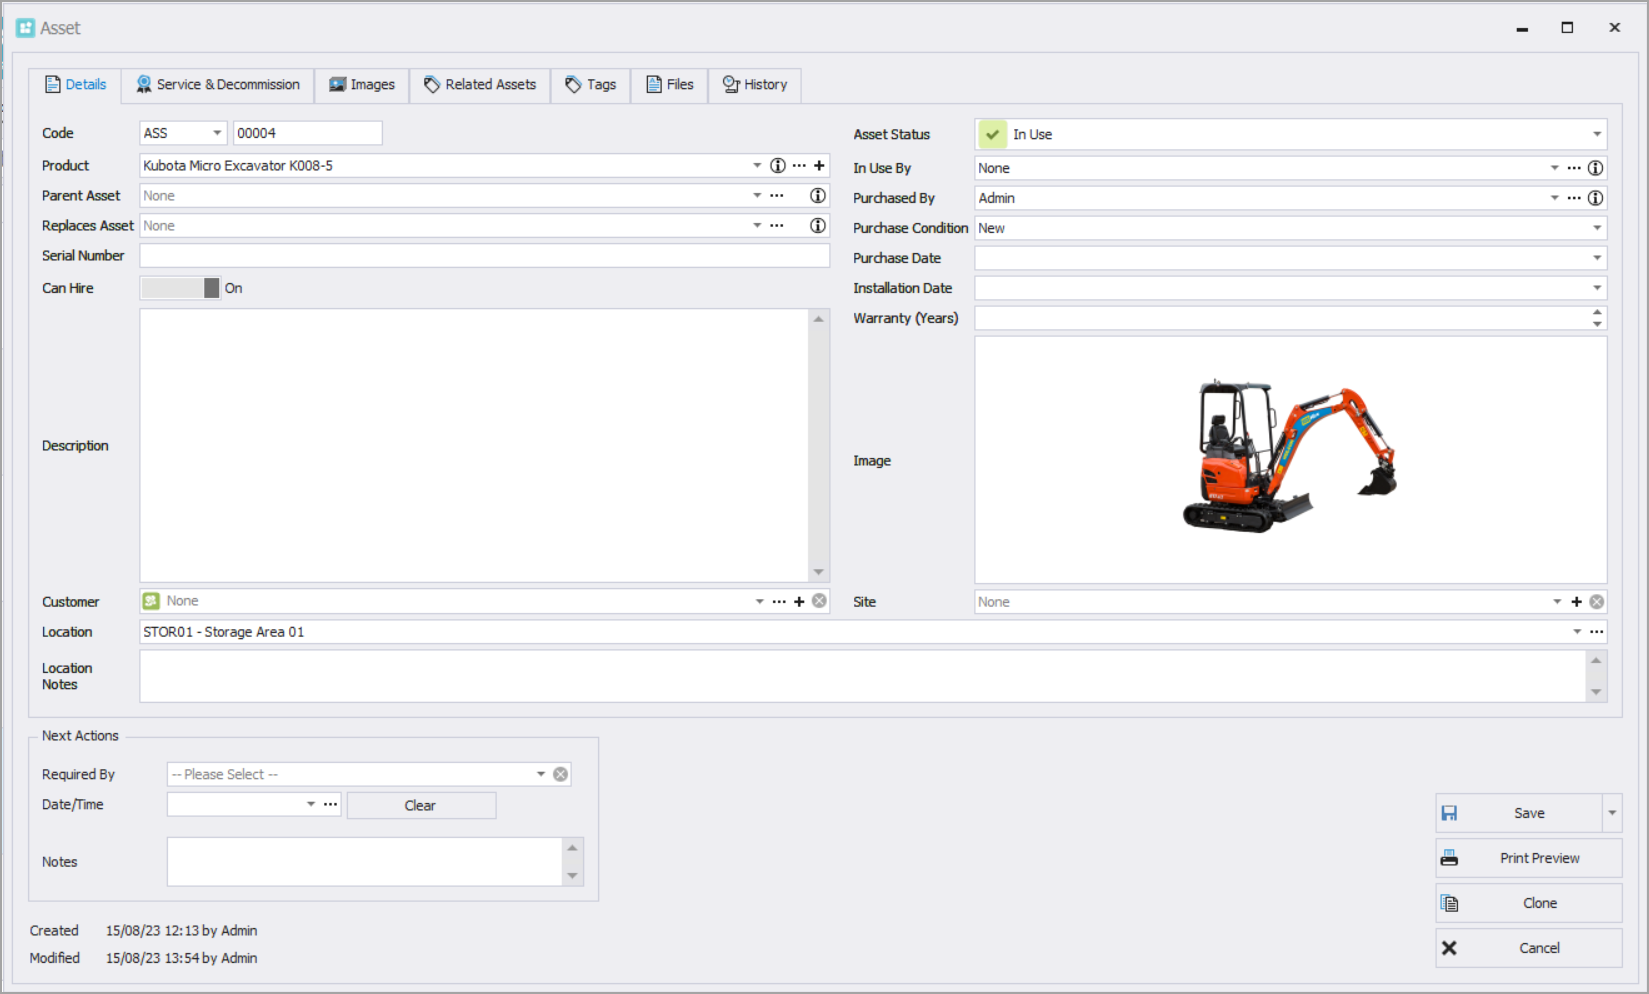
- Select the Product that you previously created and if it has a picture, that picture will automatically come onto the record. Note, if you want a more individual picture, you can override this image with one of your own by right clicking it. For example the Asset might have individual markings even though it's the same make/model as others in the product range you hire out, so you might want to call that out with its own picture for easier identification.
- Code - You can code this however you want. If it's a vehicle, it's quite useful to use the registration number, or you can code if you have say an existing asset register and perhaps mark each with your own internal code.
- Parent Asset and Replaces Asset - Allows you to select other Assets. Selecting a parent makes this Asset a child of it (and not hireable, only assets with no parents can be hired), and is used to make the relationship between Assets.
- Can Hire - Switch this to On if the Asset is hireable. To make it unhireable later for any reason (decommissioned, under repair), you can turn this Off to make it disappear from the hire list.
- A variety of fields such a Serial Number, Description, Status, Purchased By, Purchases/Installation Date, Condition, Warranty are optional but you can specify them if you want to help track that information. Specifying a purchase or installation date for example, lets you search out older Assets that you might ringfence for replacement.
- If the Asset belongs to a customer, say it's an onsite asset you maintain, you may select the customer and site here.
- Assets can also be placed in a location. Clicking "..." next to Location opens settings and allows you to make a tree of locations to cover any number of on-site possibilities.
- The usual Next Actions is present (optional).
- After you've entered the basic details (code, product and perhaps flick on Can Hire at a minimum), you can Save.
- Note you can clone your Asset, so if you have 10 to hire out, just open the first, clone it, and give it a new code then save again. This allows you to quickly get in your 10 assets.
5. Adding Servicing and Testing Details
Each Asset can have a number of services or tests added to it. For a car, think yearly service and an MOT (test) that starts after 3 years from new. But for a crane, things get a bit more complicated and you might have multiple assets covering different parts of it each with their own service and test schedule.
If we use the car example, we might add the following:

- Our service is the first row and our MOT (test) the second.
- Both are mandatory and occur ever year (frequency), with the MOT 3 years from new.
- We have a note of our first ever service date, the last one that occurred, and the next one due, with some comments. These can be adjusted at any time for when they have been performed.
- Note there is a small calculator symbol on Next Service Date. Pressing this adds the Frequency onto the Last Service Date to calculate the next (or you can manually type it).
6. Associating Related Assets
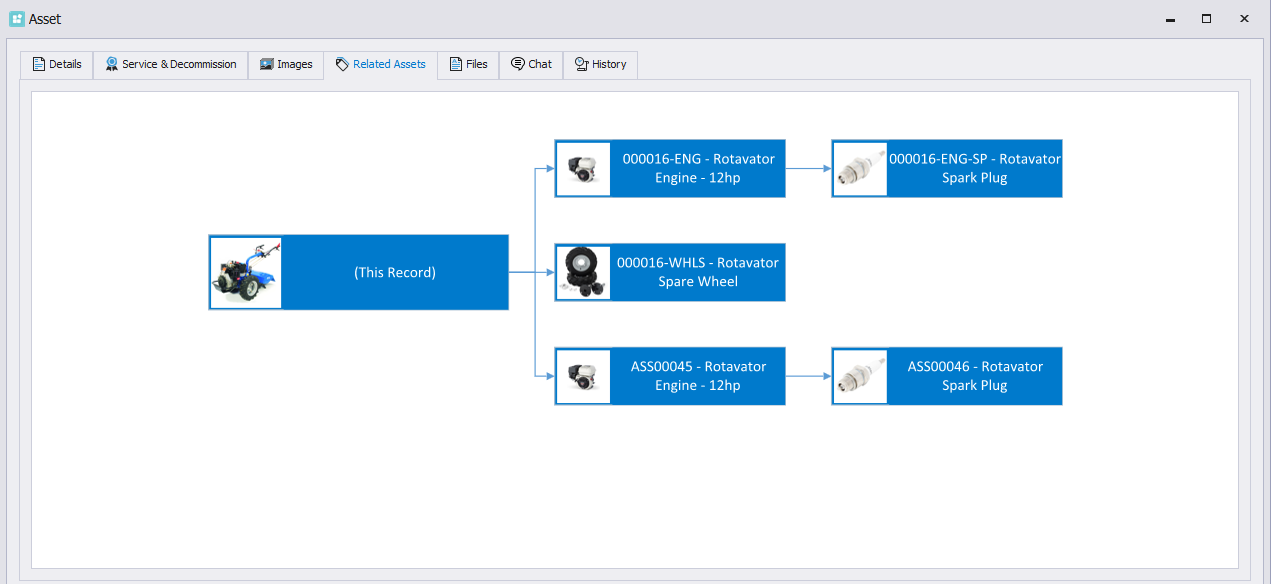
As touched on before, Parent Asset allows you build a hierarchy and link your Assets together in a simple way. If we think vehicle > engine > battery, then the vehicle has no parent asset (it is the top level item), the engine has a parent asset of the vehicle, and the battery has a parent asset of the engine. Once we select these on our asset records, the Related Assets tab gives us a nice visual breakdown of how things link together and where our record is "(This Record)". Select any Asset from this view to edit it.
7. Adding a Saved Search Reminder Notification for Services/Tests
Saved searches, as well as restoring search criteria you saved for a search, can also remind you of schedules, and this can be quite important with Assets in regards to servicing and testing as you want to get plenty of notice to organise those procedures to keep the Asset compliant.
Select Assets area > Advanced Search > Date Search By > Next Service/Test Date > "..." to open the range finder tool and choose Next, Next 4 Weeks or Next 12 Weeks for an even greater notice period. You'll see some dates appear and selecting Search will find your Assets appear that have a service or test due sometime next month (there may be none at this stage, that's ok). Note, don't alter these dates, or you'll bring them into static date mode (see General Application Features for more info on Saved Searches and relative date mode).
Select General tab > + (next to Saved Search). Give it a name, say "Tests and services due next month" and to switch on notifications, change Notify When to Records Found. This will add the saved search to the list, which you can pick to recall it any time, but it will also show you a popup notification when this date arrives if you have the application open to help you remember. Once you have set a date for the service, moving the Next Service Date on the asset record outside of next month will stop it appearing on the notify list and adding a comment can be useful for any notes.
Similarly to above, you can search our Installation Date or Purchase Date on the Asset to find old or new Assets.