Help Topics
- EaseSuite
- Frequently Asked Questions / Troubleshooting
- General Application Features
- Stock Control and Replenishment
- Accounts Package Integration
- Quick Start Guides
- Mobile Guides
- Word Templates & Print Outs
- Concepts
- Hardware
- Workflow Case Studies
- Terminology
- Submitting Help Requests
- Feature Requests
- Web Shop Preparation Guide
Files Quick Start Guide
- Introduction
- Workflows
- Adding a File to the System
- Dragging a Message from Outlook into the System
- Assigning a File to an Area/Item and Highlighting
- Searching for files
- Setting up tags
- file types and custom properties
1. Introduction
Files, including PDF files, images and emails can be added to the system and associated with one or more area items (e.g. a Job, Sales Order, Purchase Order etc.). On the main application bar at the top there is a Files option which opens the Files area in a new tab. Also on each item (Job, Sales order etc.), you may have noticed a File tab that lists the files associated with that item.
You might use this to put a supplier invoice that has been scanned or emailed to you against a Purchase Order for example, or add other supplier correspondence to a purchase order so everyone can see it, or attach any other relevant document for filing against any item in the system. Files can also be set to be emailed along with Sales Orders or Purchase Orders for example, so you can include accompanying documents related to those activities.
One file can be associated with many different area items, so it just needs to be added once then associations made to make it appear in different places.
2. Workflows
- Adding a File to the system.
- Dragging a message from Outlook into the system.
- Assigning a File to an area item and highlighting.
- Searching for Files.
- Setting up Tags, file types and custom properties (searchable properties you can transpose scan information onto)
- Automatically adding groups of Files to an item, for example when categorising a Job by using a Tag, you can have it gain relevant procedures for example.
- Setting up document files such as job procedures that need to be approved by staff on the mobile app.
3. Adding a File to the System
There are several different ways you can add Files to the system.
All commence from a Files list area, which will either be the Files tab of an item (Sales Order, Purchase Order, Job etc.) or the Files area accessed from the top bar. It doesn't matter too much where you start from but if you start from the Files tab of an item, it will automatically add the association to that item otherwise you need to add the association when in Files area (see Associating a file to an area item and highlighting).
3.1 Drag and drop
Click and drag a File from Explorer onto the list. This may be a PDF you have scanned or obtained from somewhere else for example.
It is worth noting that any File that gets added to the system is copied into the system, so you can delete the original if you wish.
3.2 select a file from file system
First locate the Files list either in the system or the Files area. Click the + button the usual way to start a new File.
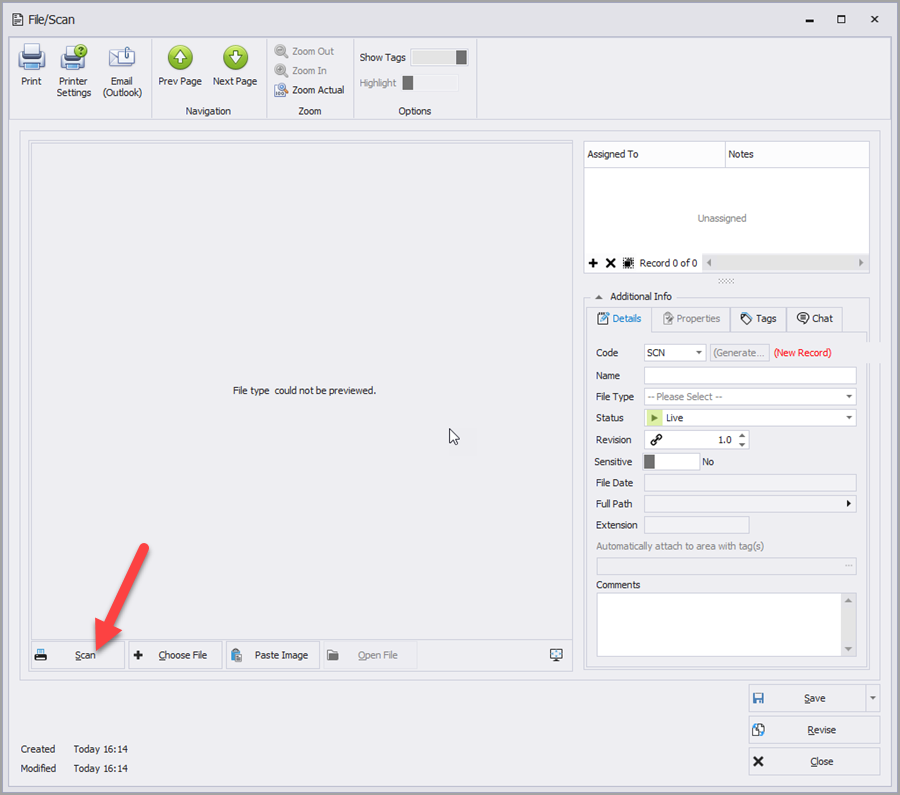
3.3 scan directly
From the File/Scan form, select Scan to scan documents directly into EaseSuite.
The Scan Direct function works with WIA compliant scanners.
3.4 Paste an image from the clipboard
If you wish to copy an image from an open document or web page for example, Right Click > Copy the image and then in the File/Scan form select Paste Image.
3.5 Set up scanner software to load up EaseSuite and add the scan
4. Dragging a Message from Outlook into the System
Set Outlook and EaseSuite side by side, then simply drag the email message onto a Files list.
5. Assigning a File to an Area/Item and Highlighting
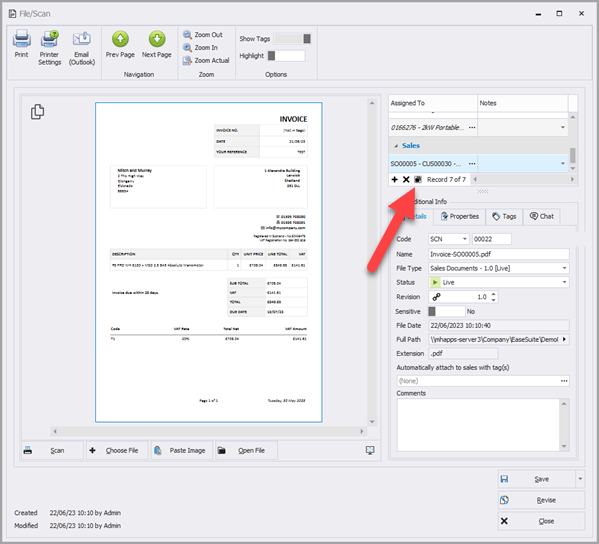
A File can be assigned or associated to many records in EaseSuite. When a File is added from the Files tab in a record form it is automatically associated with that record and will appear in the Files tab for that record. It will also appear in the main Files area (Files button - top row of buttons). To add associations to a File, double click its record to open the File/Scan form.
In the File/Scan form, assignments are displayed in the window shown below and can be created or deleted using the buttons (see arrow in image below)
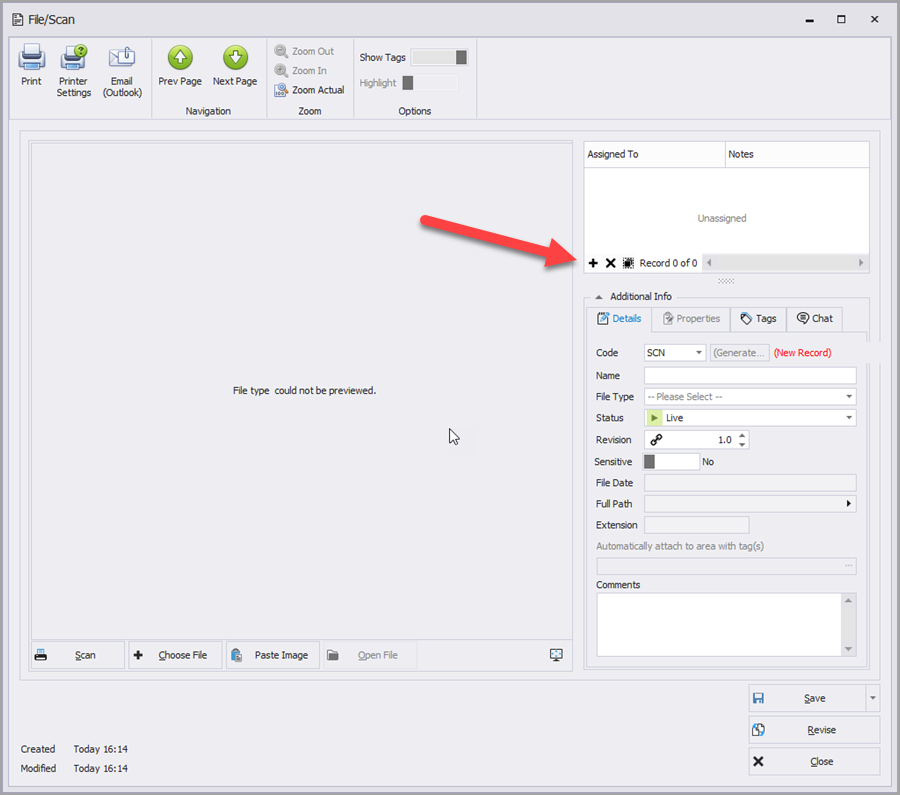
Clicking + opens the Assign Scan form.
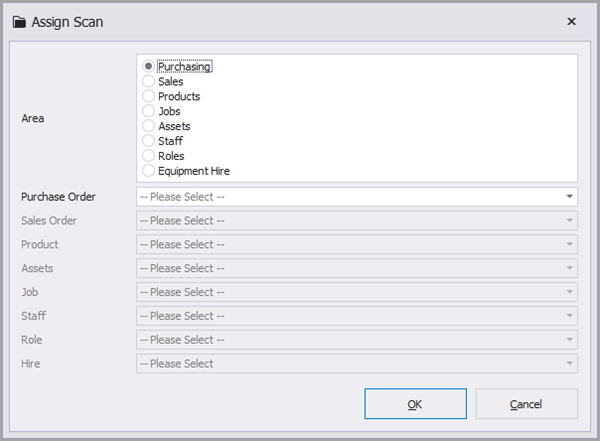
From here you can select any record under any area. Select OK to Assign your file to this record. Repeat to Assign the File to other records as needed. A File can be associated to as many records as required.
Alternatively, a file can be assigned to multiple items selecting the Add Currently Selected Records from Search button (see below)
This Add Currently Selected Records from Search option works when you have a list of items open eg. a list of Stock that fits a Search criteria. Having the items in the list selected (ticked), this button will assign the File to all these items at the same time. A very useful way of adding an important document to a large number of items quickly and simply.
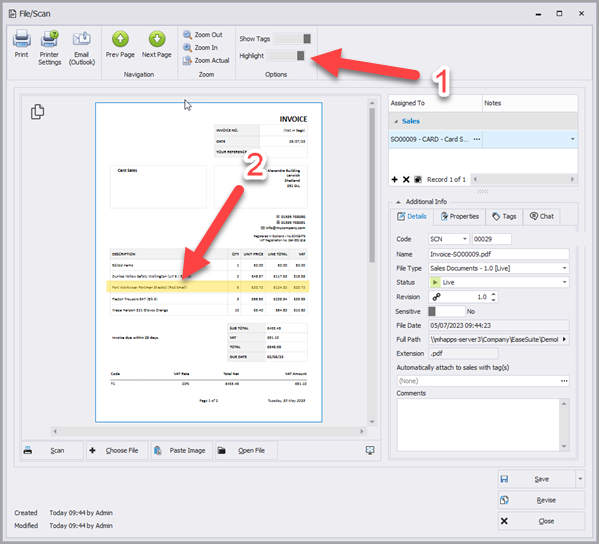
5.1 Highlighting
A document here can have an area highlighted. The area highlighted is individual and specific to each item it is assigned to, so relevent information in the document for a specific item can be highlighted when the document is viewed associated with that item.
To switch on Highlighting select the Highlight slider (1). Then to highlight an area simply drag the cursor over that area to create a highlight box (see (2) below)
5.1 Searching for files
The Files area has the standard search facilities available at the top of the list of files. Initially a simple search facility is visible but more search option can be revealed by selecting Advanced Search.
5.2 Setting up tags
Tags can be added to Files. Select the Tags tab in Additional Info in the Files/Scan form for the file you wish to tag (1).
.png)
This shows Tags available. To create additional Tags or edit/delete existing Tags Click the Ellipses (...) bottom right (2). This Opens the Tags Section of the Settings form.
Tags can be shown as overlays on the file preview. To turn this visibility on/off select the Shows Tags Switch (3).
Tags for Files and every other area of EaseSuite can also be managed via Setting > General > Tags.
5.3 file types and custom properties
In the File/Scan form you can select the File Type for the document from the drop down list in Additional Info.
For some File Types custom properties will be available and the Properties Tab will be selectable when the File is set to that File Type. These can allow you to transpose and record important information from a scanned document. Eg Invoice Number etc.
File Types can be added/edited/deleted in Settings > General > File Types. Custom properties can be created/edited for specific File Types. In the Settings > File Types > (...) to open the Edit File Type form.
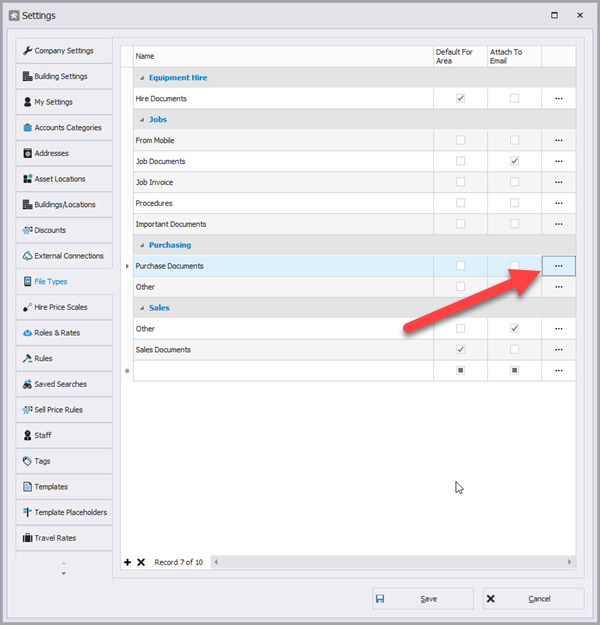
In the Edit File Type form select to Edit Custom Properties.

This opens the Properties form.
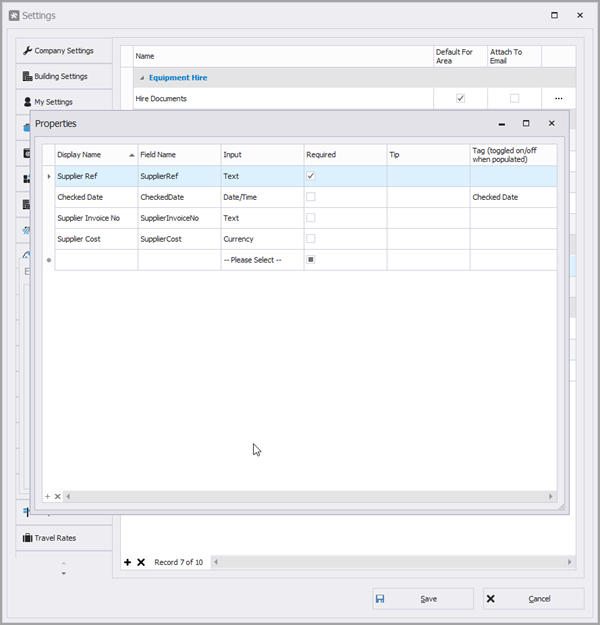
When these have been edited select Save to close Settings form.
6. Automatically adding groups of files to an item, for example when categorising a job by using a tag, you can have it gain relevant procedures for example
Tags can be used to automatically add specific Files to an item.
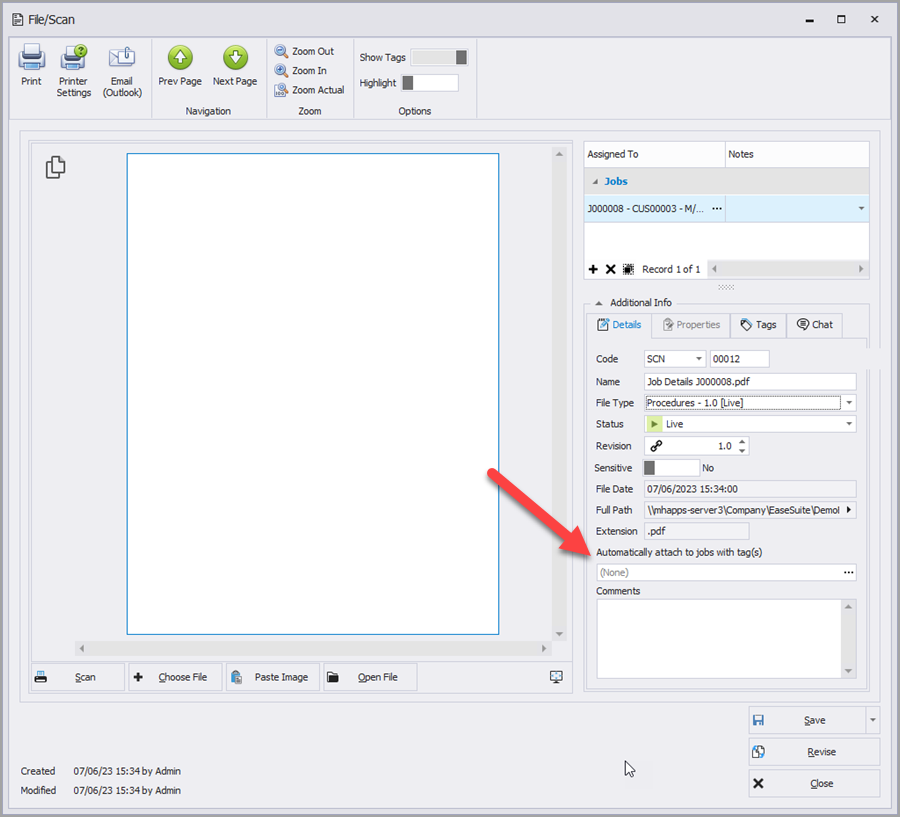
Depending on the selected File Type the wording for the field shown above will change slightly. In this example the File Type is set to Procedure. So the field is labelled Automatically attach to jobs with tag(s). If the File was designated a Sales Document for example, instead of attach to job... it would say attach to sale...
Select the Ellipses (...) to open the Select Tags form (below).
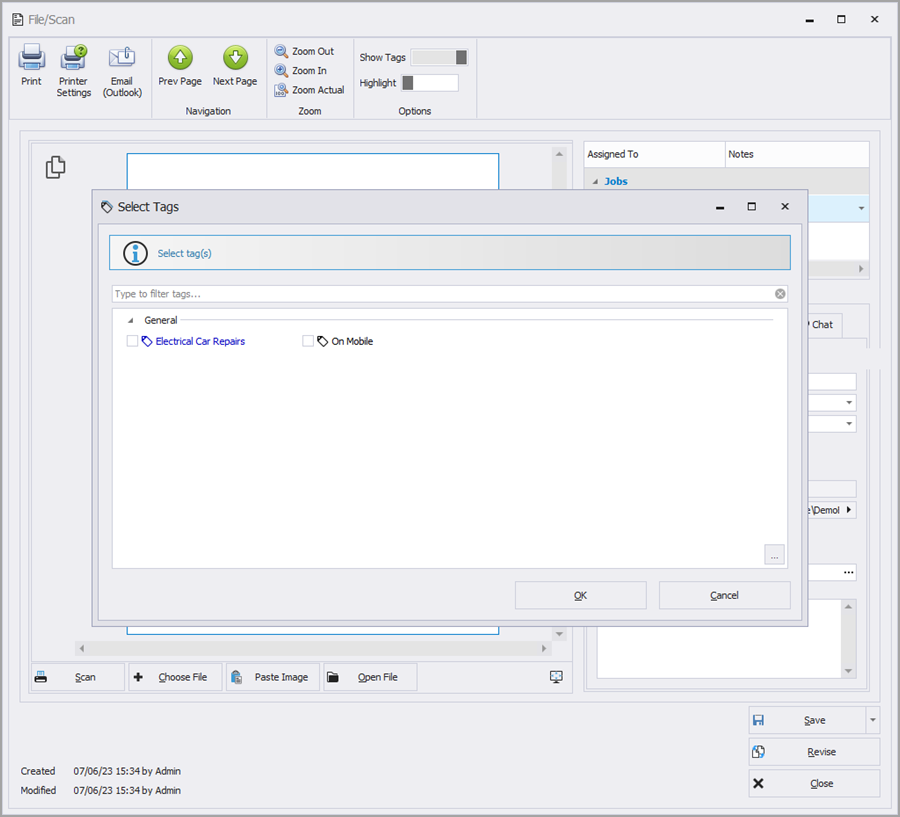
Select the required Tags. If you need to edit Tags click the Ellipses (...) (bottom right) to open the Tags Settings.
A good use of this would be to bring together a group of Files that are needed for a type of Job. For example a type of Job (eg High Voltage Electrical) may require certain procedures, risk assessments, protocol documents etc. By creating a Job Tag for High Voltage and associating all relevant documents to that Tag, all you have to do when setting up a Job is tag it as High Voltage and all the relevant files will automatically be added to the Job.
6.1 Setting up document files such as job procedures that need to be approved by staff on the mobile app
It is possible to set up a File so that it is included on the records downloaded onto the Timesheet App of staff. A use example of this would be assigning specific written Procedure documents to a Job. These could be instructions, schematics, health & safety, risk assessment documentation etc. Files can be marked so that it is required for staff to confirm they have read the document before beginning the Job.
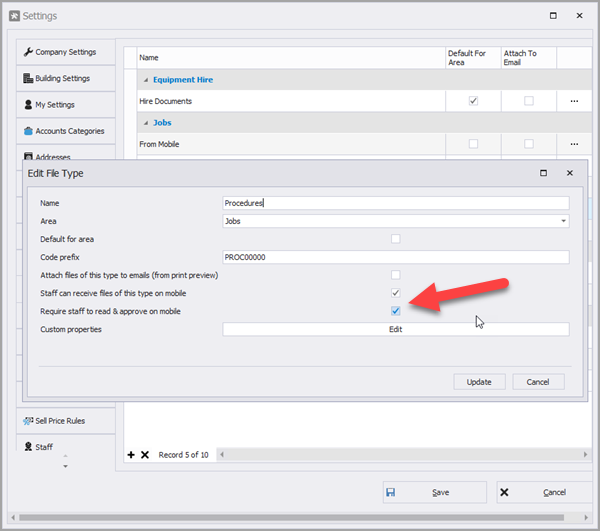
For a File to have these properties, go to Settings > General > File Types. Click the Ellipses (...) to open the Edit File Type form.
Tick the boxes for Staff can Receive files of this type on mobile and for Require staff to read & approve on mobile as required.