Help Topics
- EaseSuite
- Frequently Asked Questions / Troubleshooting
- General Application Features
- Stock Control and Replenishment
- Accounts Package Integration
- Quick Start Guides
- Mobile Guides
- Word Templates & Print Outs
- Concepts
- Hardware
- Workflow Case Studies
- Terminology
- Submitting Help Requests
- Feature Requests
- Web Shop Preparation Guide
Job Quick Start Guide
1. Prerequisites
- Jobs require customers to be present (Sales > Customers).
- Jobs require either sales orders, timesheets or both to be associated for invoicing.
2. Workflows
- Creating a job
- Pushing jobs to the accounts package
2.1 Creating a job
2.1.1 Introduction
This workflow guide will give a basic introduction to the process of creating a Job in EaseSuite. It will cover the basic, necessary information needed to create a Job.
2.1.2 The Jobs Area
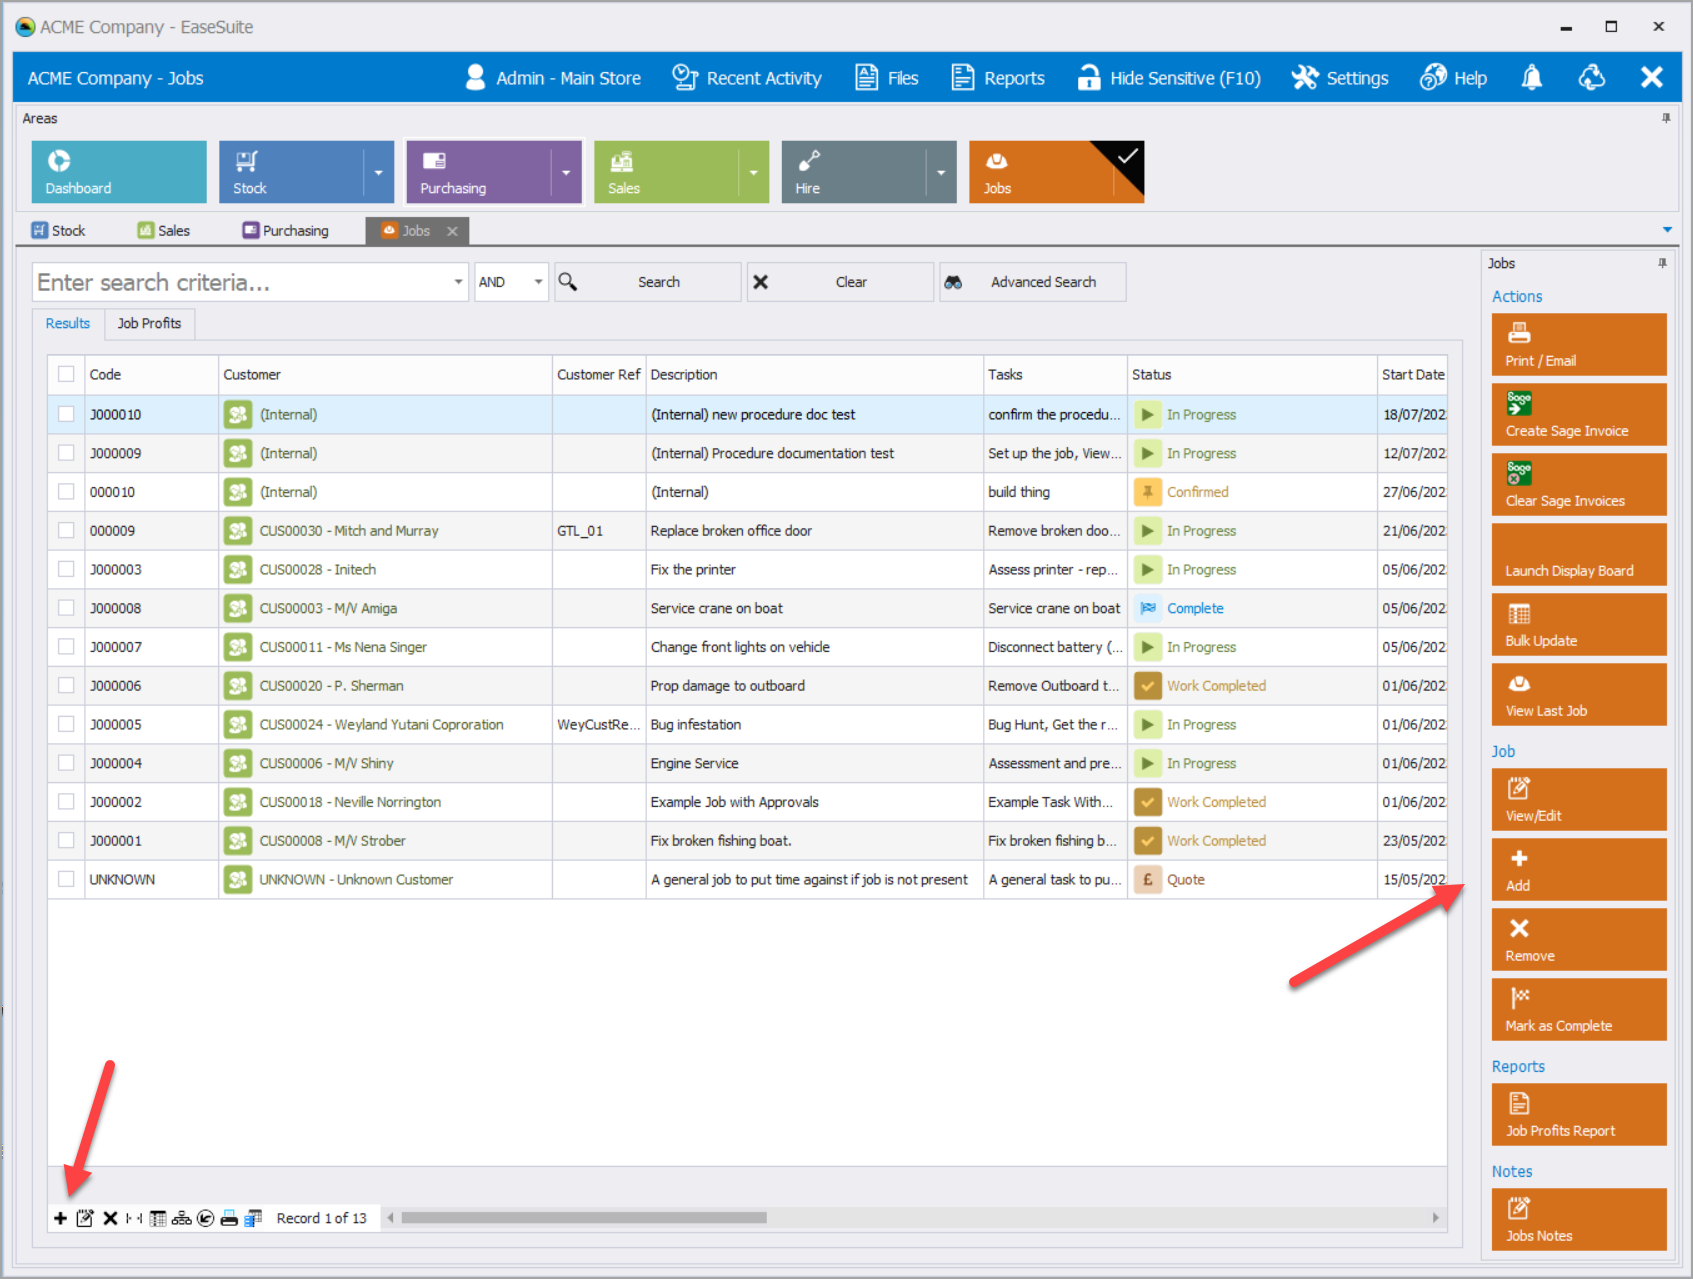
- Select Jobs to open the Jobs Area.
.png)
- With the Jobs Area open, a list of all current Jobs will be shown.
- To open a new Job, either select + icon bottom left or Add on the right hand side (See screenshot below)
- The Add Job form opens in the Details tab
- For the most basic Job record the three fields shown in the image below should be completed.
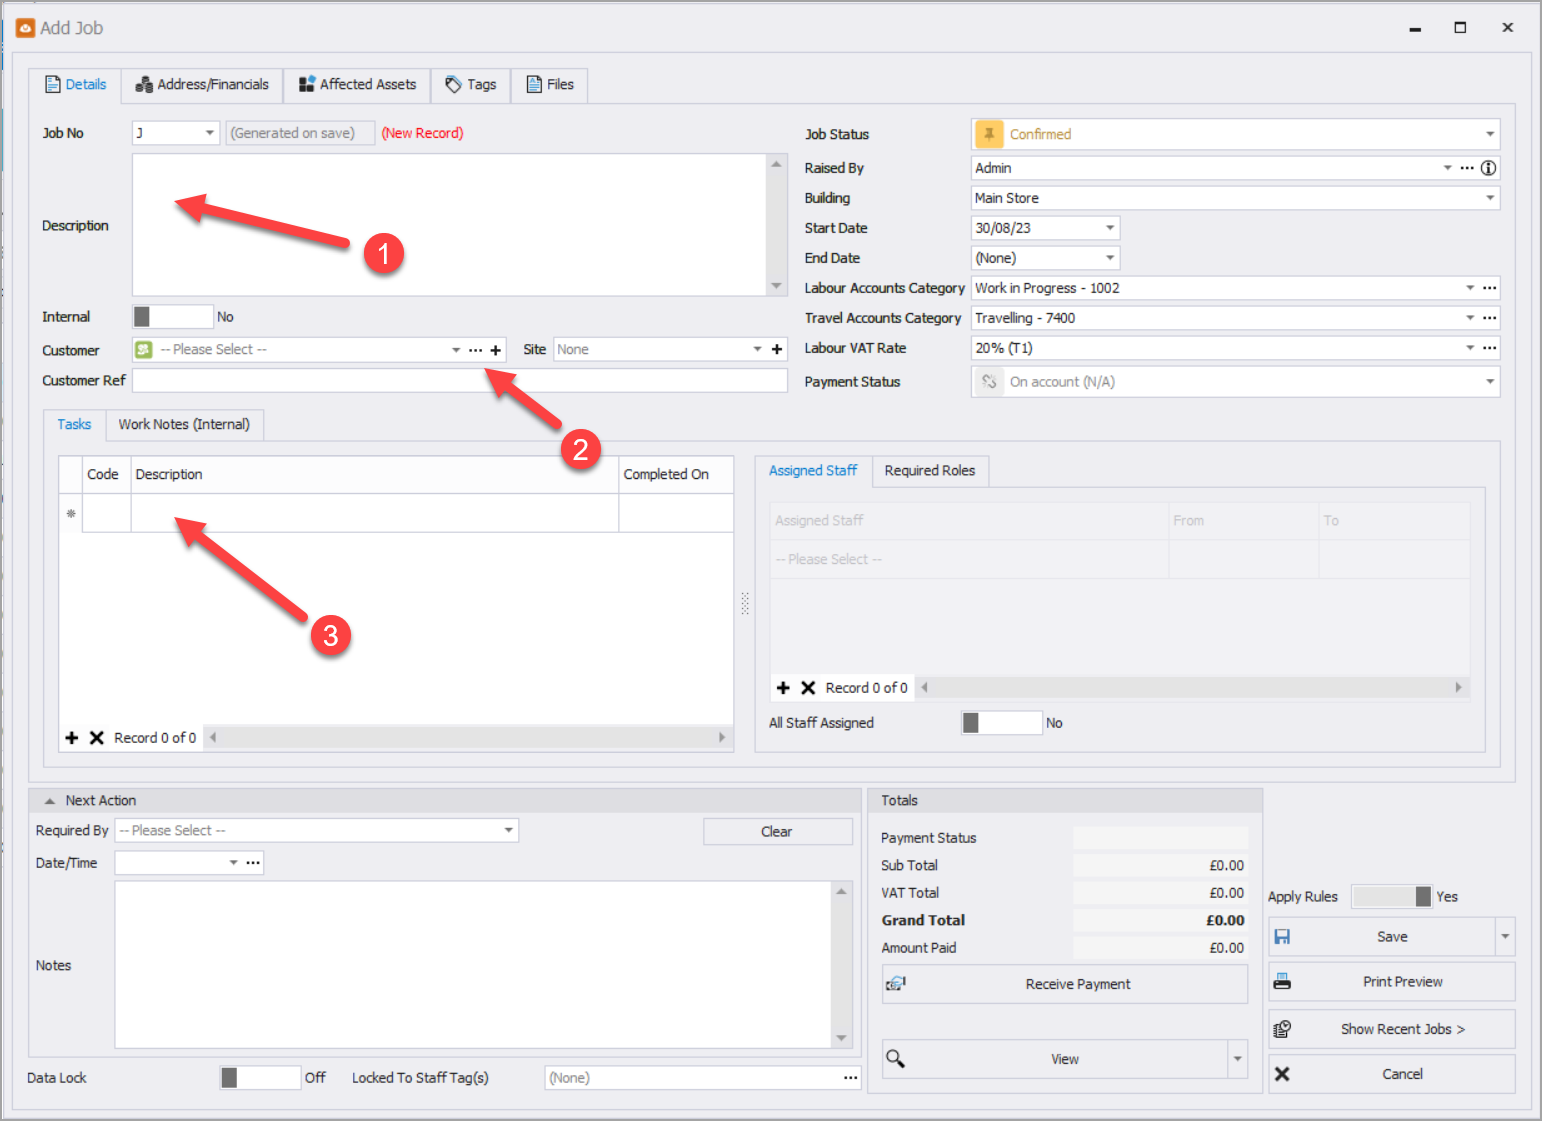
- Description - Add a brief description of the Job.
- Customer - Select the customer from the drop down list.
- Task Description - Add tasks to the Job. Tasks can be thought of as the steps, subdivisions, or building blocks, of a Job. A Job can comprise of many Tasks. Add as many Tasks as needed to complete the Job. For a very simple Job, one Task may be enough, but many Tasks can be added for more complex Jobs especially involving large teams.
- Select Save to close the Add Job form and save the Job.
- The Job will now appear in the Jobs list along with all the other Jobs.
- The Job can accessed from this list by double clicking to open the Edit Job form.
3. Pushing Jobs to the accounts package
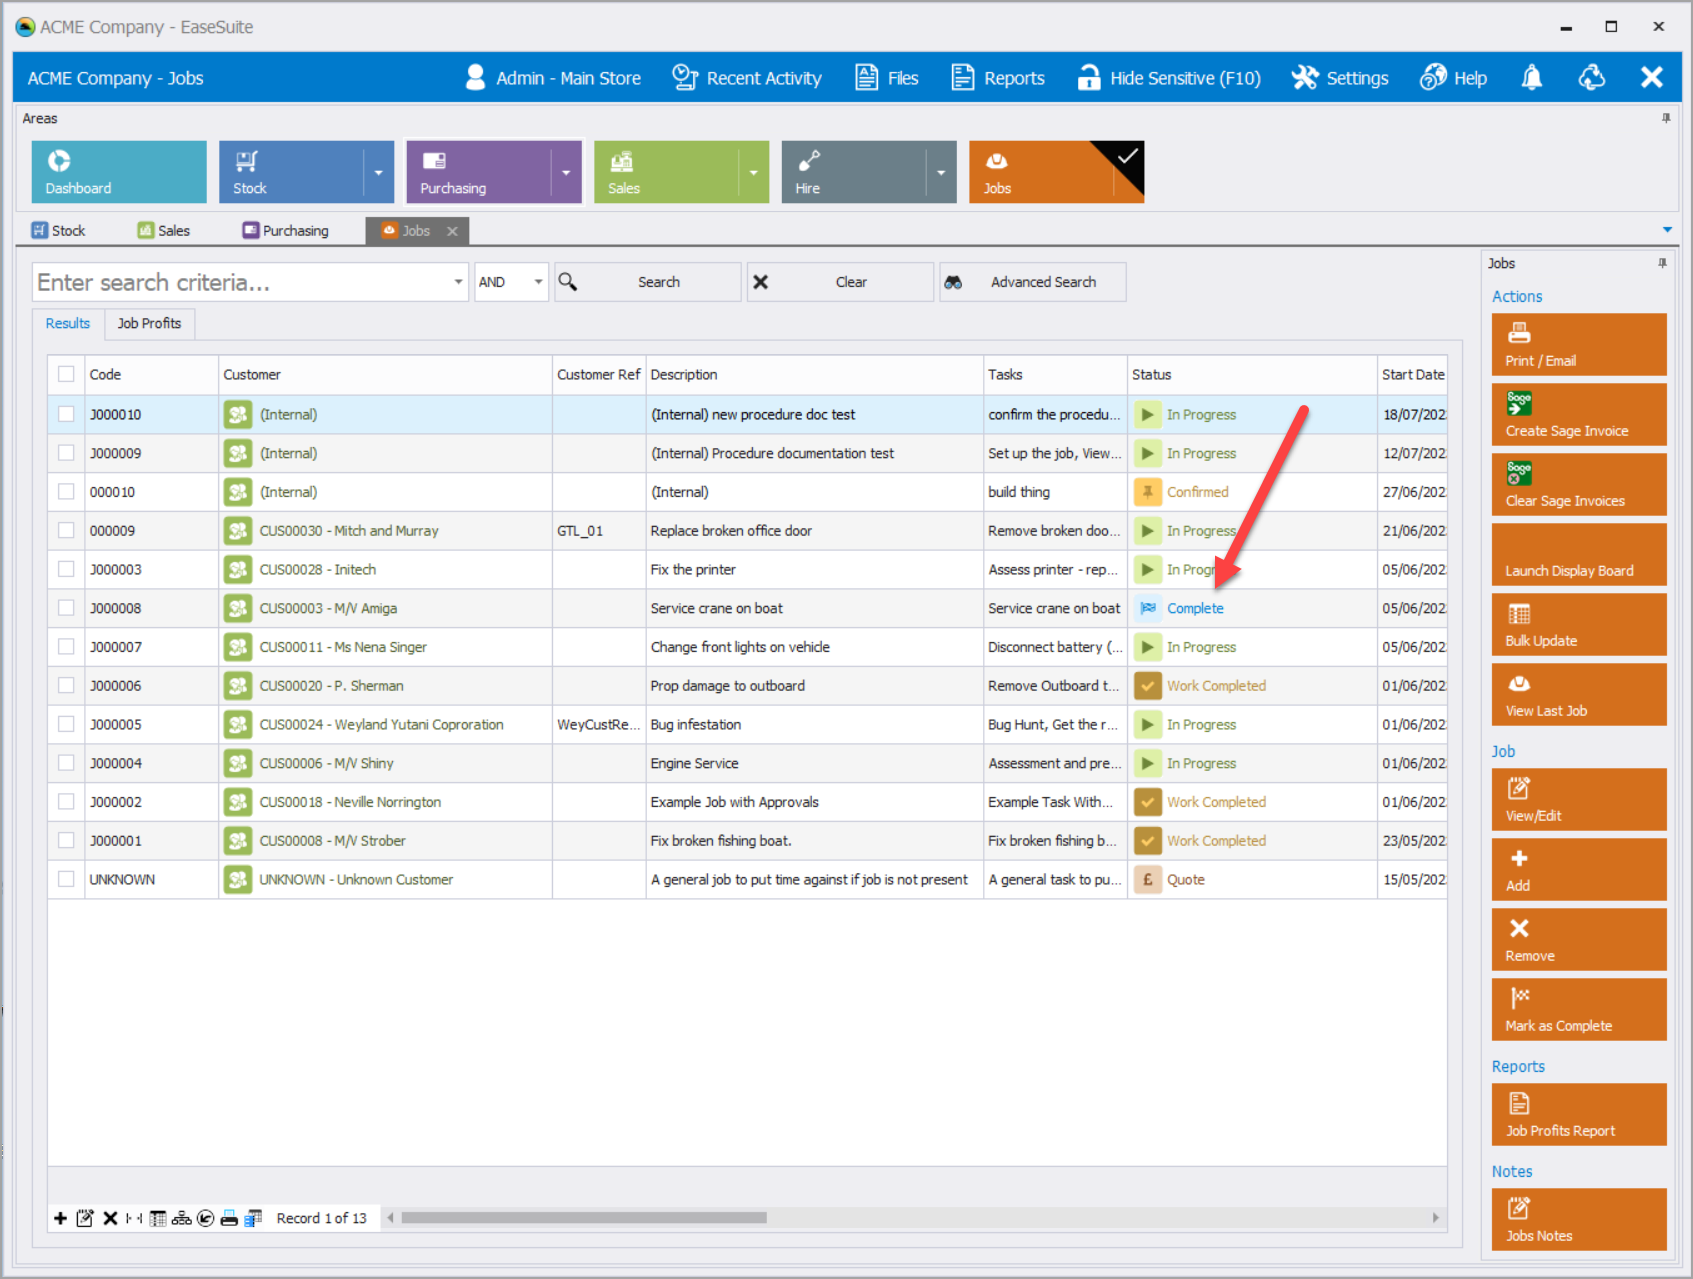
- When a Job is ready to be sent to Sage Accounting Software, Select the Job and select Create Sage Invoice. (see below).
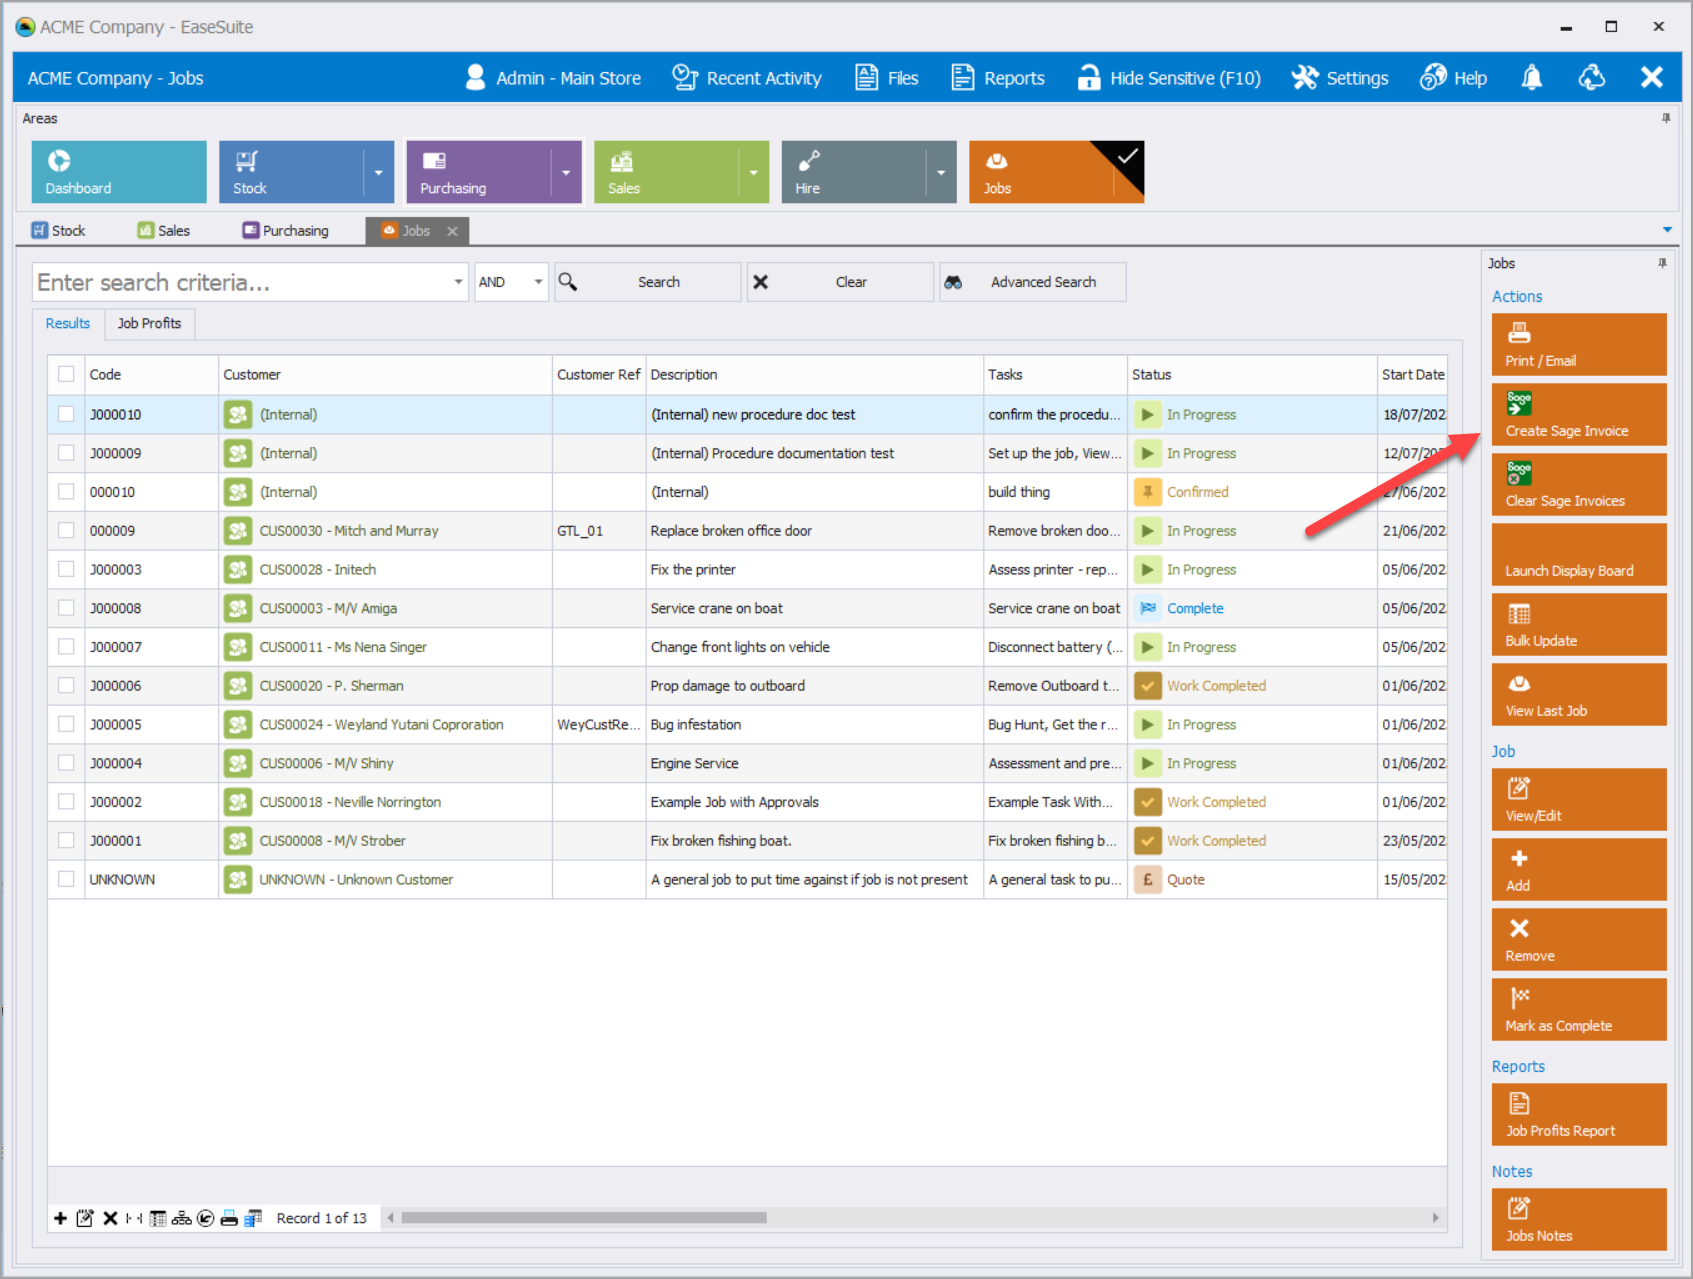
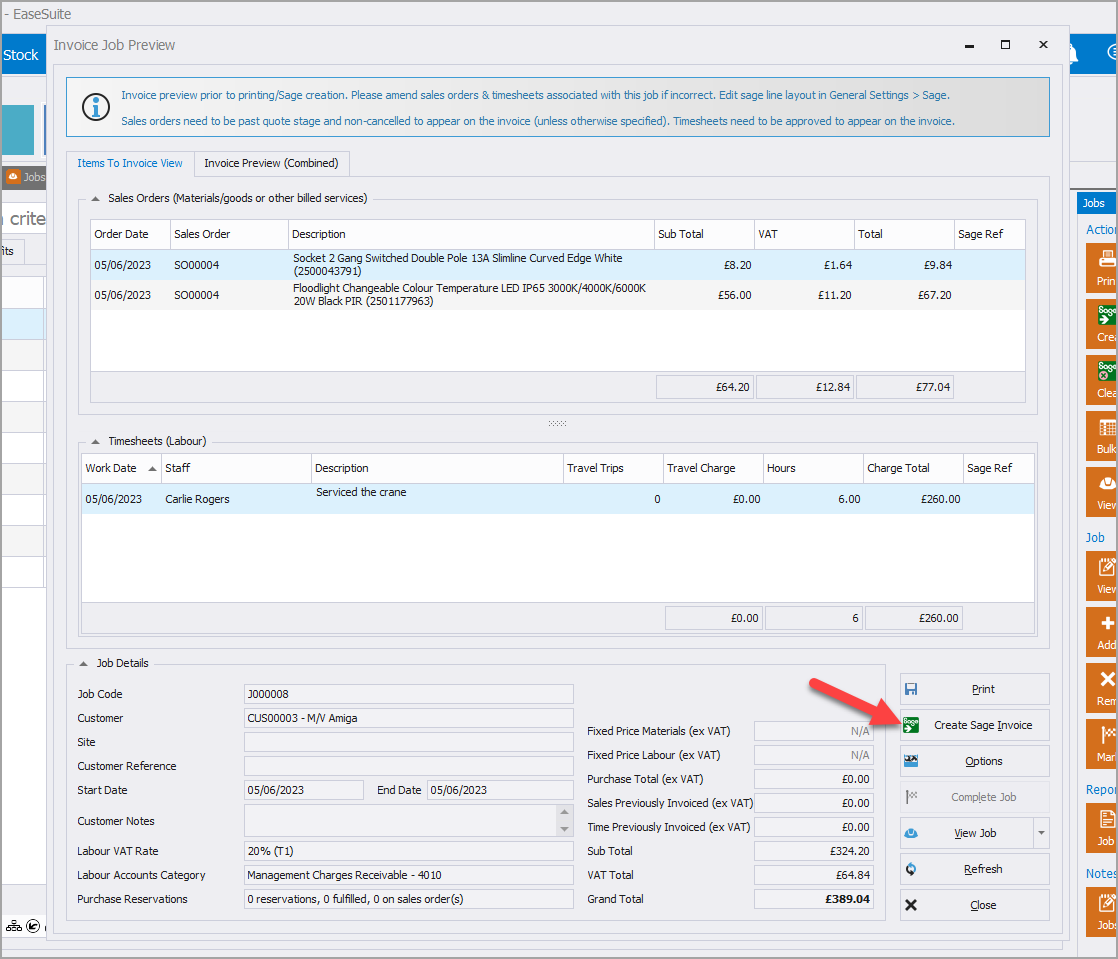
- This opens the Invoice Job Preview.
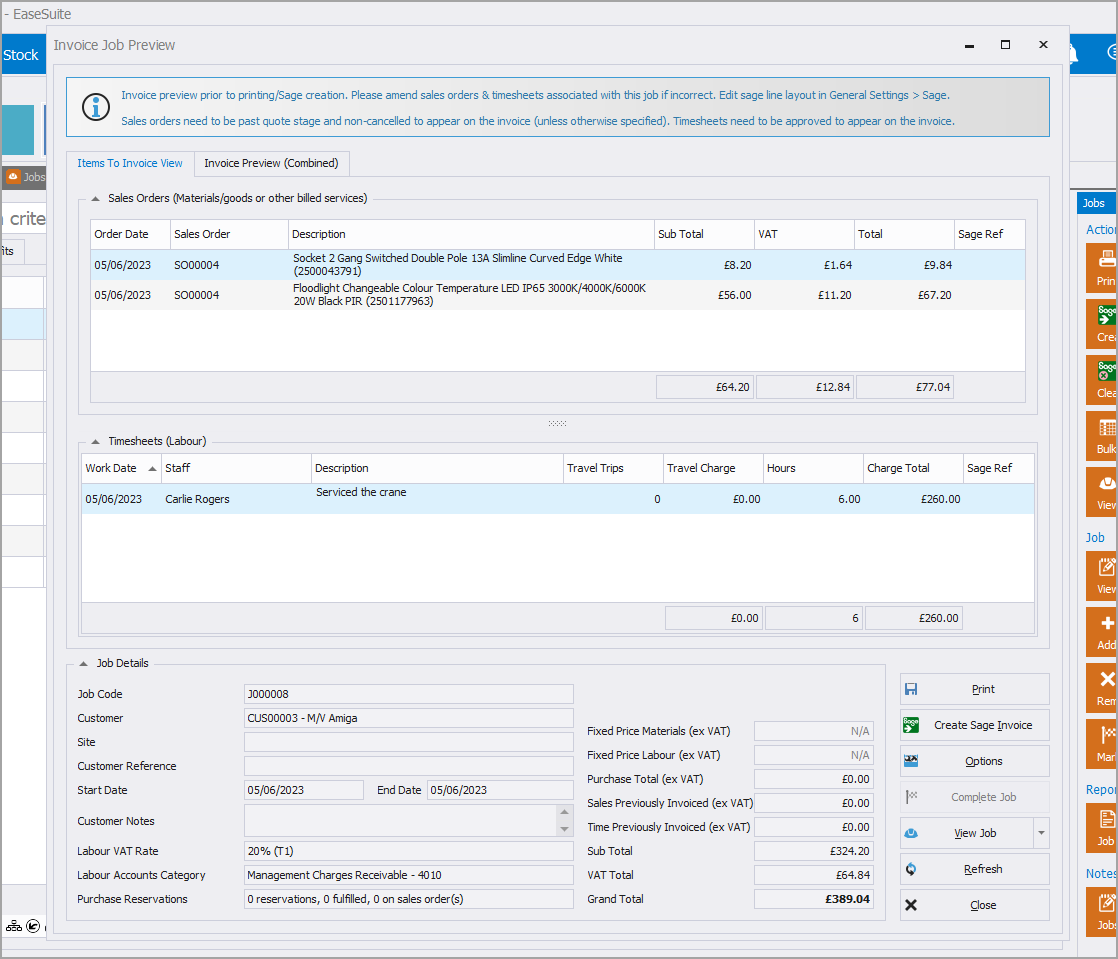
- The Invoice Job Preview opens with the Items to Invoice View visible by default. This view (as shown above) separates Sales Orders and Timesheets into their own list.
- By selecting the Invoice Preview (Combined) tab, you can view an alternative preview with all the items combined into one list. This more closely resembles the way Sage produces its invoices.

- If you don't need to change any of the options from their default setup, select Create Sage Invoice.
- At this point you may be asked to Login with your Sage account name and password.
- Following the successful Push to Sage, a results window will open giving details of the specific actions that have taken place. Select OK to close this.
- The Invoice Job Preview will now be updated to include the Sage Reference Number.
.png)
- Close this Preview to return to the Jobs Area. The Job you just sent to Sage will now have its Status updated to Complete.
- If you need to change the Invoice from the default, select Options in the Invoice Job Preview.
.png)
- Invoice Options opens and provides opportunity to change the options for your Invoice.
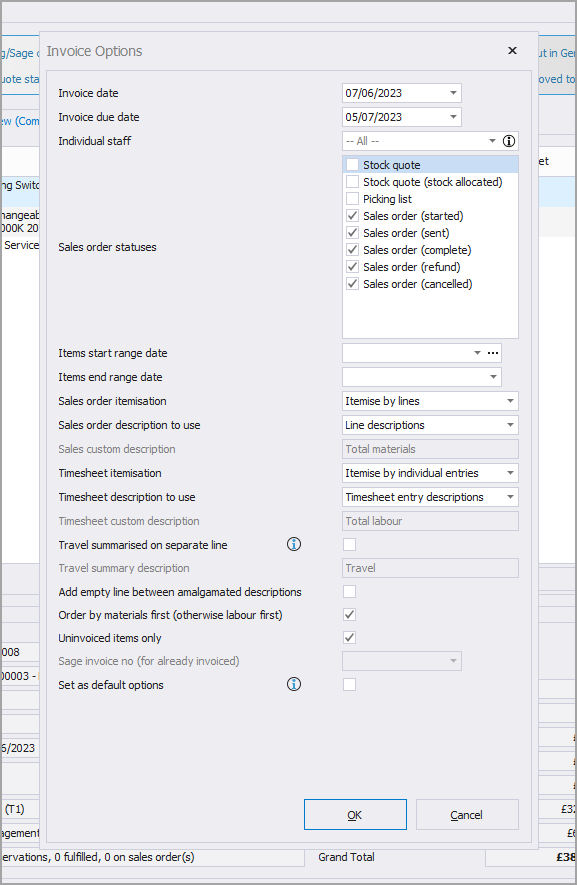
- Invoice Options allows the customisation of the following options:
- Invoice Date - Will default to today's date, but can be edited if required.
- Invoice Due Date - This defaults to 28 days after the Invoice Date. It can be edited here if needed on an individual invoice basis or the default 28 days can be change in Settings > General > Building Settings > Accounts Package Settings > Sales.
- Individual Staff - Limits the invoice to the Timesheets of just the individually selected Staff.
- Sales Order Statuses - Select what status a Sales Order must be for inclusion in the invoice. Tick or untick as required if you need to change from the default.
- Items start range date & Items end range date - Manually select the date range for items to be included in the invoice. Alternatively select (...) then select from a list of pre-determined ranges eg. last week; last month; older than... etc. Selecting one off these will automatically populate the two fields with the appropriate dates/times.
- Sales Order Itemisation - By default this is set to Itemise by lines. Alternative options are to summarise and amalgamate the details into one line only. The final option is to Exclude Sales Orders completely.
- Sales Order Description to use - Select whether to default to using the Line descriptions to populate the descriptions on the invoice or apply a generic Custom description.
- Sales custom description - This is greyed out unless you select Custom description in the field above. If Custom Description is selected above then a default generic description of Total materials will be applied. This can be edited as required. This option allows a less detailed list of material costs to be presented at invoice if required.
- Timesheet itemisation - This field presents four option for how the invoice handles Timesheet itemisations
- Itemise by individual entries - The default most detailed option.
- Itemise by day (amalgamated) - Summaries and amalgamates each day to a total.
- Summarise into one single line (amalgamation) - Least verbose. Same as this option for Sales Orders.
- Exclude - Again exclude Timesheets entirely from this invoice.
- Timesheet description to use - Options to select from are as follows:
- Timesheet entry descriptions - Default to using the Timesheet entry descriptions to populate the descriptions on the invoice.
- Job Task Descriptions - Use the information entered into Job Task Descriptions.
- Timesheet summaries - Use Timesheet summaries in the description.
- Custom description - Apply a generic Custom description.
- Timesheet custom description - This is greyed out unless you select Custom description in the field above. If Custom Description is selected above then a default generic description of Total labour will be applied. This can be edited as required. This option allows a less detailed list of labour costs to be presented at invoice if required.
- Travel summarised on separate line - If this tick box is selected, travel will get a separate invoice line with the description taken from the Travel summary description option below. If left unticked, travel is included in the Timesheet lines.
- Travel summary description - This is greyed out unless you tick the box in the filed above, in this case a default generic description of Travel is be applied to the separated out travel line. This wording can be edited as required.
- Add empty line between amalgamated descriptions - Changes the layout of the invoice when amalgamated lines are selected.
- Order by material first (otherwise labour first) - Tick box selected by default. Deselect to reverse order and present labour first.
- Uninvoiced items only - Tick box selected by default. If previous invoices have been submitted for this Job, items already invoiced for will not be included. Untick to duplicate items if required.
- Sage invoice no (for already invoiced) - Greyed out unless Uninvoiced items only (above) has been deselected and a previous invoice has already been created, in which case the invoice number is selectable and the contents of that invoice can be recreated.
- Set as default options - Select this to make you selected options the default for future invoices.
4. The Add Job/Edit Job Form
The Add Job form and the Edit Job form contain the same detailed information. The form is called Add Job when you select + or Add to create a new Job. Select an existing Job in the Job Area to open the same form, now labelled Edit Job.
The form comprises information across 11 tabs. Some of these, Tags, Files, History & Chat, are generic across forms. Those detailed below provide specific functionality to the Jobs form.
4.1 Details
This tab is visible by default when first opening the form.
- Job No - Specifies the unique code for the Job. The first box acts as the prefix, and can be selected via dropdown. Alternatively typing in a new prefix will use this. On save, the latest code for this prefix will be used as the job number.
- Description - A brief description of the Job.
- Internal - A toggle switch to select if a Job is Internal. An internal Job will not have a Customer assigned.
- Customer - Select from the drop down list of Customer. Select Ellipses (...) to open the Edit Customer form for an existing Customer. Select + to open an Add Customer form to add details of a new Customer to the system.
- Job Status - The status of a Job can progress through a number of stages.
- Enquiry
- Quote
- Confirmed
- In Progress
- On Hold
- Awaiting Approval
- Work Completed
- Raised By - The staff member/account that originally raised/created the Job.
- Building - The building/instance containing the Staff that will process the Job's Tasks.
- Start Date - Defaults to the date the Job was raised, but can be edited if required.
- End Date - This can be set ahead of time if known, otherwise it is automatically set when all Tasks are marked as Complete.
- Labour Accounts Category - Set the accounts category/nominal assigned to all labour when pushing a Job Invoice into your accounts package.
- Travel Accounts Category - Set the accounts category/nominal assigned to all travel time when pushing a Job Invoice into your accounts package.
- Labour VAT Rate - When an Invoice is generated, this specifies the VAT Rate of all billable timesheets against this Job. This defaults to the customer's VAT Rate.
- Payment Status - selectable from:
- On account (N/A) - default
- Unpaid
- Partially Paid
- Paid in Full
- Tasks - A Job is made up of a number of Tasks. A record of each Task required to complete the Job can be listed here with a Code, Description and Date completed.
- Work Notes (Internal) - An area for adding notes that are for internal use only. Information entered here will not be included on client invoices etc.
- Assigned Staff - A record of Staff assigned to a Task. Staff added here will be added to the specific Task selected/highlighted in the Task's record. Selecting a different Task will show the Staff assigned to that Task and allow changes to be made as required. From and To dates can be added also.
- Required Roles - Specific Roles or Staff Tags required for the Task. Expected Hours can also be added here.
4.2 Address/Financials
- Address Information - Delivery and Billing Address information is populated here based on the details entered the Customer form. It can be edit if required. If the Same as Delivery toggle is switched to Yes, the Billing Address is greyed out and unavailable for editing.
- Payment Notes
- Timesheet Default Description
- Invoice Due Date (Current)
- Timesheet Billing
- Cost Analysis - This section brings together costs for Materials & Labour. Figures for Profit and Margin are calculated allowing monitoring of the costs of a Job as it progresses. Costs and Charge information are taken from Timesheet data and Rates specified in Settings. A Fixed Price Charge can be entered instead if required. This replaced the Charge cost in the Profit and Margin calculations. To revert to the Non-Fixed Price details, delete the Fixed Price Charge figure and select Recalculate.
4.3 Timesheets
This tab opens with its Timesheet Entry tab. This shows details of all Timesheet entries associated with this Job. Entries can be added here, from the Timesheets Area of the EaseSuite software or from the Timesheets Mobile App.
The Staff Hours tab shows hours worked by individual staff
In both these layouts, totals are displayed for the different Time Types.
4.4 Affected Assets
Assets that are affected by the Job are recorded here. Any Asset that has the same Customer as this Job will appear on the list on the left. Items can then be added/removed from the list of Affected Assets on the right using the two arrows in the middle.
Affected Assets is intended to be used for assets of the Customer that are affected by your work. This could be items you manage or service, test or repair regularly for your Customer. Only items in your Asset Area that have a Customer listed and the Customer is the same as the Customer of the Job will be available to be Affected. For tracking and scheduling internal assets used on Jobs, use a Hire to assign and track the Asset. Hire costs can be charged to the Customer or set up at zero cost for items that can't be directly billed to the Customer.
4.5 Reservations
A record of Purchase Orders that contain items reserved for this Job. Selecting a record will open the Edit Purchase Order form for the Purchase Order that contains that reserved item(s).
Each Reservation will be transposed to a Sales Order line once fulfilled and a Sales Order created.
4.5.1 Status
Unfulfilled: No items for this Reservation have been fulfilled.
Partially Fulfilled: At least one item for this Reservation has been fulfilled, but not all.
Fulfilled: The quantity fulfilled matches the reserved quantity, but no Sales Order has been generated yet.
Fulfilled - Sales Order Created: The item has been fulfilled and invoice created. Clicking the ellipsis on the Sales Order column will bring you to the sales order.
4.5.2 Sales Order
A Reservation can be assigned to an existing Sales Order by clicking the dropdown and finding a Sales Order.
When Generate/Add To Sales Order is clicked the following happens:
No Sales Order Selected (New): Creates a new Sales Order for this line and all lines without an order
Sales Order Selected: Adds the lines to the selected sales orders and updates the totals respectively.
4.6 Hire
This tab opens onto the Hire List View. This shows details of all Hires related to the Job
The Hire View Calendar tab presents the same information arranged by Calendar date. Selecting a Hire will open the Hire form.
4.7 Sales Orders
This tab shows details of all Sales Orders relating to this Job. Selecting a record will open that Sales Order form. Sales Orders can be added or deleted from here as required. Totals for VAT, Sub Total and Grand Total are provided to allow monitoring of the Job.