Help Topics
- EaseSuite
- Frequently Asked Questions / Troubleshooting
- General Application Features
- Stock Control and Replenishment
- Accounts Package Integration
- Quick Start Guides
- Mobile Guides
- Word Templates & Print Outs
- Concepts
- Hardware
- Workflow Case Studies
- Terminology
- Submitting Help Requests
- Feature Requests
- Web Shop Preparation Guide
Purchase Order Quick Start Guide
- Prerequisites
- Workflows
- Creating a Purchase Order
- Using the +/- buttons from the Stock Search
- Receiving a Purchase Order Delivery
- Reserving a Purchase Order for Customer(s)
- Creating Sales Orders from Reservations
- Searching Purchase Orders
- Purchase Order Returns
- Pushing Purchase Orders to the accounts package (optional)
1. Prerequisites
- Purchase Orders require Suppliers to be present (Purchasing > Suppliers).
- Products require one or more Suppliers to be associated.
2. Workflows
- Creating a Purchase Order
- Receiving a Purchase Order delivery (this is when stock is replenished)
- Reserving a Purchase Order for customer(s)
- Creating Sales Orders from reservations
- Searching Purchase Orders
- Purchase Order Returns
- Pushing Purchase Orders to the accounts package (optional)
3. Creating a Purchase Order
At its simplest:
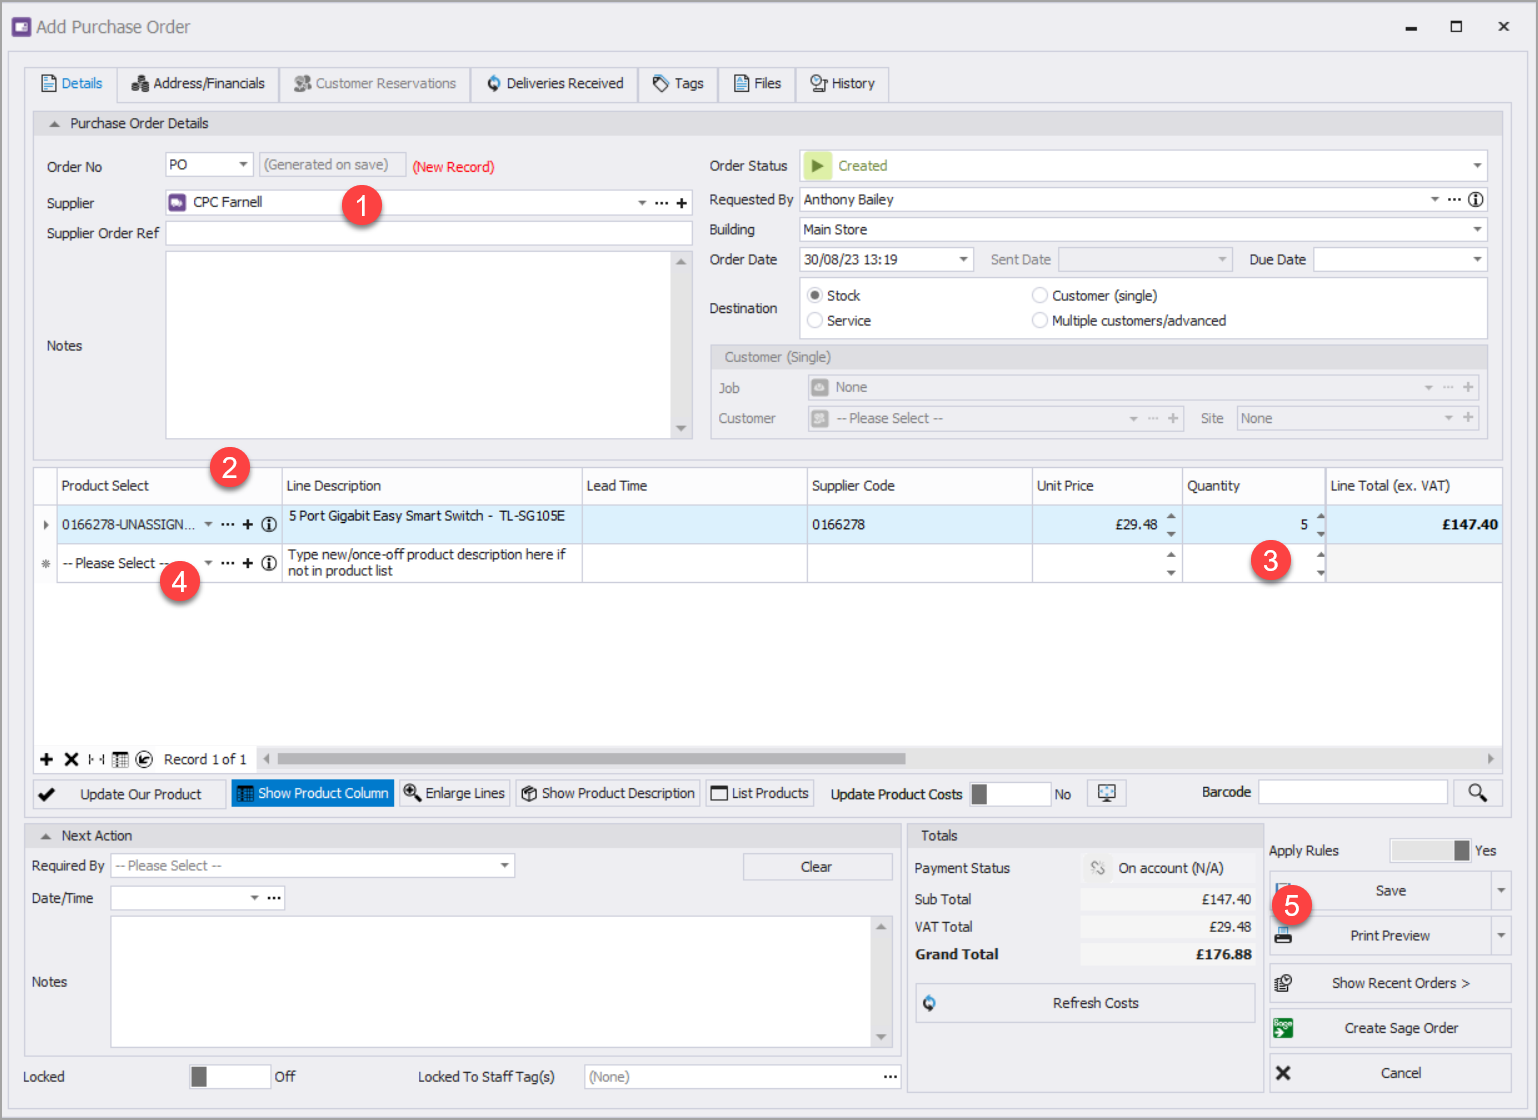
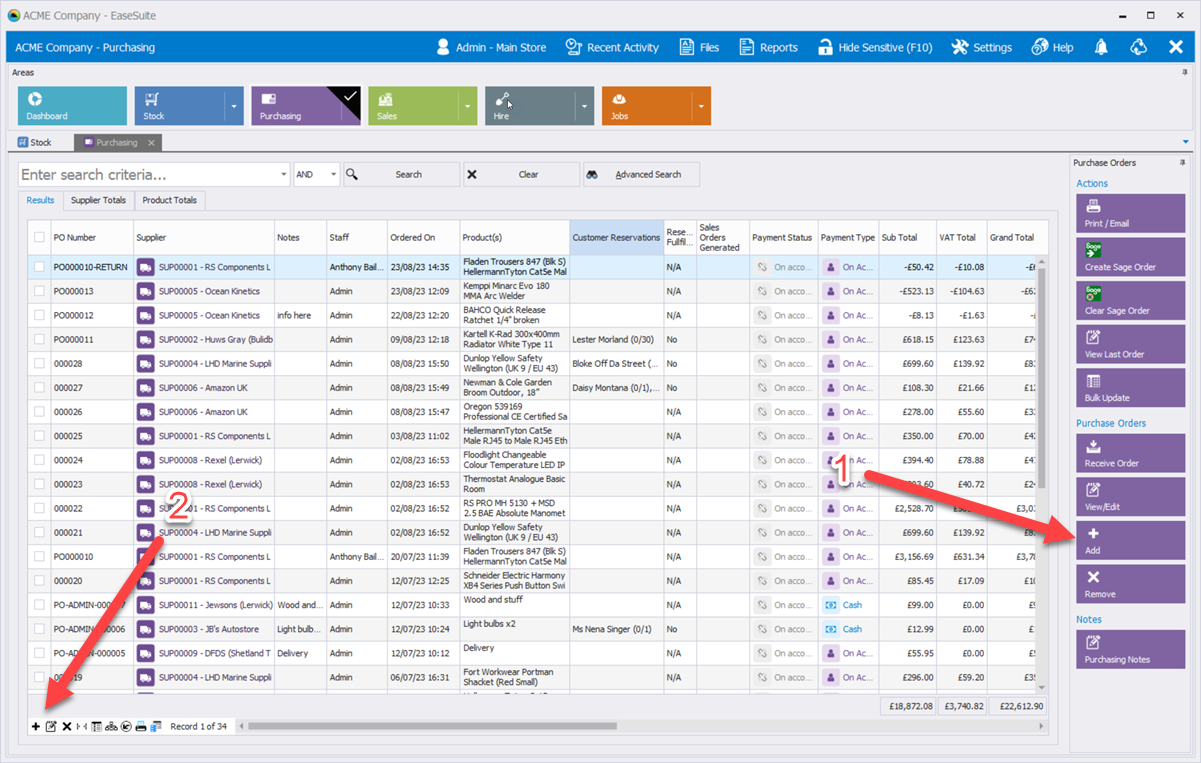
In the Purchasing area, add a new record the usual way using + on the grid or Add on the right hand side bar.
- Select the Supplier to order from.
- Next select a product from the dropdown. By default, this will show only products from the selected supplier (see Associating Suppliers). However, you can choose to view all products and any product you select can be associated with the current supplier.
- Adjust the quantity as appropriate.
- Repeat (2) for any additional products you wish to order.
- Save.
Getting into more detail:
- The Supplier Code is often a useful item of information to have on each line and can be added in the Product form for each supplier listed, or you can add it here and optionally use Update Our Product to send it back onto the main product (more on this below). Similarly Lead Time can also be supplied to help influence ordering decisions.
- Generally, you want to switch Update Product Costs to yes. What this does is push every cost on a line back to the Product. so that next time you order, the costs are more up-to-date and are gained from the latest order. There are times when you don't want to do this, such as for occasional discounts that aren't worth reducing the overall cost for, you don't have accurate costs at that time, or the Purchase Order has been superseded with other more recent orders. Cost updating can be achieved using this switch our the Update Our Product functionality.
- Related to the previous, at the time of order, held costs are often not accurate if not ordered for a while and perhaps not particularly important. Many will send a P.O. to a supplier without any costs listed and just lines with code and name for example, then wait for the costs to come back on a supplier invoice received with the goods or via email. They will then update the Purchase Order's prices after that. So having accurate pricing is usually unnecessary in a busy ordering situation, however there can be exceptions and you may wish to sought costs in advance and even send them through on your order on occasion, perhaps when a supplier has given you an upfront quote for example and/or you want to clearly clarify all costs. EaseSuite keeps this up to you and out of the box offers two purchase templates - with costs and without costs, and you can set the most frequent template as your default.
4. Using the +/- buttons from the Stock Search
These behave slightly different for purchase orders compared to sales orders. For a sales order you can sell anything to anyone, but for purchases you generally only want to order products that are supplied by that supplier. A product is associated with suppliers here.
Some notes:
- When clicking the + button without a purchase order open, and you select to create a purchase order, it will create one using the first supplier against the product (if set) in the product association list. Note point 6 also as you want to start with the correct supplier as there can be lossage if you don't.
- To counter above if it creating the wrong supplier, we recommend you start the PO first, choose your supplier, then start clicking + button. If the supplier is in the supplied list, it will then target this purchase order.
- If you click + button and have a PO open already per previous, but it doesn't match the supplier, then EaseSuite will generate another new purchase order for that products first supplier. This is helpful for low stock items in that it will keep on generating and target appropriate purchase orders where it can.
- Using +/- above means you generally need a very good representation of who supplies the product in the associations before you start using it from stock search, otherwise you might end up with an unexpected supplier (note point 6).
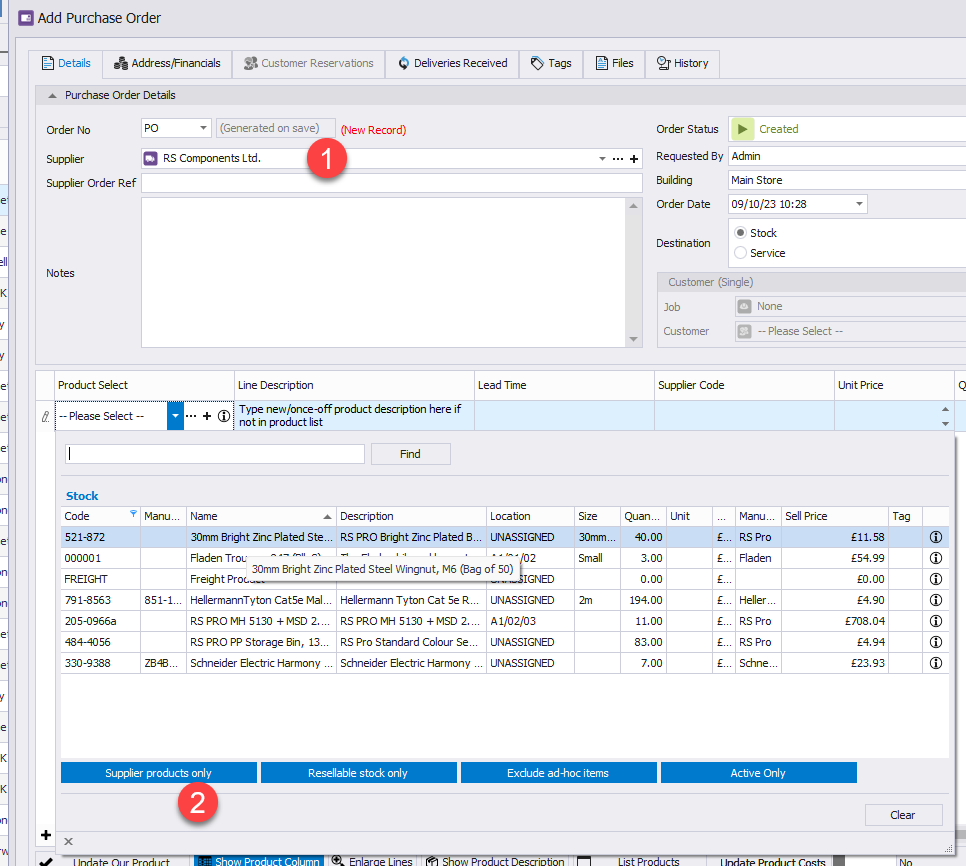
- In the absence of product supplier associations, we recommend you start the PO, set the supplier (1), and use the product dropdown on the line per the screenshot below. You can unlick Supplier Products Only (2) to show everything in the list and every time you select something that is not associated with the supplier, it asks you if you want to then associate it with this supplier. This is a good way of initially building the list up on the fly and this adds them to the supplier list for that product. When you later edit the product (use "..." from the PO line as a fast way to directly edit) you can flesh out specific supplier details or use Update Our Product to update them directly from the purchase order line (described above it allows you to push some core details from the purchase order to update the product, which can be fast). When updated next time you select the supplier on the order it will then use supplier's own code and price for example.
- Note when you select a different supplier from the one you started with on a PO and there are lines present, EaseSuite has to clear the lines, since the lines have a close tie with the original supplier (they get its price, specific supplier code and so on). With this in mind, it is best you start with the initial supplier correct before you progress the PO further.
5. Receiving a Purchase Order Delivery
Once you have sent a Purchase Order above and it has come in, it is time to receive the delivery on the system. This can also be done on the stores mobile app.
To receive a delivery, whether it is a full delivery or partial, go to Deliveries Received tab at the top of a purchase order.
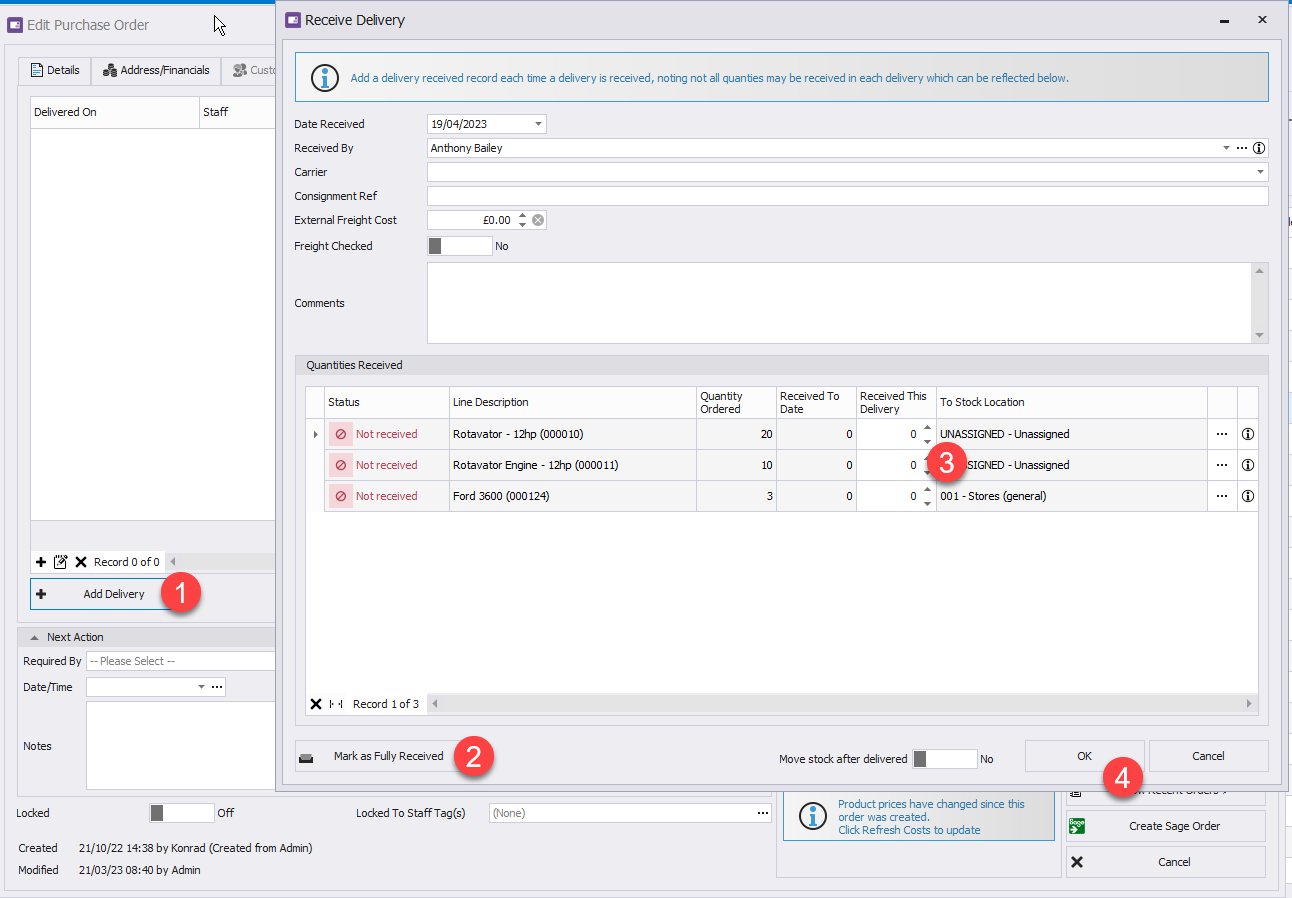
Select Add Delivery (1). it will open the Receive Delivery form and list all your Purchase Order lines. If you received everything (or almost everything), select Mark As Fully Received (2), that’ll up all the Received This Delivery (3) quantities to what you ordered.
You can adjust (3) on each line for what you didn’t get. Sometimes it is easier to select Mark As Fully Received(2) to up everything and then work the quantities down, especially if you nearly got everything, other times don’t select Mark As Fully Received(2) then increase/type the quantities as needed.
Select OK (4) when complete and that will add a delivery record and replenish stock for what you did receive (replenishing stock quantities, i.e. increasing them for resale). You’ll see this record now added in the deliveries list on the Purchase Order. It will also update the received status to either Partially Received or Fully Received depending if you received everything or not.
The form also allows you to record some additional details like Carrier, Consignment Ref, etc. if you wish to keep track of those details.
Note, External Freight Cost can be added now if known, set to £0 if no external freight, or use clear to set it to TBC (to be confirmed) if it is to come later. Purchase orders with TBC can be searched out later for backfilling this once known. See Dealing With External Freight for a recommended workflow.
If you didn't receive everything this delivery then when the next consignment comes in, simply go in here again and select Add Delivery again. Received To Date will now reflect what the previous delivery had, and Received This Delivery can be adjusted to what came this time (and in this case Mark as Fully Received will push up the remaining). For drips and drabs receiving, you can repeat this process as many times as necessary until everything has come in, which will cause several delivery records to be created. Since stock gets replenished every delivery, you are then in a position to sell it (Sales Orders) or fulfill any reservations on the order, whether in full or part.
6. Reserving a Purchase Order for Customer(s)
There's two ways to reserve an order:
6.1 When The Whole order is reserved for a Single customer (Simple)
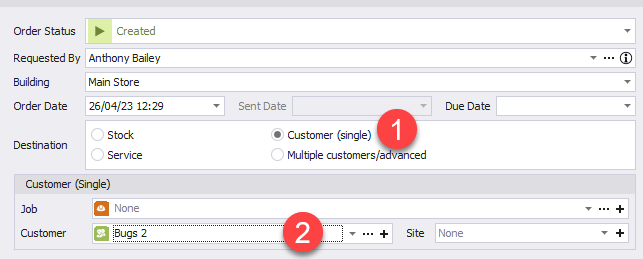
- On the Details tab, select Customer (Single) as the destination.
- The area below becomes available, and you may select a Customer (or Job if for specific Job).
6.2 The Order Can Be Split Between Multiple Customers (More Advanced)
Allocation on an order can become quite detailed. If an order has a single line with a quantity of 10, then the line may be split multiple times for different customers, i.e. Customer A gets 3, Customer B gets 3, Customer C gets 4 (for 10), and that's just from a single line! When other lines are involved, then whole or part quantities of those lines can get split off to different customers too. This is where we want to go into a more advanced mode to represent this.
Select Multiple customers/advanced above (1), then go to the Customer Reservations tab.
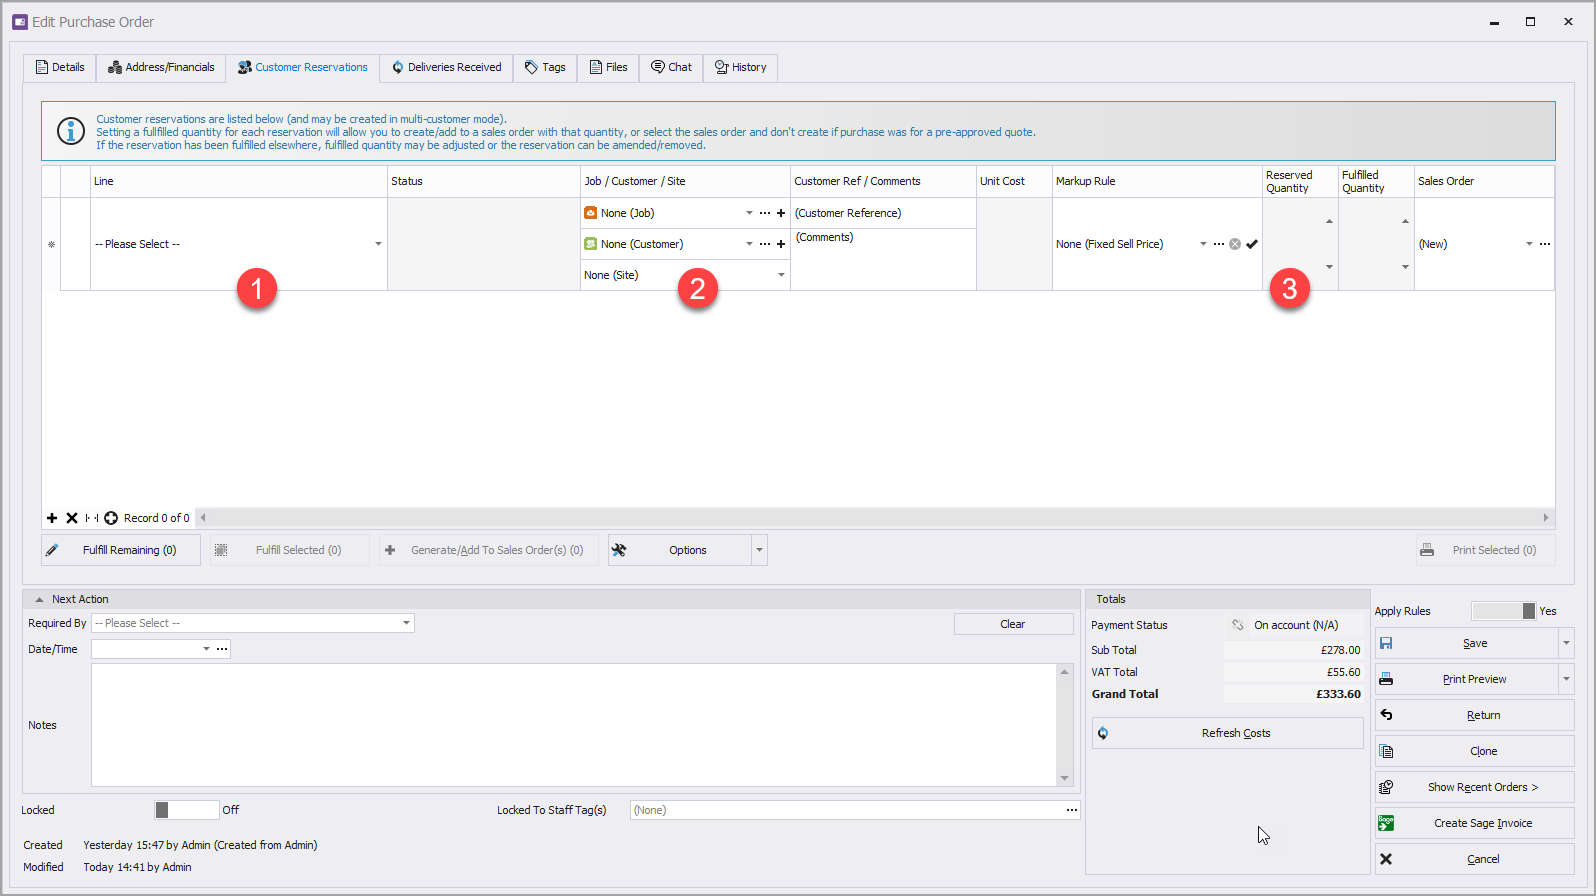
Above we start off with a blank new record to populate. In this example, where I am ordering 3 x USB sticks (in creating a Purchase Order), we are going to split this into 3 different customer reservations (each gets 1 of the 3).
- Select the line from the dropdown to start with, this refers to the lines from the first tab. We just have one for the USB stick, but if there were multiple lines they would be in the list.
- Next choose a Customer (or Job), this is the Customer/Job we are reserving all, or in this case part, of the line for.
- Finally set a reserved quantity, we will choose 1 here. Tip: you can double click the value to put it to the full quantity.
- Repeat again to add another row (the list will keep feeding us a new row at the bottom to edit). We will repeat this again but choose another Customer and quantity of 1 again. Do this one more time, so we get 3 Customers each with a reserved quantity of 1 per below:
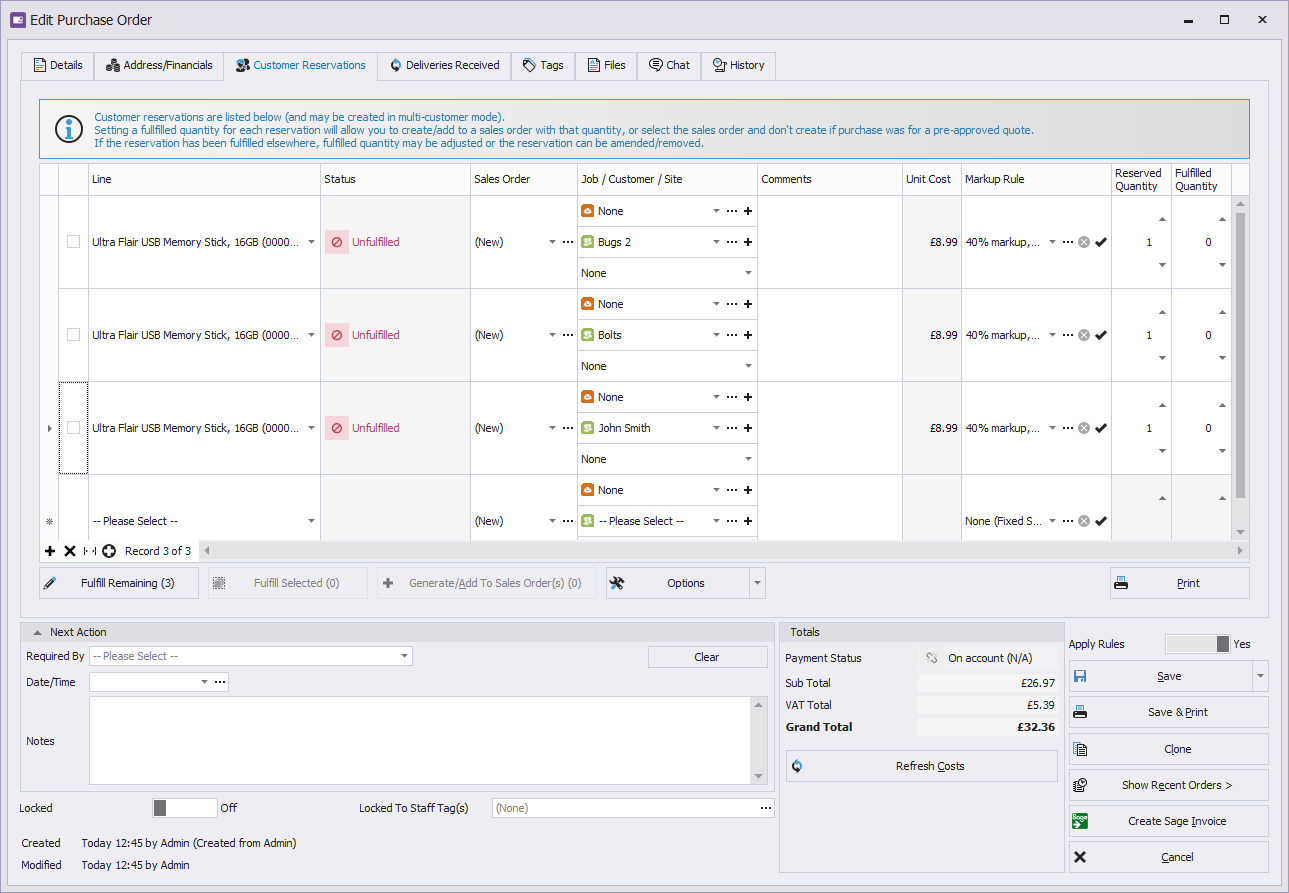
Great, we've just created our first more complex reservation. Some things to note:
- The total of the Reserved Quantity won't let us go above 3 (the total from the single line on the sales order line). We have divided it up here to go 3 ways, but we could do any number of combinations with different amounts for different customers.
- If the product has been set up with a markup rule, it will automatically populate, 40% in the is case. You can overrule here however by selecting something different.
- The bottom row in the list is always empty, feeding us a new record in case we need it, but if we don't, we can ignore it.
- Save the Purchase Order now and the 3 customer reservations will be saved.
- If we need to involve more than one line, we can do very similar, and design our reservations similarly. Reserved Quantity will tail off to keep you right so you can't reserve more than you ordered for a line.
- Single Customer mode described above will also create records here too, it will be more locked down and maintained for us because the customer is getting everything. You can start off in Single Customer mode, then switch to advanced, then edit, and it will retain what was there.
7. Creating Sales Orders from Reservations
The Customer Reservations tab allows you to optionally convert the reservation into a Sales Order with added markup for customer billing. You can create a new Sales Order or add to an existing (the existing must have the same characteristics as the reservation - i.e. customer, job and customer reference). When creating new, if multiple customers/job pairings are the similar in the reservation list, it will amalgamate reservation entries into as few Sales Orders as possible.
7.1 Fulfilled quantity
This column at the end can have a couple of different meanings, but when we want to create a Sales Order, it indicates the quantity we want to add to the Sales Order.
Selecting the Fulfill Remaining button will automatically put all these quantities up to their full reserved amount if we want to create invoices for everything. Fulfill Selected is similar but applies to the selected records, which are those you can select using the tick box on the left hand side to select one or more.
Once these have a quantity set and some rows selected (via ticks), Generate/Add To Sales Order becomes available to allow you to create Sales Orders for these reservations. Pressing the button will reveal the form below:
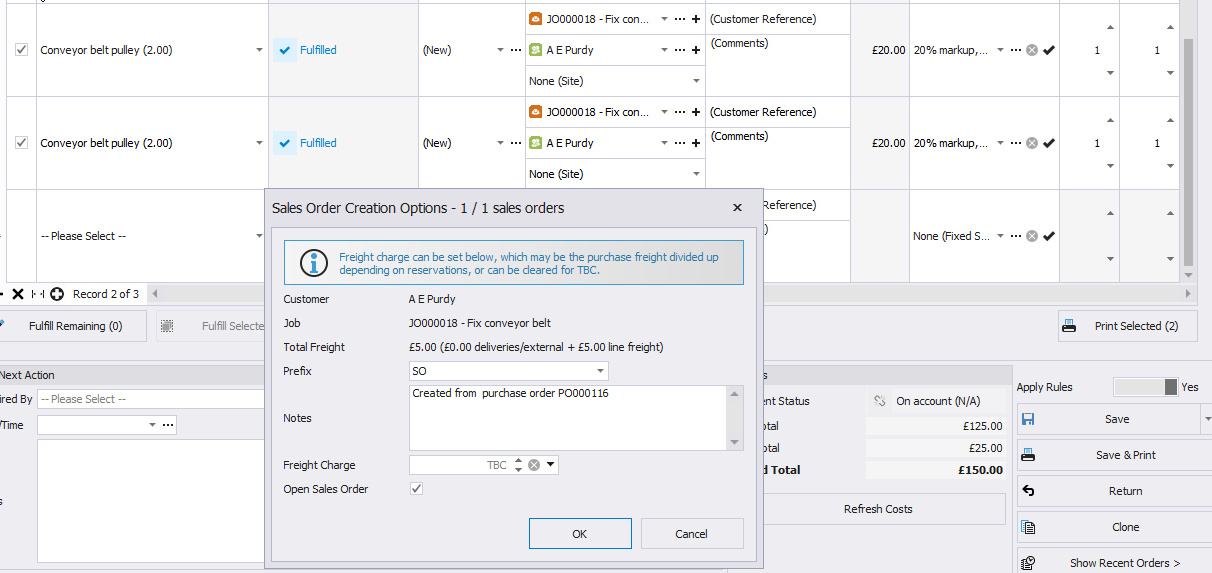
This form tells me it will create one order (1 / 1 indications amalgamation), confirms the customer, job, and total cost freight breakdown.
You can change the Sales Order prefix (if multiple prefixes are in play), and add some notes, which will form the Sales Order's notes, by default it adds a reference to the Purchase Order it was created from.
Freight charge, we can decide from our freight costs what we might want to charge. The dropdown at the far right of freight charge offers some common division options or you can decide your own based on how you might divide up the total freight charge for each customer's reservation based on the total. Leaving at TBC will allow it to be entered if not ready to be decided, i.e. external freight is pending. Selecting OK will generate the Sales Orders and if one it will open, if multiple they will be listed in a new tab for inspection or further adjustment.
7.2 Fulfilling Partially
You may not be in a position to fulfill all the reservation amount reserved, especially if just some items of the order have arrived and not all. In this case Fulfilled Quantity should represent what you do have to sell and less than the reserved amount. If you follow the process above to generate Sales Orders but with a fulfilled quantity less than the reserved, what will happen is the reservations will split into two reservations. Say for example there is a reservation with a reserved quantity of 3, but only 2 items can be fulfilled, the lines will split into two once you process the 2 - i.e. the original reservation will reduce from 3 to 2 and complete itself (2 out of 2), and another additional reservation will automatically be created for the customer/job for the remainder (0 of 1). This can be fulfilled and processed similarly on a later date once the goods are received. This is for when you want to get Sale Orders out without having to wait on all goods to arrive.
7.3 Other Use Cases
In some situations you don't want to Generate/Add To Sales Order, for example:
- Sales quote - You've created a sales quote and it has been sent and accepted by the customer, so this is a purchase that is being created to back fill it since the items are either not in stock or are specialist/once off. Since the customer has seen the prices on the quote and agreed them, you don't want them to vary from markup rules even if the supplier costs have changed and you'd generally take impact on those for a time limited quote or factor in changing costs as part of the markup. In this case you'd simply select the Sales Order, put the fulfilled up to the required amount as above, and Save without generating/pushing anything to the Sales Order, since it was created in advance and no push from purchase to sales is to happen. Note once the quote becomes an actual sale (through status change), the stock is reduced at that point. This can cause stock to go into negative until received, but that's OK.
- Stock fulfillment happens in other ways and you don't need to generate a Sales Order. In this case, you can simply fulfill all items by upping their quantity and select No Sales Order and Save. This sets reservations to fulfilled and removes them from being flagged in any saved searches described below.
7.4 Notes
- Using customer reservations isn't essential, and if you were to receive deliveries then create a separate Sales Order for a customer then this would causes the same stock control to occur (replenish on deliver, reduce on sale). EaseSuite allows you to oversell and the stock to go into negative until it is received and can be fulfilled. However, reservations can be a convenient way of both earmarking for a customer and converting them to Sales Orders when the time is right. Think of reservations as a Pre-Sales Order state attached to purchases.
- Stock doesn't need to be reserved. Any quantities on an order that are not reserved for a customer will be assumed to go back into stock automatically, so in this way you can easily mix orders with items for stock as well as earmark only some of it for customers. Deliveries replenish stock and technically everything goes back into stock in the system (but perhaps not physically placed on the shelve) before it bounces out to reservations when they are created and will be conveyed like this in history.
8. Searching Purchase Orders
See General Application Features for general search guidance.
There are a few useful searches you can perform and optionally add to Saved Searches in Purchasing to form lists for processing, here are some examples:
- Delivery arrived. If you supplied a PO number to the supplier and it has came back on the delivery note or invoices, you can type it into the simple search to locate the exact order. Failing that, searching by supplier name in the simple search box (or selecting Advanced Search > Advanced tab > Supplier) will narrow down to supplier, and you can use the date range tool (Dates tab) to narrow down to date if you have a lot of order from that supplier. Total Cost may not be up to date at this point but may give some indication of similar value (supplier prices may have moved on).
- Find all orders older than 2 week old (for chasing up). In Purchasing > Advanced Search > Dates tab choose Date Search By "Order date". Next to Date Between select the "..." button (date range finder) and choose Older than 2 weeks. Next, select the Advanced tab and from the Status field select from Sent or Sent and Partially Received to earmark these statuses and select Search. Save the search in the usual way and give it the name Orders not received and older than 2 week. Since the date range tool was used, the saved search will be relative for when the next time this saved search is selected (the date will adjust to older than two weeks from today).
- Find all reservations that are unfulfilled but have stock to fulfill them. Go to Purchasing > Advanced Search > Advanced tab > Reservations to find this item. There are a number of useful reservation finding tools in this menu. If you are not comfortable stock levels are quite correct in the system, you can use Find all reservations that are unfulfilled and perhaps use a similar Older Than date search to the previous to help you check through them and confirm arrivals. You might want to double this by specifying a Customer or Job in the advanced tab to narrow down to a specific customer.
- Next action date can be useful to use and can be a separate adjustable date you can hook into searches instead of order date. For example if you expect some orders within a week and others within two, by setting next action date individually when creating the order (e.g. order date + 7 or 14 day as next action), then utilising it in a saved search, you can potentially get a bit more precision if required. Also, if the order is due a week after sent, but hasn't arrived, and after further enquiry with supplier it should be received within the following week, then you can then further nudge the next action date on by a further 7 days so it appears on a future list and is kept relevant for chasing up on.
9. Purchase Order Returns
It is possible that Stock may need to be returned to the supplier. This can happen for many different reasons and at many different points along a Stock item's journey. For that reason there are a couple of different ways of creating a Purchase Order Return, and the options for how this return affects Stock levels are at the control of the user allowing for maximum flexibility and adaptability to your workflows and the particular circumstances of your Stock return.
9.1 Creating a Purchase Order Return
There are two ways to create a Purchase Order Return. The first is the preferable method but there are possible scenarios where method two may be required and we will set them out below.
9.1.1 Returns Created from the original Purchase Order
Ideally, and as a first option, when returning an item to the supplier, find and open the Purchase Order that includes the purchase of the item(s) being returned.
From the opened Edit Purchase Order dialog select Return (see below)

This opens the Remove Stock dialog. At this point we can decide what parts of the Order and how many are to be returned. This is done in the Quantity To Return To Supplier column.
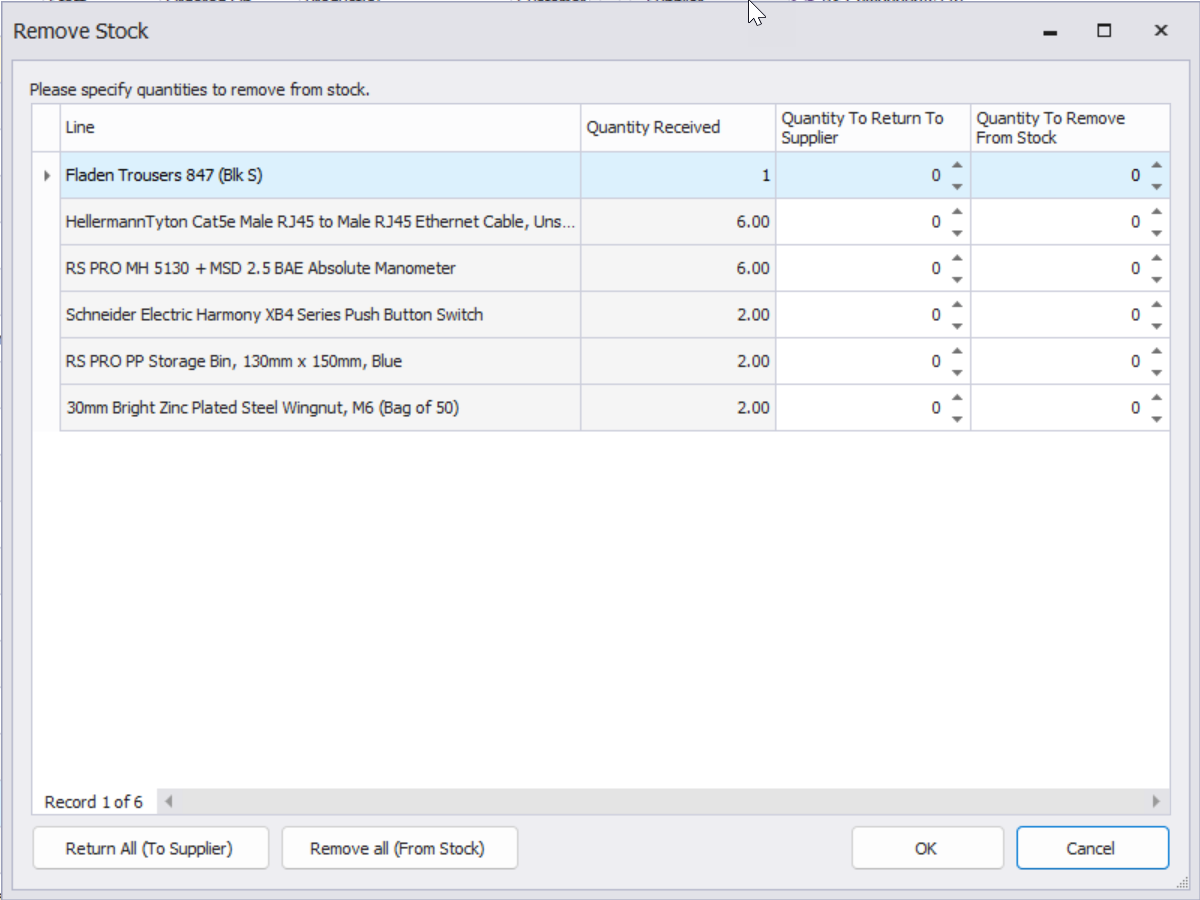
We also can decide how we want the return to affect Stock Levels. The third column, Quantity to Return From Stock will enable stock levels to be reduced accordingly as stock items are returned to the supplier. If however, items are returned before they have been received into stock this may not be appropriate. An example of a possible scenario would be if a delivery arrived damaged and was to be immediately returned to the supplier before it was received into the system and before stock levels were adjusted to reflect the delivery. In this case you would not want the return to trigger a reduction in stock levels as the goods never got as far as becoming stock in the first place. For this situation you would enter the quantities to be returned but leave the Quantity To Remove From Stock column at zero so no stock level changes occur.
If the entire Purchase Order is to be returned, buttons are at the bottom of the dialog for Return all (To Supplier) and Remove all (From Stock). This will automatically populate the supplier and stock columns with the numbers from the Quantity Received column. Select OK to close this dialog. A results dialog will inform you that a new Return has been created using the original PO number appended with Return. This new Return is open ready for you.
If you need to document the reason for your return on the PO Return this can be done at this point in the Edit Purchase Order dialog. To provide specific details for each item, you can add information to the Line Description after the product information. E.g. Customer return - fastening broke after 1 week. If all the returns on the Purchase Order-Return are for the same reason. E.g. Arrived water damaged in transit, then this can be added to the Notes field and will appear on the Purchase Order-Return that will be printed and/or emailed with the return.
9.1.2 Returns Created From Scratch
There may be reasons why the original Purchase Order is unavailable when processing a return to the supplier. It could be that the Purchase Order was created before EaseSuite was in use, or was processed on an outside system. In these cases a Purchase Order - Return is begun in the same way as a Purchase Order. By Selecting Add (1) or + icon (2) to open the Add Purchase Order dialog.
In the Add Purchase Order dialog set the Order Status to Return (see below).
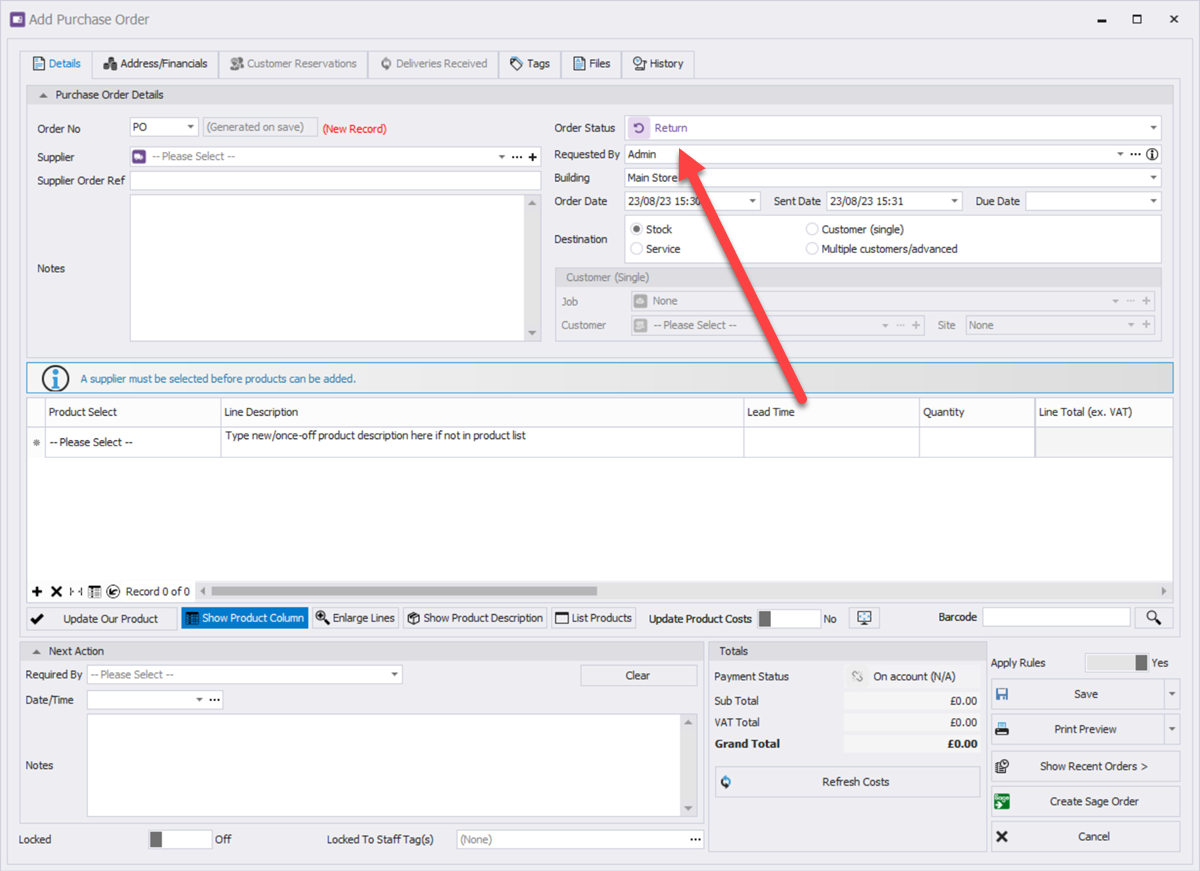
From here the supplier and Product(s) can be entered as you would with a regular Purchase Order. Again, details of the faults or other return reasons can either be added to the Line Description information for specific products or entered into the Notes field for more general information.
Selecting Save or Print Preview at this point will open a slightly different version of the Remove Stock dialog. (see below)
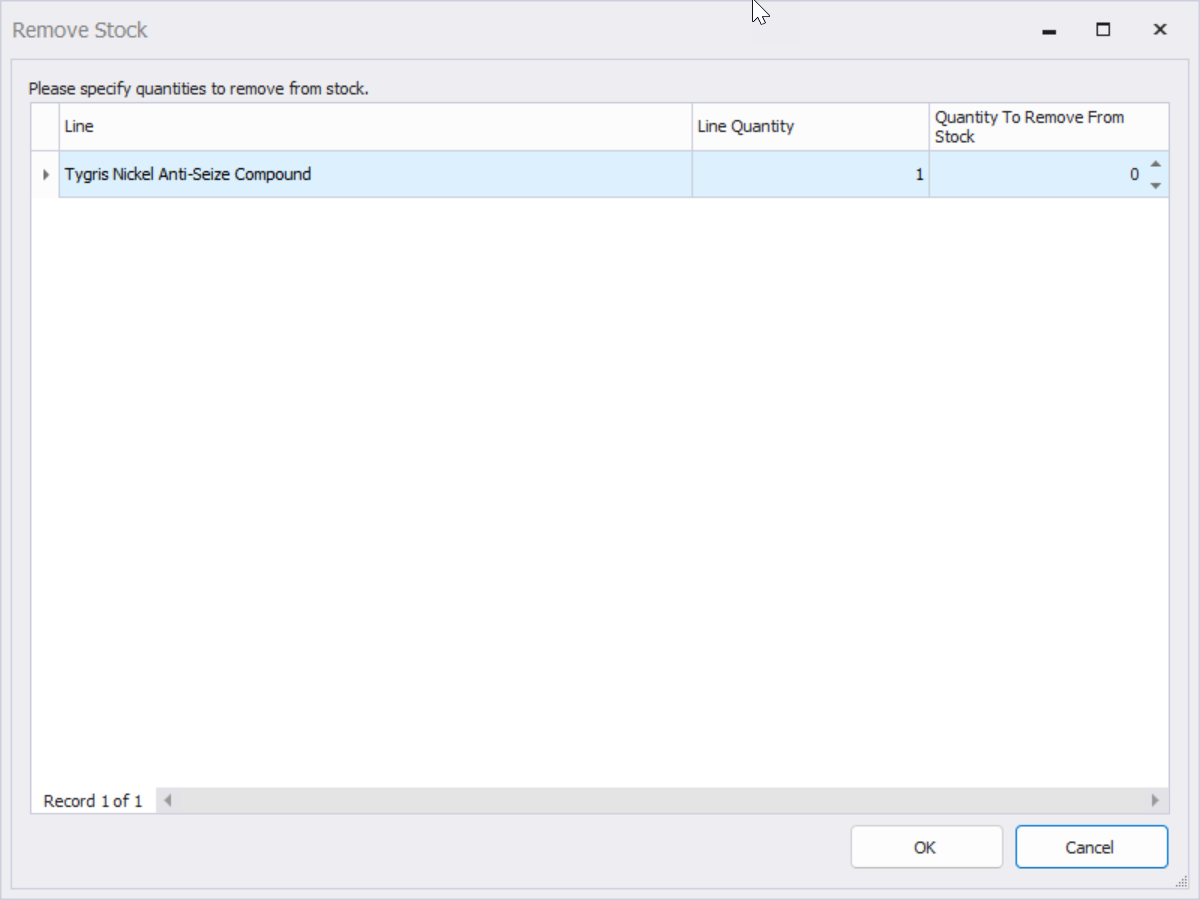
The purpose is the same as when creating a return from an existing Purchase order (discussed above). In this situation though, the Line Quantity is fixed based on the quantity you entered in the PO- Return. As before, at this point you can select whether or not you want the return to affect the stock quantity of the product. In the image above increasing the Quantity To Remove From Stock value to 1 would result in the return of the item reducing its Stock Quantity by 1. This would usually be what you would want to do unless the return is initiated before the delivered good have been recorded into stock. E.g.. Found damaged on delivery.
9.1.3 Multiple Returns
Additional returns can be made by Selecting Return on A Purchase Order as describe above. Again the dialog will allow you to select what is being returned and how it affects stock levels.
Additional items can also be added to existing PO-Returns and will again prompt you to decide on how the return affects stock.
10. Pushing Purchase Orders to the accounts package (optional)
Some organisations choose to do this, others don't.
10.1 Reasons not to
- Most businesses reconcile purchases at bank statement stage, i.e. Sage bank reconciliation, where minimum details such as amount, VAT, accounts category (nominal) with a simple reference that can be used to look up the Purchase Order or scanned supplier invoice in our system by a simple search if need be. Automatic rules are often in place for this for recurring items, which often may not exist in our system.
- Most categorise the nominal code by the supplier itself rather than product, so you don't need to go into line by line detail. But if by product, this can be a reason for (see below).
- For end of year accounts, the purchase detail isn't all that important unless you are being investigated. The minimal details above keep everything balanced and categorised for accounts and it's enough to breakdown those details without going into line level.
- By not pushing, you generally reduce an ongoing step.
10.2 Reasons for
- You categorise the nominal code on a product level, and therefore each line becomes relevant. In this case pushing a P.O. can be useful, but adds an extra step.
- You're being investigated or are subject to audits and there is a requirement for verbose purchasing in the accounts package. Accounts systems such as Sage.
Notes
- You may wish to mark a PO as complete 1) as soon as sent 2) after payment has gone out of your bank account (this generally means going back to our system and bulk updating status), or 3) if pushing, it can automatically be marked as complete at that stage. It is flexible and up to you how you want to check off each by marking complete.