Help Topics
- EaseSuite
- Frequently Asked Questions / Troubleshooting
- General Application Features
- Stock Control and Replenishment
- Accounts Package Integration
- Quick Start Guides
- Mobile Guides
- Word Templates & Print Outs
- Concepts
- Hardware
- Workflow Case Studies
- Terminology
- Submitting Help Requests
- Feature Requests
- Web Shop Preparation Guide
Staff Planner Guide
Introduction
The Staff planner allows simple scheduling of staff onto Jobs by dragging and dropping Tasks onto the appropriate staff member's calendar. Staff can be filtered by their role/trade and abitilites added as Tags. This allows useful skills outside their specific trade to be added to a Job or Task. For a Job may require a Qualified First Aider from among the staff. It may require an approved van driver. These additional skills and attributes can be recorded on a Staff member's record through the use of Tags. See below for further details.
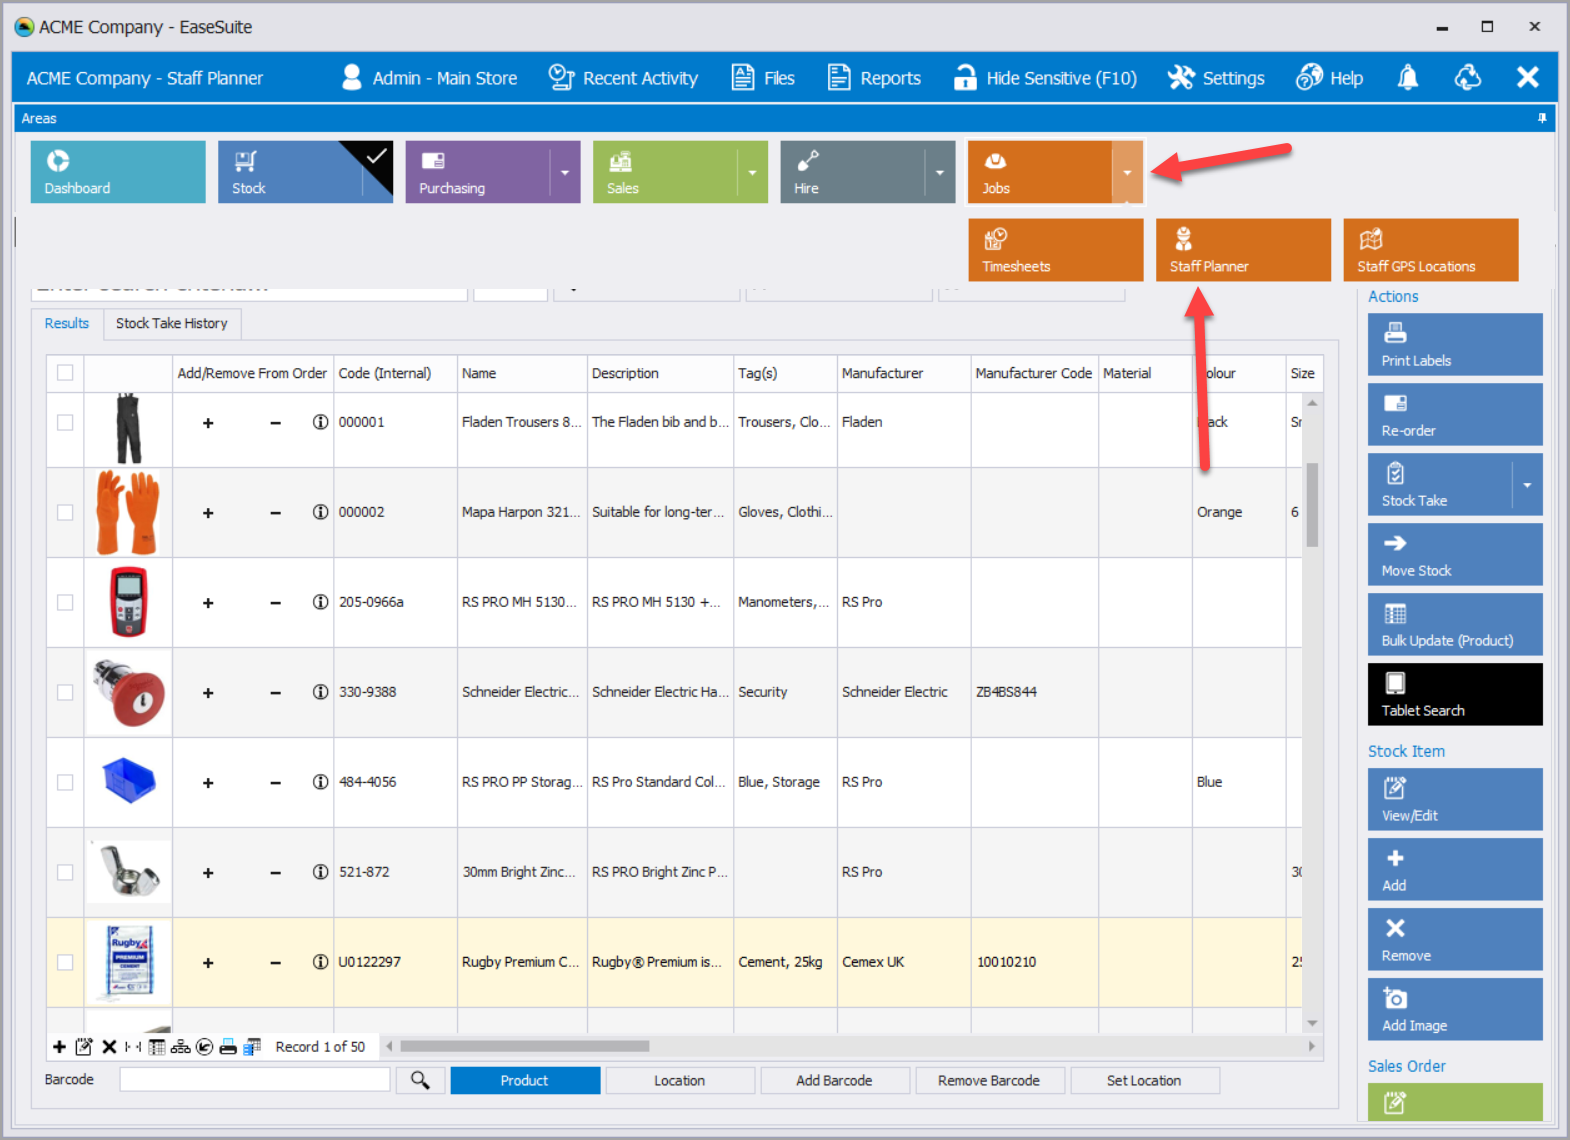
1. Staff Planner Area
The Staff Planner Area is opened via the drop down menu on the Jobs button. (see below)
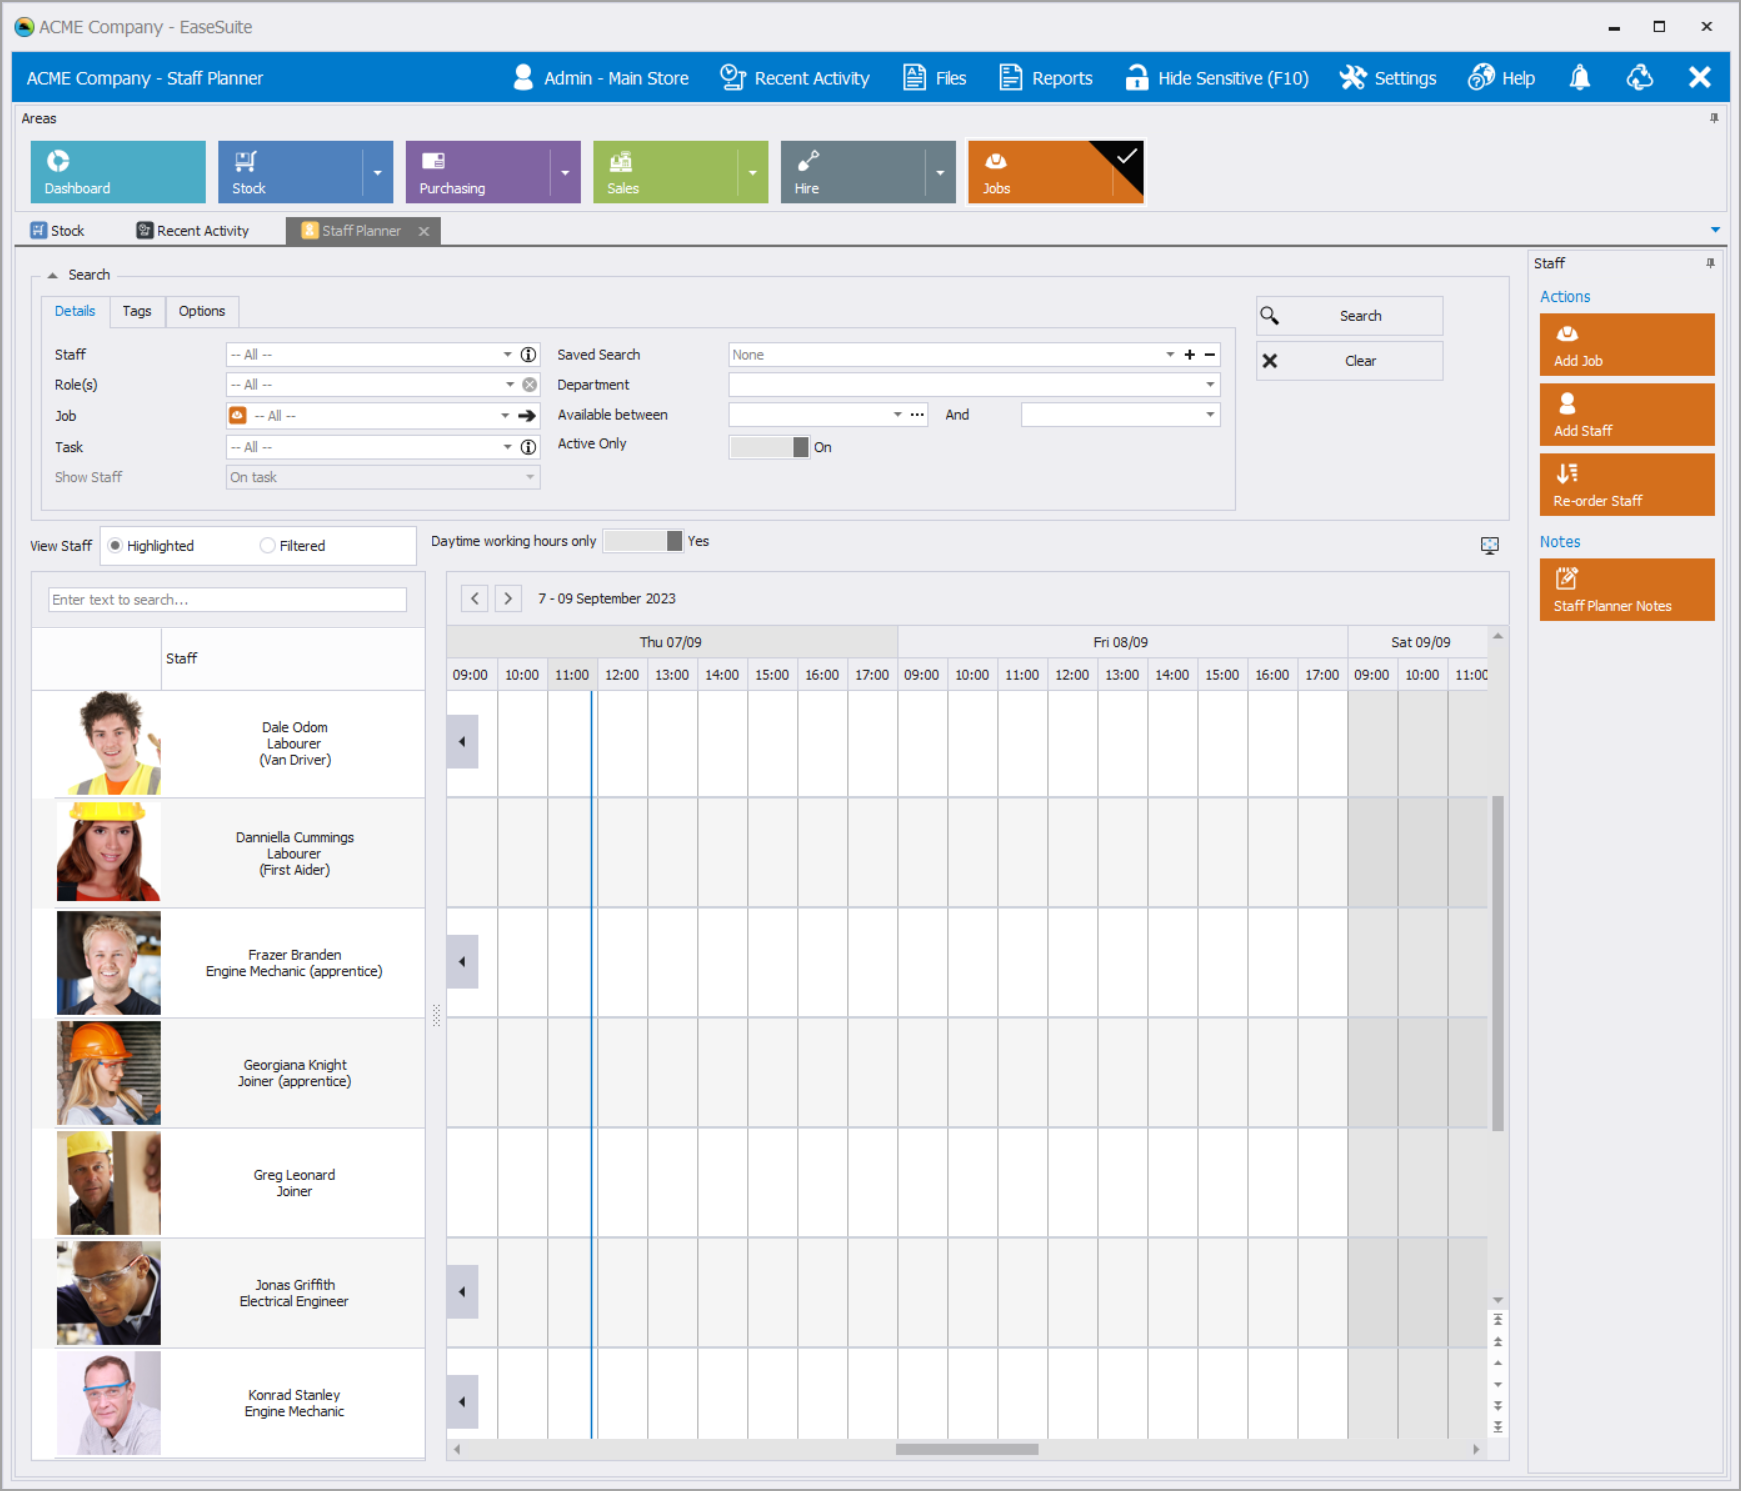
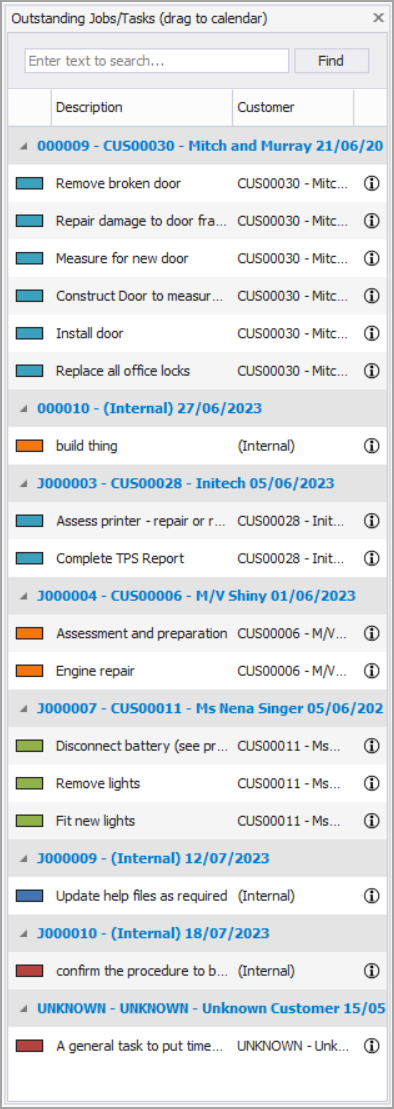
When Staff Planner is selected the main Staff Planner Area opens, but also a second movable window opens showing Outstanding Jobs/Tasks.
1.1 Assigning Tasks to Staff
By dragging a task from Outstanding Job/Tasks to the timeline for a Staff member you open the Assign Staff To Task dialog.
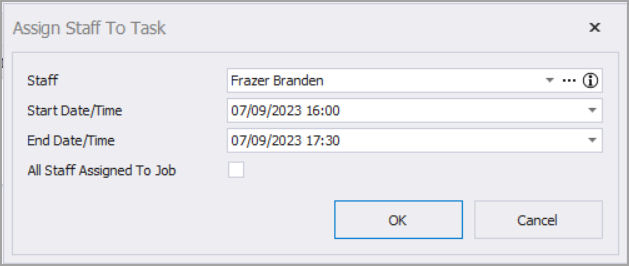
From here you have options of how you assign the Staff to the Task.
- Staff: This is pre-filled with the name of the staff member you dragged the Task onto.
- Select the drop down arrow to select another staff member from the drop down list
- Select ... (three dots) to open the Settings dialog at the Staff tab. Use this if you need to amend any staff details or add new staff members.
- Select the (i) icon to display a brief overview of the selected Staff member.
- Start Date/Time: Add the start date and time information. Use the drop down arrow to select the date from a calendar view. Time entries must be rounded to the nearest 15 mins.
- End Date/Time: Add the end date and time information. Use the drop down arrow to select the date from a calendar view. Time entries must be rounded to the nearest 15 mins.
- All Staff assigned to job: Select this box when assigning the last staff member to the Task. It signifies that All staff have now been assigned to the task and rmoves the task from the Outstanding Jobs/Task list.
1.2 Editing Assigned Tasks
Tasks added to staff members appear on the timeline on the main Staff Planner Area.
Entries can be edited on the timeline. Clicking the entry and dragging left or right will reposition the time of the job. To alter the duration, click either the left or right edge of the entry and drag left or right to alter the start or end time of the assigned task.
Assignments can also be edited by double clicking on the entry to open the Edit Assignment dialog.
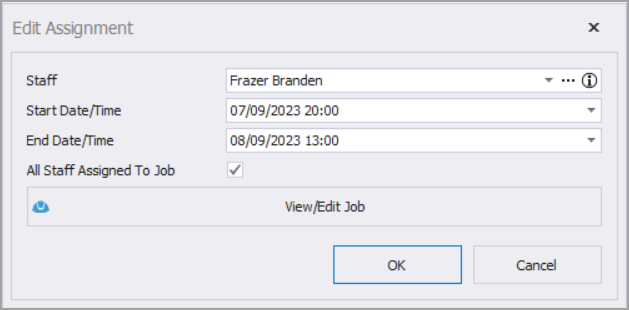
Options here are the same as for the Assign Staff To Task dialog detailed above, with the addition of a View/Edit Job button. Select View/Edit Job to open the Edit Job dialog.
1.3 Searching and Filtering
The search options in the Staff Planner area allow the searching and filtering of staff by a number of criteria, allowing the easy allocation of suitable members of staff. The following search criteria are available under the Search > Details tab:
- Staff: Select or search for the staff member by opening the drop down list. Select the (i) icon to open an overview of the selected staff member.
- Role(s): Drop down the list of Roles and tick the boxes of as many as you wish to refine the list/search to only those who are assigned those roles. Select the X icon to clear the list and return to searching all roles.
- Job: Select the Job from the drop down list. When a job is selected the Right Arrow Icon can be selected to advance the timeline to the Job Start Date.
- Task: This search field only functions if a Job has been selected in the Job field above. In which case the drop down list will enable selection of specific
- Show Staff: This search field becomes active only if a Job and a Task have been entered into the two search fields above. In which case three options are selectable from the drop down list:
- On task: Already assigned to the selected Task.
- With role(s) for task: Only those with roles that are listed as required for the task.
- With role(s) and tag(s) for the task: Only those with roles and tags that are listed as required for the task.
- Saved Search: Saved searches can be accessed from the drop down list, created and removed using the + and - icons. This allows speeds up the search for regular scenarios by saving the search criteria for quick access.
- Department: Select from the drop down list of departments. Departments are assigned to Staff in the Staff dialog.
- Available Between: Add a date range to the search or select ... (three dots) to select from a range of pre-made date range search options.
- Active Only: Staff members can be have their Active switch selected On or Off in their Staff dialog. By default this field is set to On and shows only Active Staff. Switch it to Off to search all staff whether or not they are marked as Active.
The Tags Tab allows searching by specific tags that can be assigned to Staff. These can be other attributes besides their trade/role etc that may be of use for a Task or Job. For a Talk may require a trained First Aider, or a qualified Fork Lift operator, or digger, or crane. Maybe an HGV driver. Any skills/attributes such as these can be setup as Tags and Staff members with these Tags will be shown as these Tags are selected in the search.
Switch on the Drilldown function to allow search by drilldown. This way, after the first tag is selected the list of available tags will be reduced to show only those available on staff also tagged with the initially selected tag. And so on reducing the tags and staff list as you drill down to the staff member with the skills required.
Highlighted vs Filtered: The way the results of the searches are displayed for the user vary depending on whether View Staff is set to Highlighted or Filtered:
- Highlighted: This will show the staff members that match the search criteria highlighted in yellow, but will continue to leave all other staff members visible in the list.
- Filtered: This will show only those staff members who match the search criteria, hiding all others from the list.
Under the Search > Options tag a slider allows the size of the staff image to be adjusted allowing more or less staff members to fit on the page.
1.4 Actions
From the Actions buttons available on the right of the Staff Planner Area the following can be selected:
- Add Job: Opens the Add Job dialog and allows a new Job to be entered in the system just as you would from the Jobs Area.
- Add Staff: Opens the Add Staff dialog and allows details of a new Staff member to be added.
- Re-Order Staff: This opens the Change Staff Order dialog from where you can drag the order of staff to suit your requirements. Select OK to close the dialog and the main staff list will reflect your changes to it's order.
- Staff Planner Notes - An area for adding general notes on the Staff Planner. These notes will be visible to all users.