Help Topics
- EaseSuite
- Frequently Asked Questions / Troubleshooting
- General Application Features
- Stock Control and Replenishment
- Accounts Package Integration
- Quick Start Guides
- Mobile Guides
- Word Templates & Print Outs
- Concepts
- Hardware
- Workflow Case Studies
- Terminology
- Submitting Help Requests
- Feature Requests
- Web Shop Preparation Guide
Timesheet Quick Start Guide
- Prerequisites
- Introduction
- Workflows
- Creating a Timesheet
- Adding Bulk Time
- Approving Timesheets
- Measuring Weekly Staff Time
- Cost & Charge Rates
1. Prerequisites
- Requires a Job to be present so time can be added to the Job.
2. Introduction
- Timesheets within EaseSuite can be used in two different ways.
- Billable Hours Only - Only recording hours billable to customers via Jobs
- Full Coverage - Recoding of billable and non billable hours to give an account of all hours worked.
- Full coverage of all hours will give a consistent account of all hours worked over a period whereas Billable Hours can have a variable total as the amount of billable hours will vary from week to week depending on Jobs being undertaken.
3. Workflows
- Creating a timesheet
- Adding bulk time
- Approving timesheets
- Measuring weekly staff time
4. Creating a Timesheet
- This workflow guide will give a basic introduction to the process of creating a Timesheet entry in EaseSuite.
- The Timesheets Tab is a accessed via the down arrow menu to the right of the Jobs button.

- The Timesheets Tab shows a list of Timesheet entries
- To add a new Timesheet entry either select the + icon or Add Timesheet - See below.

- The Timesheets Tab does not open a new window like the other tabs, but adds a new row to the list of Timesheet Entries.
- For the most basic Timesheet Entry the following 4 fields need to be entered. Your organisation may require additional information beyond this minimum.

- Time Type - This defaults to Billable Work and can be left as is if only Billable Hours are being documented. If Full Coverage of worked hours is recorded the following option are available:-
- Billable Work - Hours that can be charged to a Job and therefore a Customer.
- Internal (Work) - Work not billable to an external customer/client.
- Internal (Dead Time) - Inactive work time.
- Holiday
- Sick
- Staff - Select the staff member associated with this Timesheet entry from the list.
- Trade - After selecting the Staff member, their default Role as stated in their Staff Page will populate the Trade/Roll field in the Timesheet entry. If needed this role can be changed.
- Job - If the Timesheet entry has the Time Type selected as Billable Work then a Job must be selected from the drop down list. Or by selecting + in the Job field, a window opens for the creation of a new Job.
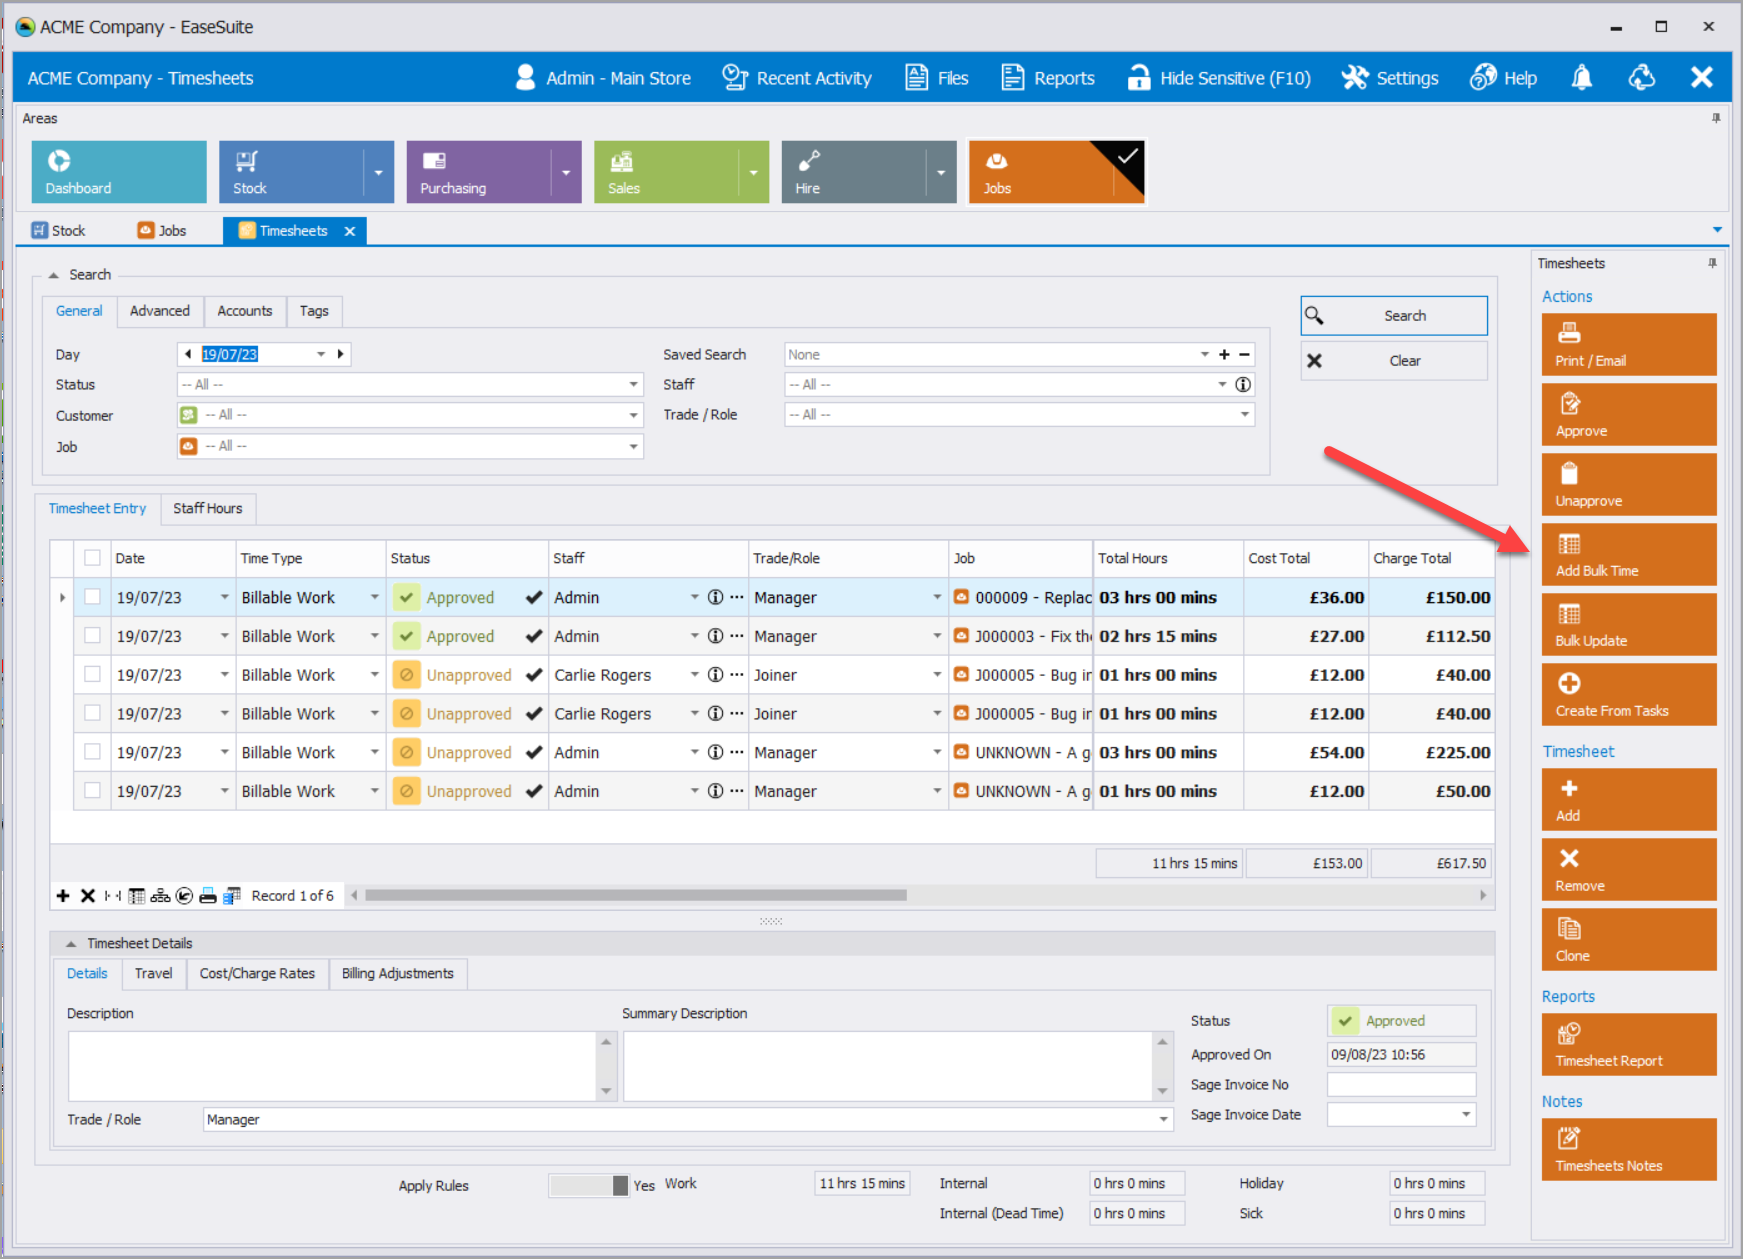
5. Adding Bulk Time
- To add multiple Timesheet Entries, for example if a Staff member was assigned regular hours and days to a Job over a long period of time, an Add Bulk Time option is available.
- Select the Add Bulk Time button.
- This opens an Add Bulk Time form
.png)
- Once filled out with the relevant information, select OK to add all the selected days as Timesheet entries.
6. Approving Timesheets
- If a Timesheet entry has only been partially completed, but worked hours have not yet been added, Status will be shown as Hours Pending.
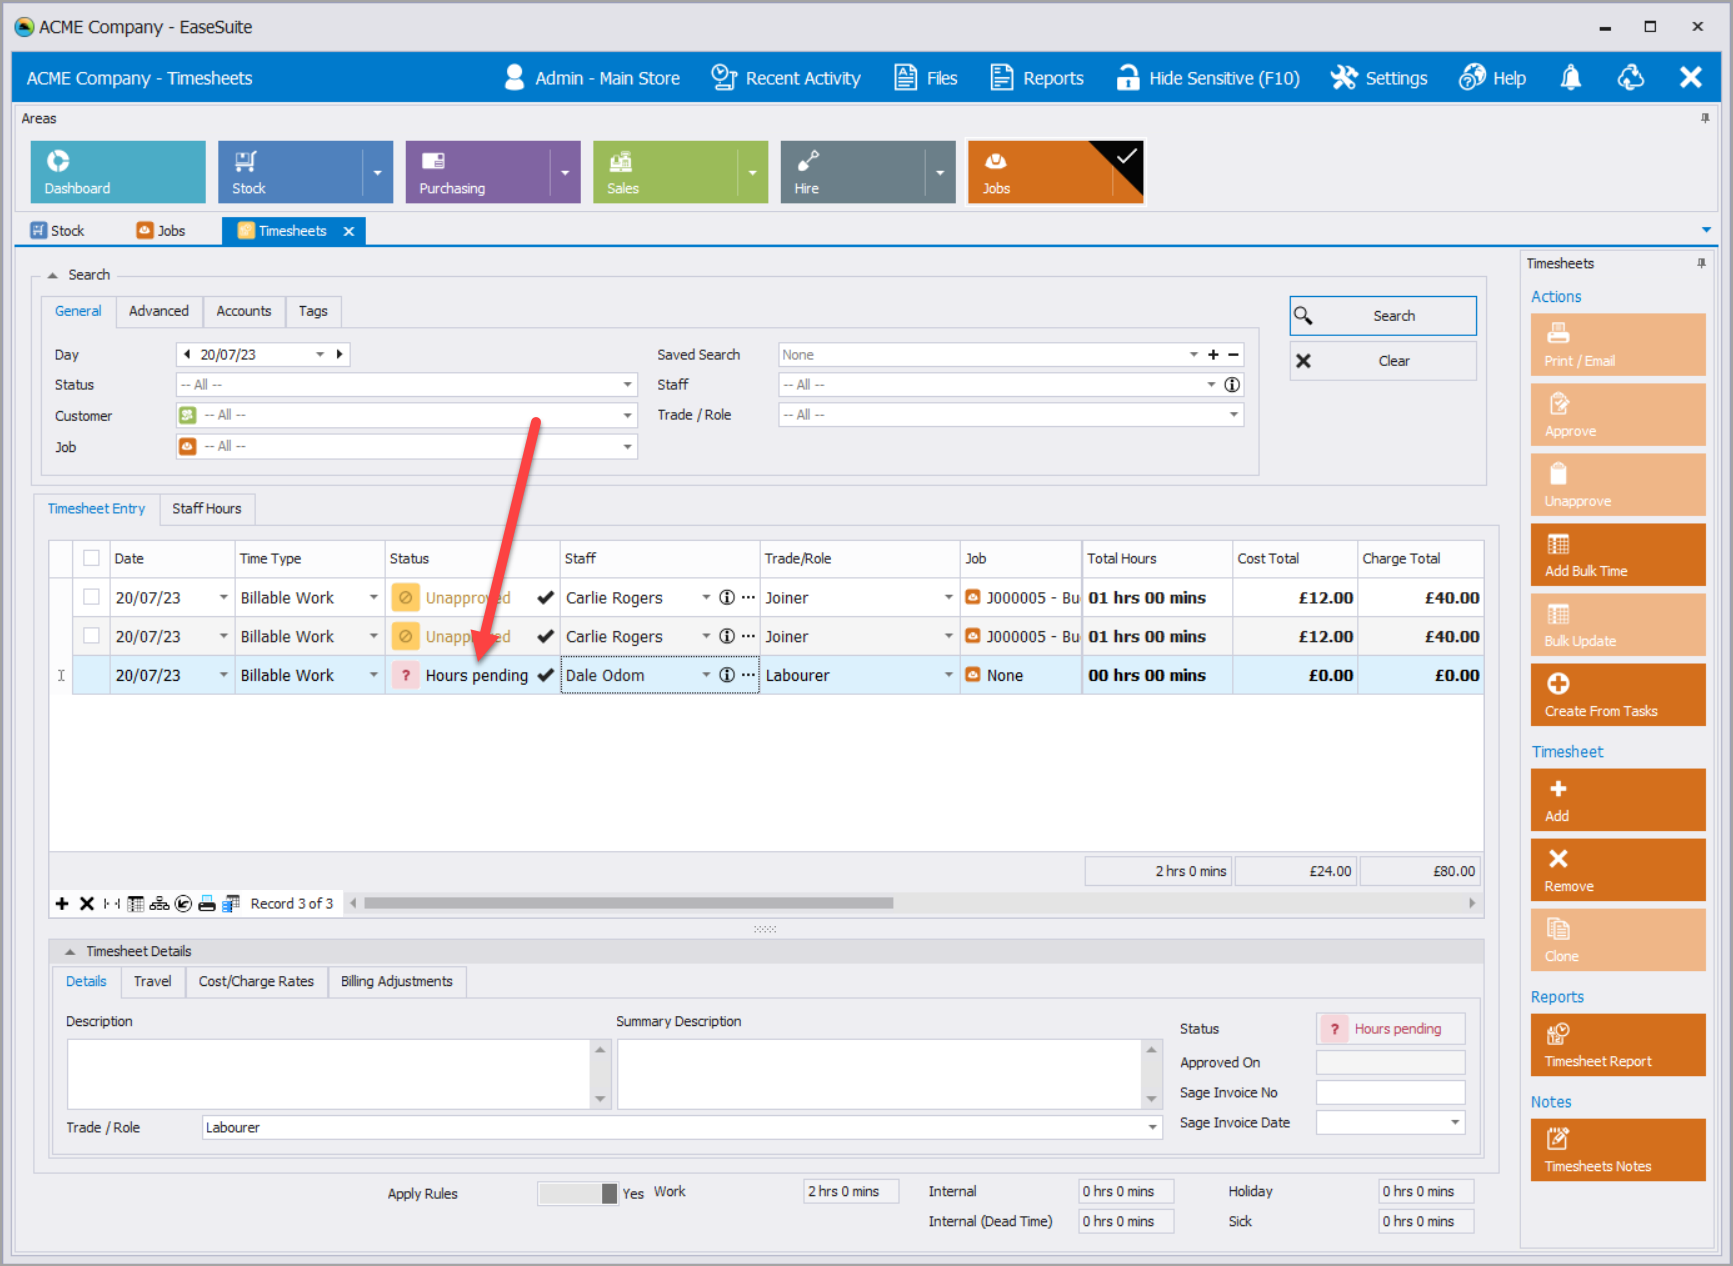
- Once hours have been added, Status shows as Unapproved.
- To approve Timesheet entries, either select the Tick in the Status column to approve the entry, or select multiple entries and select Approve on the right.

- If required, selecting the tick of an Approved Timesheet Entry will revert it back to Unapproved. The same can be done for multiple entries by selecting the Unapprove.
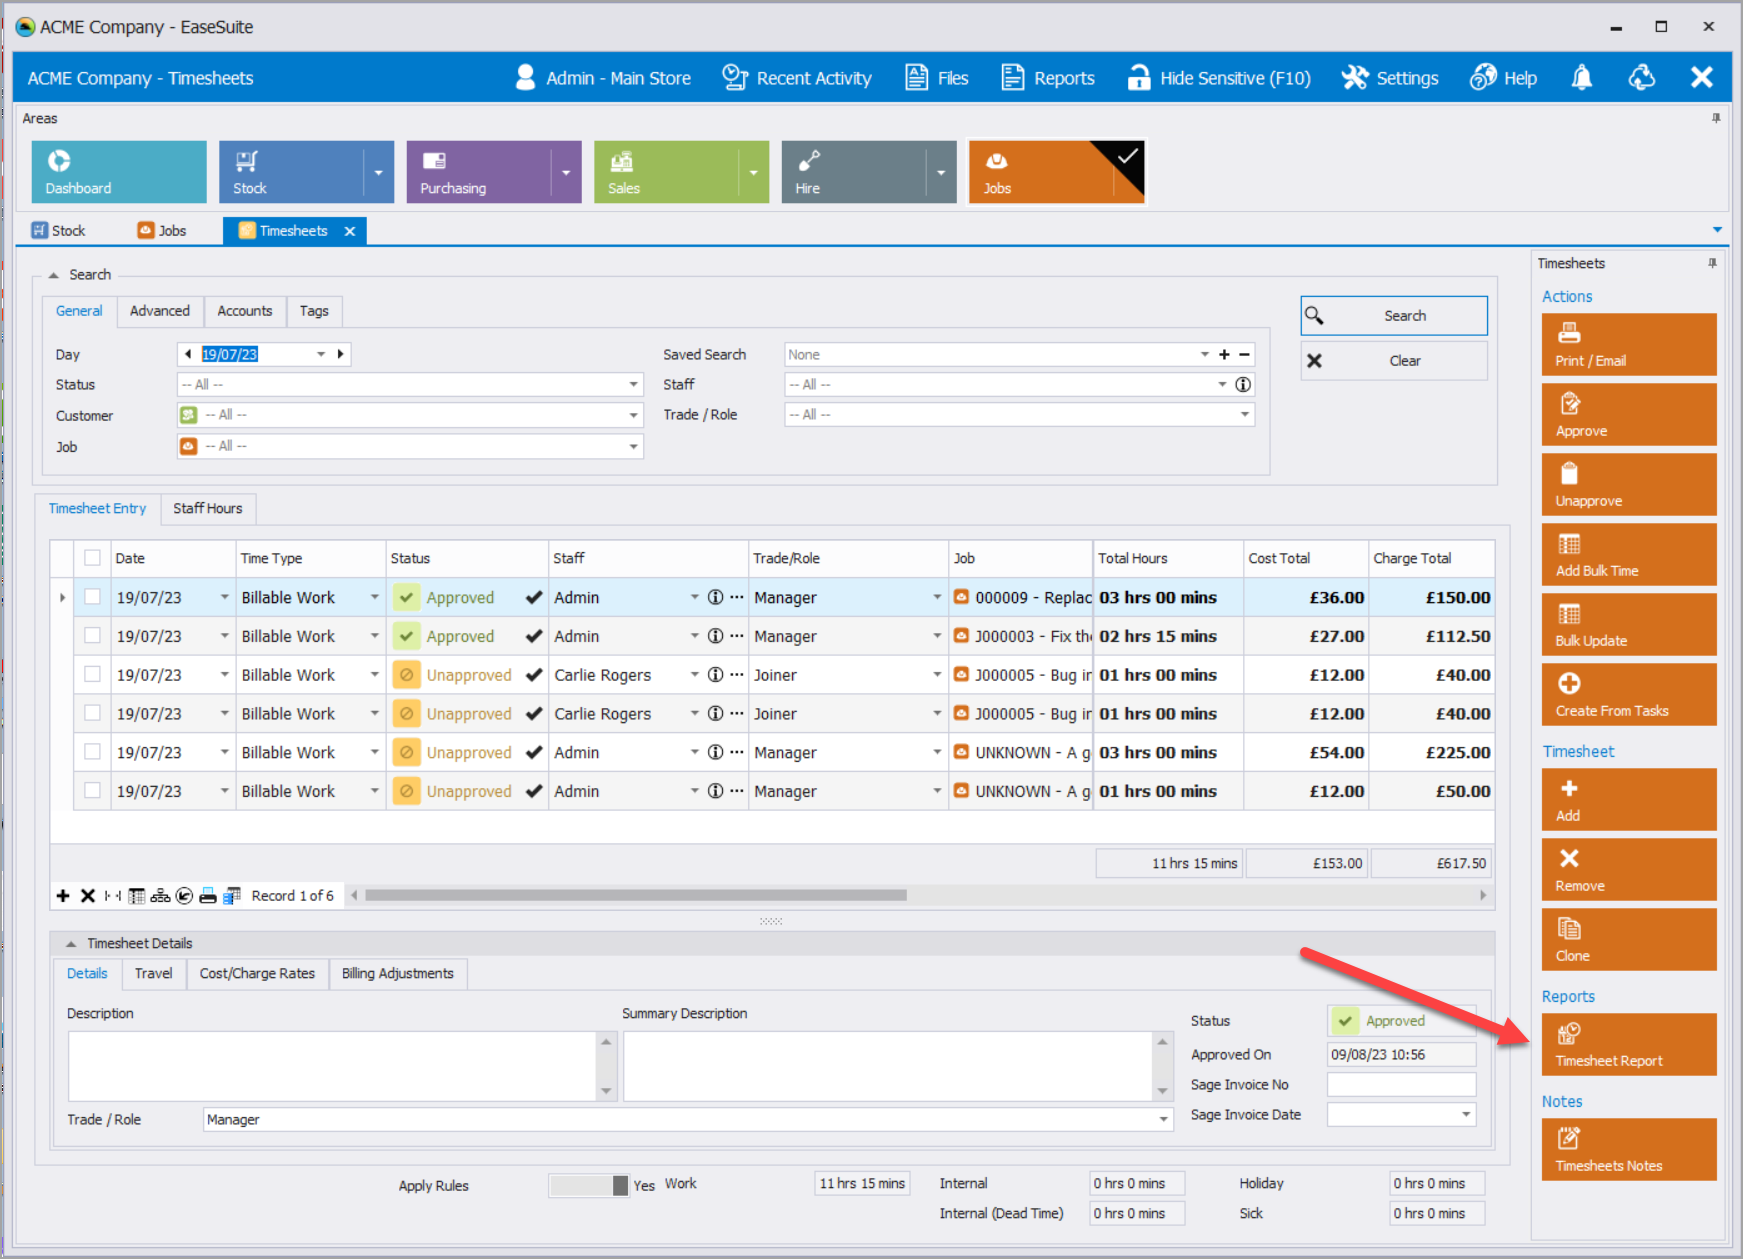
7. Measuring Weekly Staff Time
- Various information about Staff and Timesheets can be collated into a number of reports.
- Select Timesheet Report to open the Report Options form.
- The Report Options form allows you to select the type of report and details required
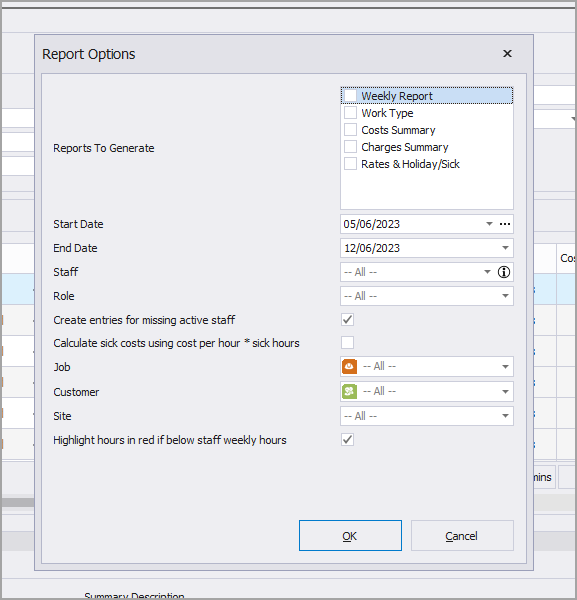
- Reports to Generate - Select from the 5 different reports available. Selecting more than one option will create a separate PDF report for each selected report.
- Dates - Manually select the required date range or select (..) to select from a list a ranges/dates etc.
- Staff - Restrict the report to selected staff member
- Role - Restrict the report to a specific role.
- Create entries for missing active staff - Selected by default. Deselect to remove these entries.
- Calculate sick costs using cost per hour * sick hours - Tick to include these calculations in the report.
- Job - Select from the drop down list to restrict the report by Job
- Customer - Select from the drop down list to restrict the report by Customer.
- Site - Select from the drop down list to restrict the report by Site
- Highlight hours in red if below staff weekly hours - Selected by default. Untick to remove this highlighting from your reports.
Select OK when you are happy with your options. A PDF will open for each selected report type in the Print Preview windows. Select the required options to print, email or export the report as required.
8. Cost & Charge Rates
- Timesheet hourly rates are set by the currently select Role/Trade (see Settings > General > Roles & Rates). Each role can include up to 5 time rate types, for example standard, overtime and doubletime (and two more of your choosing). The can be reflected in the Timesheet App also.
- Each staff can have a default role (see Settings > General > Staff), and when they are selected on a timesheet this role will go onto the timesheet by default, but may be changed.
- When those 5 time rate types don't cover everything, the role can be changed to pick up a role with different set of charge rates (and up to another 5 varied time rates). So as well as this covering Roles & Trades and their typical charges, additional pseudo roles may be added to cover price variances. For example, prices may increase on more high responsibility jobs, or you may offer lower rates for charities or pensioners for example.
- Another use case is when a staff member goes out as something they don't normally do, e.g. a plumber goes out as an apprentice electrician, the role can be switched on the fly and appropriate charge rates picked up for that service.
- The above covers every situation and is why we have a separation between role/trade and the staff member, i.e. for knowing what they are doing and also what the charge rate is for that service.
- Cost and charge rates can also be over-typed on an ad-hoc based on the individual timesheet in the section below for once-off or less frequent use case manipulation.
- Note the staff cost (hourly rate) is in Settings > General > Staff (whereas charge rates are in Settings > General > Roles).
- Billing Adjustments (tab) allows ad-hoc adjustment to hours or charge. It slots in after the line but before the total and as such it covers a few scenarios such as a) alter charge without adjusting hours (retaining accurate hours for payroll) b) alter hours without adjusting charge c) do both, where you would put in the hours and additional charge (which is a flat amount that does not get multiplied by hours). Note these can be a negative values. Typical adjustments might be to correct what you might deem overcharging (whilst retaining hours), or to add special expenses.
- Additional Lines (new) allows for ad-hoc quantity, description and cost and charge to be added. This again adds to the respective totals without adjusting hours. Items can be unapproved, an in some automated situations we may slot in placeholder items here that would either be approved (with perhaps adjustment), or disregarded by deleting.
8.1 Automatic Rates
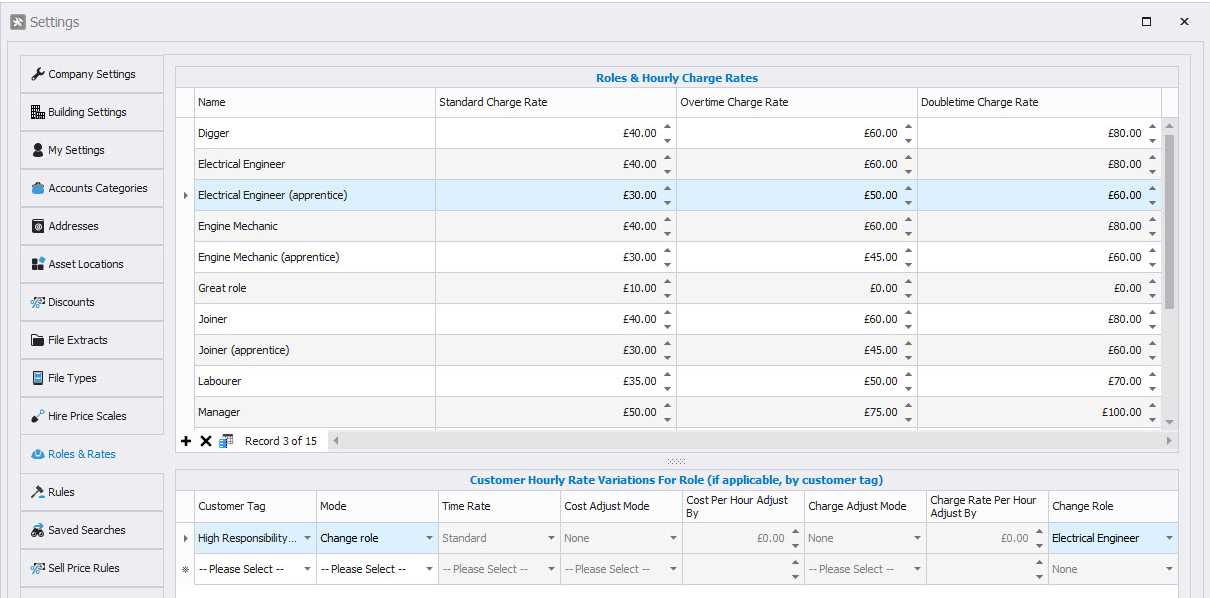
There is a chance a customer (or group of customers) may dictate different charge rates as touched on in point 3 above that vary from the standard role's rate, i.e. they may be deemed "High responsibility". In this case we can create one or more tags for the customer to categorise them into different groups (by editing the customer and going to Tags tab to select), with each group opening up the possibility to have different cost/charge rates applied.
In Settings > General > Roles & Trades, note the grid underneath each role. Each time a role is selected, it can have a different set of customer tag rules applied. There are two main modes:
8.1.1 Adjustment
This is the most in-depth mode and will keep the same role but make cost or charge adjustments. When a timesheet is updated and it has a customer selected with the matching tag in this grid (i.e. High Responsibility) and the role matches (Digger), it can make all sorts of individual adjustments on up to 5 time rates.
In the example below Mode (2nd column) is "Adjustment" and each row can make an adjustments on a different time rate cost or charge rate (or leave certain ones alone if they are not there). They can set fixed amounts or add or remove percentages/fixed amounts to both the cost or the charge rate. The offers a lot of flexibility to manipulate based on the customer's tag (chosen in the first column) and even several tags may be added to get really granular. You can think of these as rules, i.e. if a customer has a tag, and they match the selected role, make an adjustment to Time Rate. Repeat for each time rate.
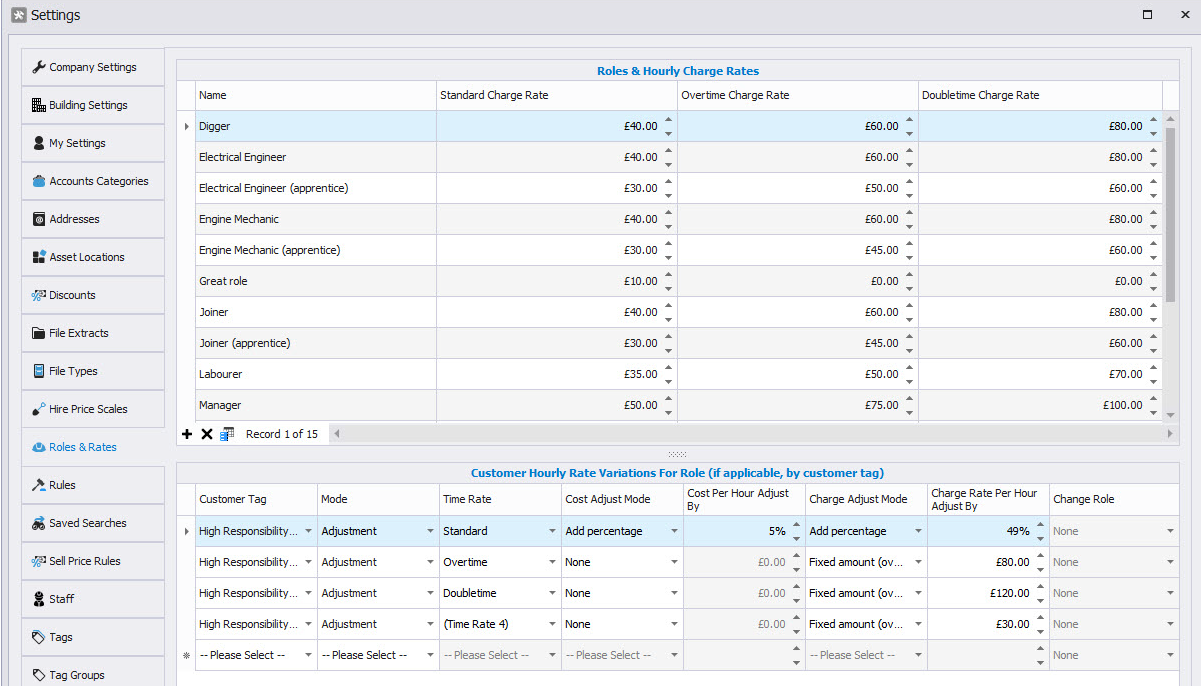
8.1.2 Change Role
In this mode, when a timesheet is updated and it has a customer elected with the matching tag in this grid (High Responsibility) and the role matches (Electrical Engineer (apprentice)), it can divert to a different role instead to pick up that role and its different set of rates.
If we look at the example below, the Mode (2nd column) is "Change role" and the last column becomes available (and the rest unavailable) to divert the role to that of an Electrical Engineer, which can carry a different set of rates. Only one row below is required in this case.