Help Topics
- EaseSuite
- Frequently Asked Questions / Troubleshooting
- General Application Features
- Stock Control and Replenishment
- Accounts Package Integration
- Quick Start Guides
- Mobile Guides
- Word Templates & Print Outs
- Concepts
- Hardware
- Workflow Case Studies
- Terminology
- Submitting Help Requests
- Feature Requests
- Web Shop Preparation Guide
Stock Control and Replenishment
1. Introduction
At its simplest:
- Sales will reduce stock levels.
- Purchases (when receiving a delivery) will replenish.
- Manual stock adjustments/stock takes can also adjust stock levels, as well as purchase returns back to a supplier and sales refunds to a customer. (Items may or may not go back on the shelf depending on return reason).
2. Workflows
- Setting stock quantities and re-order levels
- Selling and refunding
- Receiving purchase deliveries and returns
- Manual stock adjustment
- Stock taking
3. Stock Taking
A Stock Take is a specific assessment and recording of the amount of Stock held by a business. As such a Stock Taking Mode is built into EaseSuite to help with carrying out the assessment and providing records and reports of Stock Take activity. Changes to Stock quantity made during Stock Take are recorded differently from an ordinary adjustment to Stock quantity made for other reasons during the normal course of business. This help section will go step by step through the process of Stock Taking.
3.1 Stock Take Mode on the Desktop App
To enter Stock Take Mode when in the Stock Area select Stock Take (1).
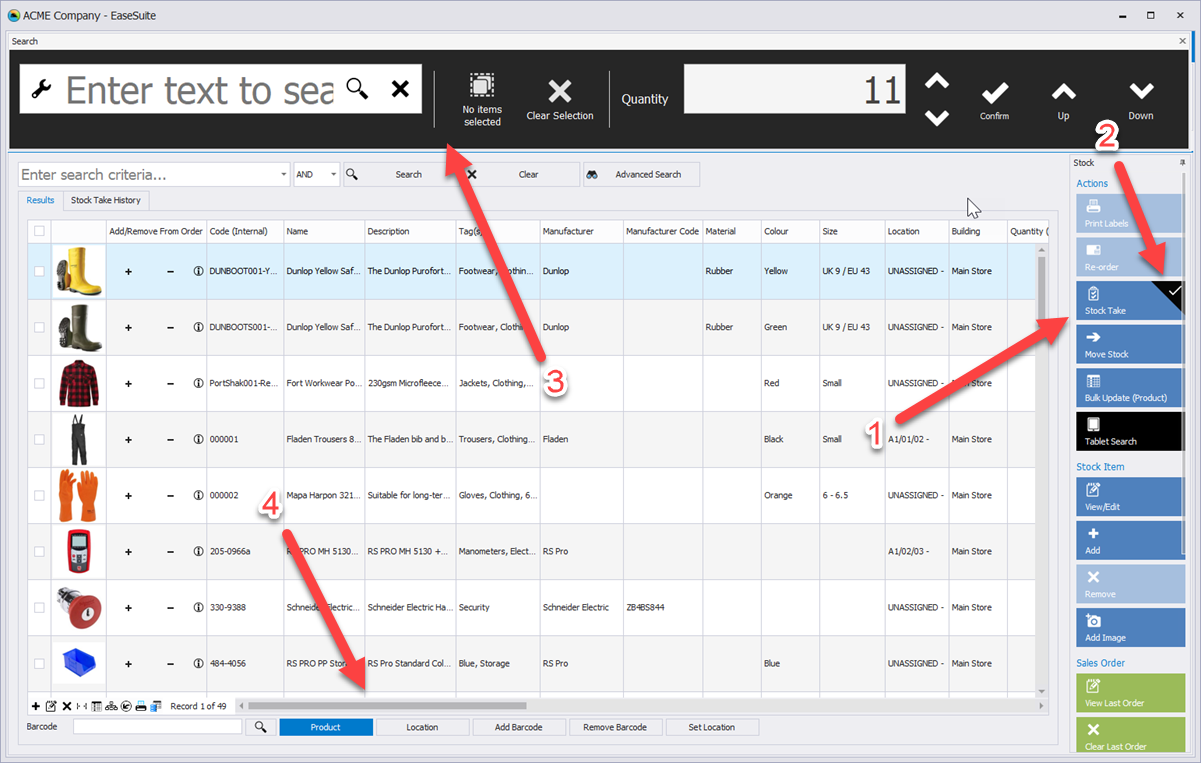
The following happens when EaseSuite is switched into Stock Take Mode.
- A tick mark (2) is visible in the corner of the Stock Take button to indicate that Stock Take Mode is active.
- A large, movable, black Stock Taking window opens. (3)
- All changes to Stock Quantity will be recorded in Recent Activity with the Entry Type - Stock Take. (At all other times changes to Quantity are recorded with the Entry Type - Quantity Adjustment).
Stock can be found in a number of ways:
- Entering text into the large search field active in Stock Take Mode
- Using the Barcode scanner to do one of the following:
- Scan the product barcode to locate the product information in EaseSuite
- Scan the location barcode with Location selected (4)
- Scroll through the list of products in the main Stock Area. Clicking the top of a column can order the list as required. Eg by name; by location; by Quantity Last Verified On etc
- Advanced searches can provide a useful way of conducting specific searches especially by location:
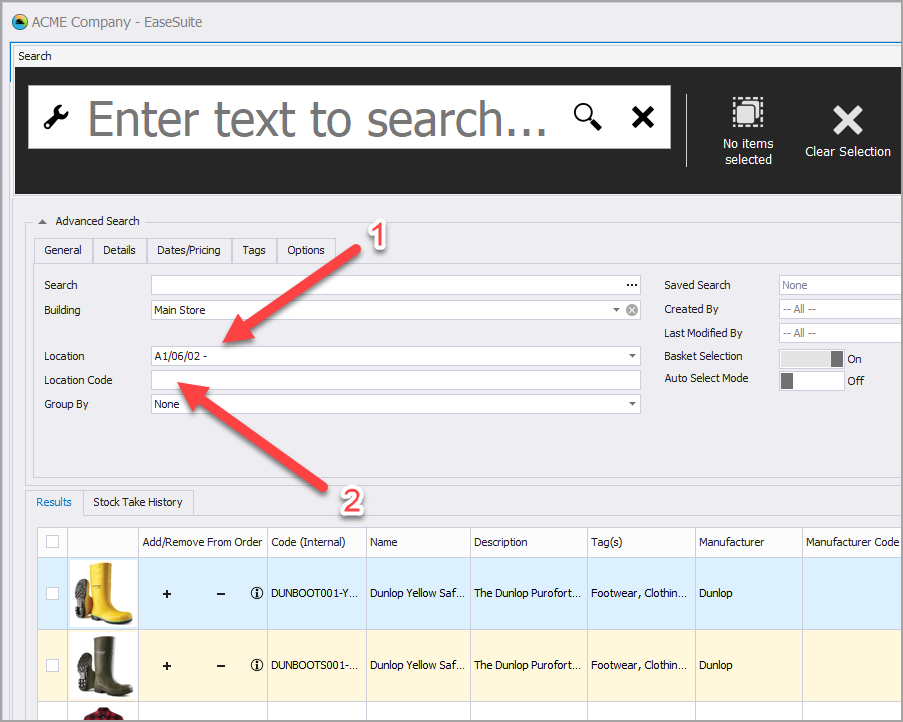
- In Advanced Search the drop down arrow for the Location field (1) will allow you to Search for all the stock held at that location. For the example below we are searching for all the Stock in Aisle 1, Section 6, Shelf 2. For a more detailed discussion of Location naming options see here.
- If you wish to make a broader location search. For example you want to search for all items located in Aisle1, Section 6. You can do this in the Location Code field (2). Here you can add part of the location code. In this case A1/06 so you see info for all shelves at that location. You could be even broader and find all items in Aisle1 by just searching A1 if you wish.
3.2 Stock Take settings options
By Default Stock Take Mode operates in what is called Instant Mode. In this mode every time you make an alteration to Stock quantity the change is instantly applied to the Stock level. This happens for each subsequent change as it is entered.
Stock Take mode can also be switched to operate in Confirm at End mode. To switch modes Select Settings > General > Building Settings > Product/Stock. In the drop down list for Stock Take Mode, Select between Instant or Confirm At End. (see below)

When using Stock Take in Confirm at End Mode, all changes made will be presented in the Stock Take Confirmation Dialog when exiting Stock Take Mode.
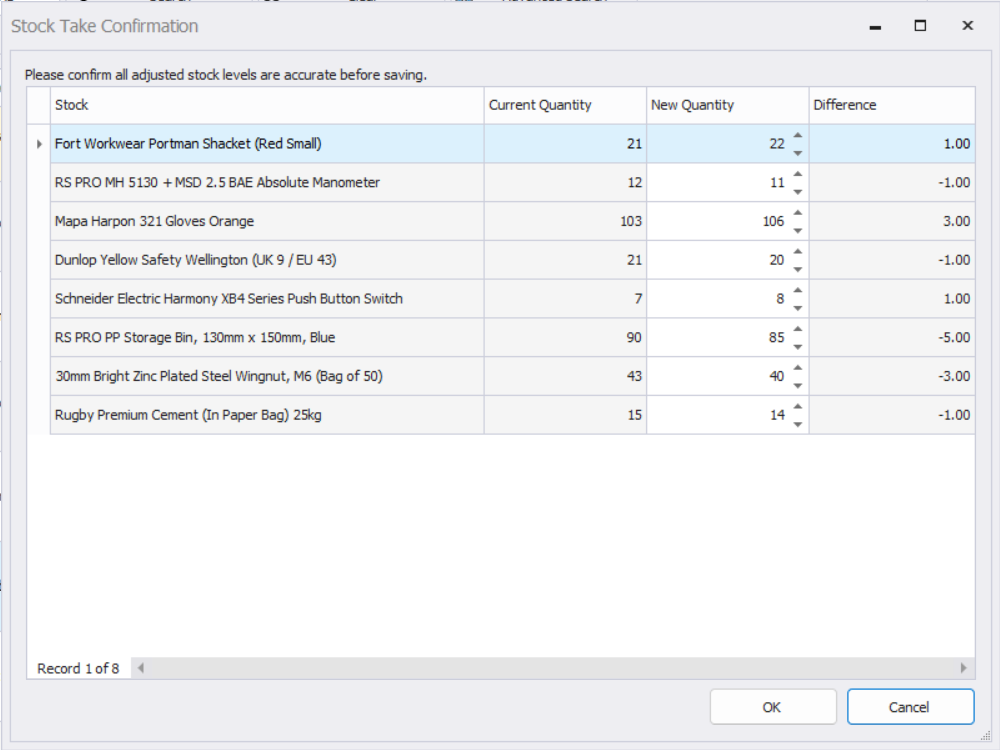
Here, all changes entered are listed, showing values for Current Quantity, New Quantity & Difference. At this point further changes can be made to the New Quantity amounts if required. On Selecting OK, the changes are confirmed and entered as Stock Take items into the database.
3.3 Stock Take Mode on the Stores App
For information on using the Stores App in Stock Take Mode see the section of the Stores App help here.
3.4 Taking Stock
As each Stock item is selected for Stock Take (either through scanning or searching) the Quantity EaseSuite expects the to be is displayed in the large Stock Take window (1). If it needs correction the actual quantity should be added here or adjusted using the up and down arrows (3). Select the confirm/tick (2) to enter the revised quantity.
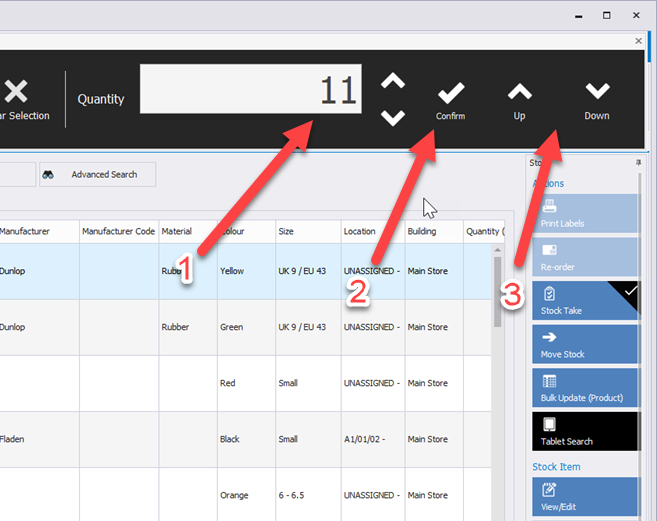
If the Stock level was found correct and as expected. Selecting the Tick/Confirm button (2) is still important as it updates the 'Quantity Last Verified On' information. This is very useful for confirming what products have and have not been checked.
3.4.1 Taking Stock on the Stores App
For information on using the mobile Stores App in Stock Take Mode see the Stores App help page here.
3.5 Finding Missing Stock
Finding and counting stock quantity as we have described so far is an invaluable part of the Stock Take process. However, if a total Stock Check is being carried out it is important to be able to obtain details of any products that have stock according to EaseSuite but no items were present during the stock take. Items with correct quantity would be checked and quantity confirmed. Items with incorrect quantities would be corrected and confirmed. What's left is any items with Stock according to EaseSuite but no items found in store. To find these records there are two options.
- The quickest way to find this information is to simply order the Stock Area by Cost Last Verified On with oldest first. You can then see whether the oldest entries are dated before you began the Stock Take. To do this ensure you have Stock Area open. Find the Column called Cost Last Verified On. You may need to scroll right to find this column using the scroll bar at the bottom of the Stock Area. If the column is not visible, open Show/Hide Columns and drag Cost Last Verified On back onto the table in whatever order suits. You can reorder columns by click and holding on the heading and dragging left or right until arrows indicate you can drop it in a new position.
- An alternative method that searches for, and displays, only those items not checked during the Stock Take can be done in the Advanced Search Tab of the Stock Area. If for example you had spent the last two days carrying out a complete Stock take and wanted to search far any missed items you would do the following:
- Select Advanced Search
- Select the Dates/Pricing tab
- Date Search By: Set to - Quantity Last Verified On
- Between: Leave the first field blank (so no earliest limit is imposed on the search). In the second field select the date 2 days prior (ie before the Stock Take began)
- Select Search
- The Stock Area will now show you the results of this search. Displayed will be any Stock that has not been verified in the last 2 days and thus has been missed by the Stock Check and is missing from the Store.
3.6 Stock Take Reporting
To create a Stock Take Report as a pdf suitable for printing and emailing you must first select Recent Activity (1)
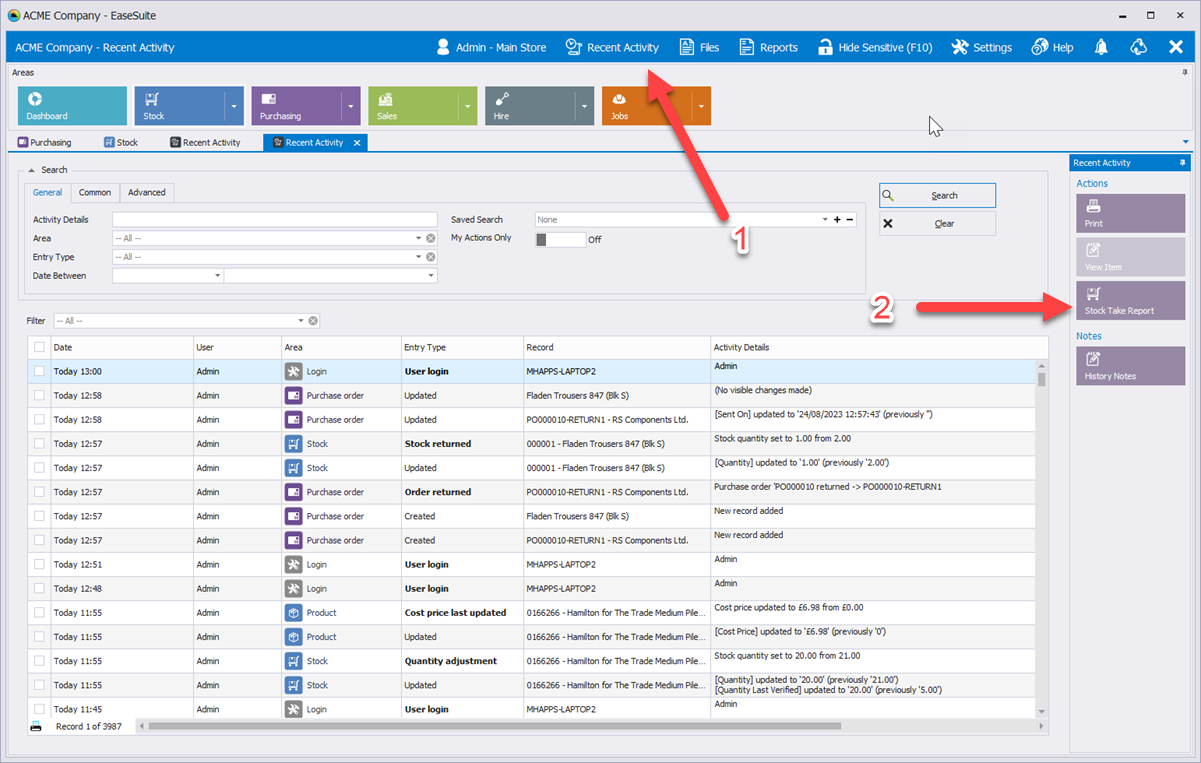
This opens the Recent Activity Area. From here the Stock Take Report (2) can be selected. This opens the following dialog:
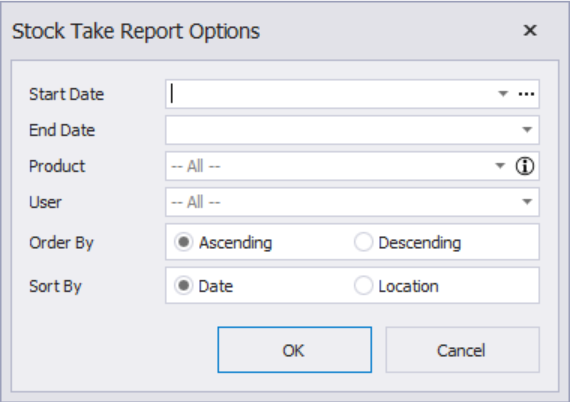
This allows you to select the information that you would like to be included in the Stock Take Report.
- Start/End Date: Either then enter the dates you require or from the drop down list select one of the pre-defined search ranges.
- Product: Leave this blank unless you want to produce on report on a specific Product only.
- User: Leave this blank for a full Stock Take Report or select a User to produce a report containing the Stock Taking entries of a specific User.
- Order and Sort by: These options allow you to customise the way the reported items are displayed.
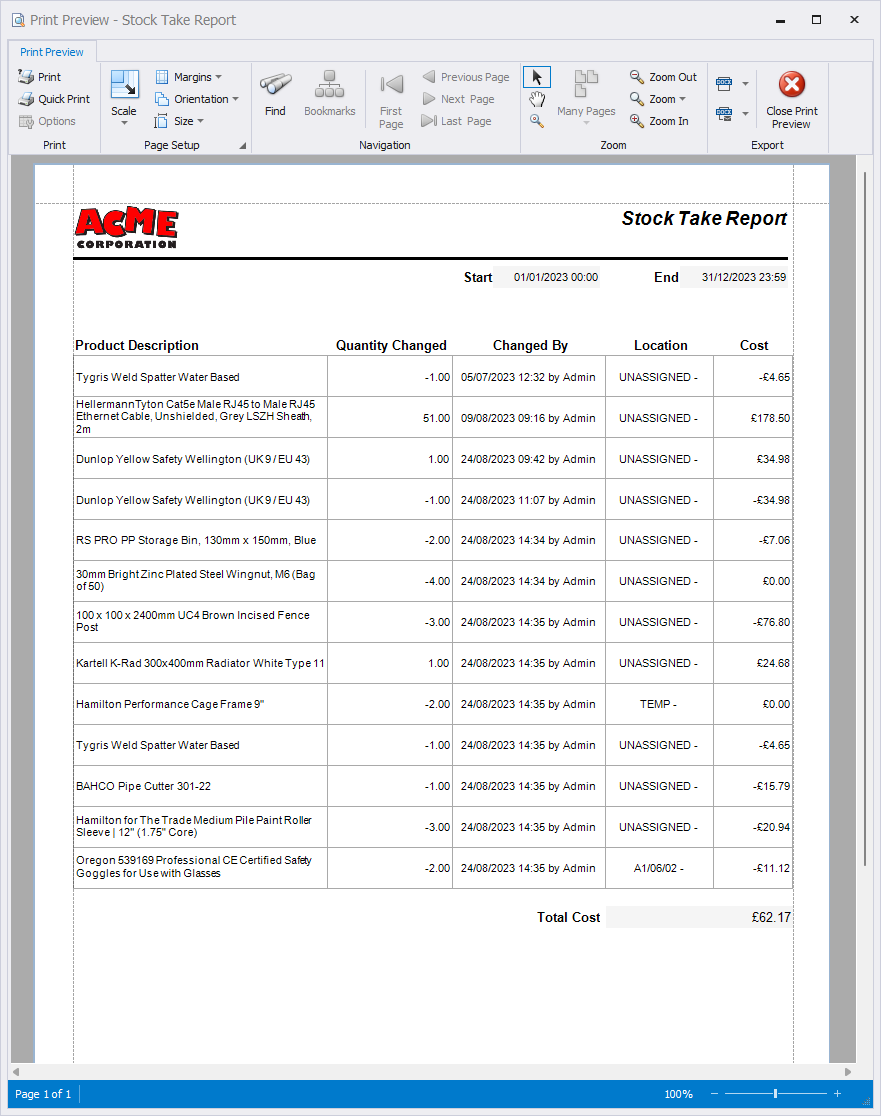
Selecting OK will then open a Print Preview of the Stock Take report from which it can be printed, exported or emailed as required. The report will show all product quantity changes that have occurred when in Stock Take mode over the selected period. It will also provide a total cost of all these items.
3.6.1 Periodic Stock Check vs Progressive Stock Check
At any given time you can guarantee a certain percentage of stock will be wrong in system vs actual. One option is to completely shut down stores and attack that once a year, noting it takes enormous effort to do, downtime, and will start to run off again quite quickly afterwards. The alternative is what we call "progressive stock taking", which can be done bit-by-bit gradually by attacking oldest Quantity Last Verified On first and updating a limited amount of stock items say a weekly basis. This technique allows things to gradually come full circle by always attacking the oldest first and can ensure a better overall average of accuracy across stock at any given time. Since the stock take report takes a date range, the progressive stock take adjustments can be seen over the year and totals analyzed. This or a combination of the two techniques can greatly reduce or eliminate the need for downtime.
4. Manual Stock Adjustments
By default the Stock Take button operates in the ways described above and enters the system into Stock Take Take Mode. However, there are times out with of Stock Take mode where manual adjustments to Stock quantities may be necessary. The drop down menu of the Stock Take button provides access to these functions.
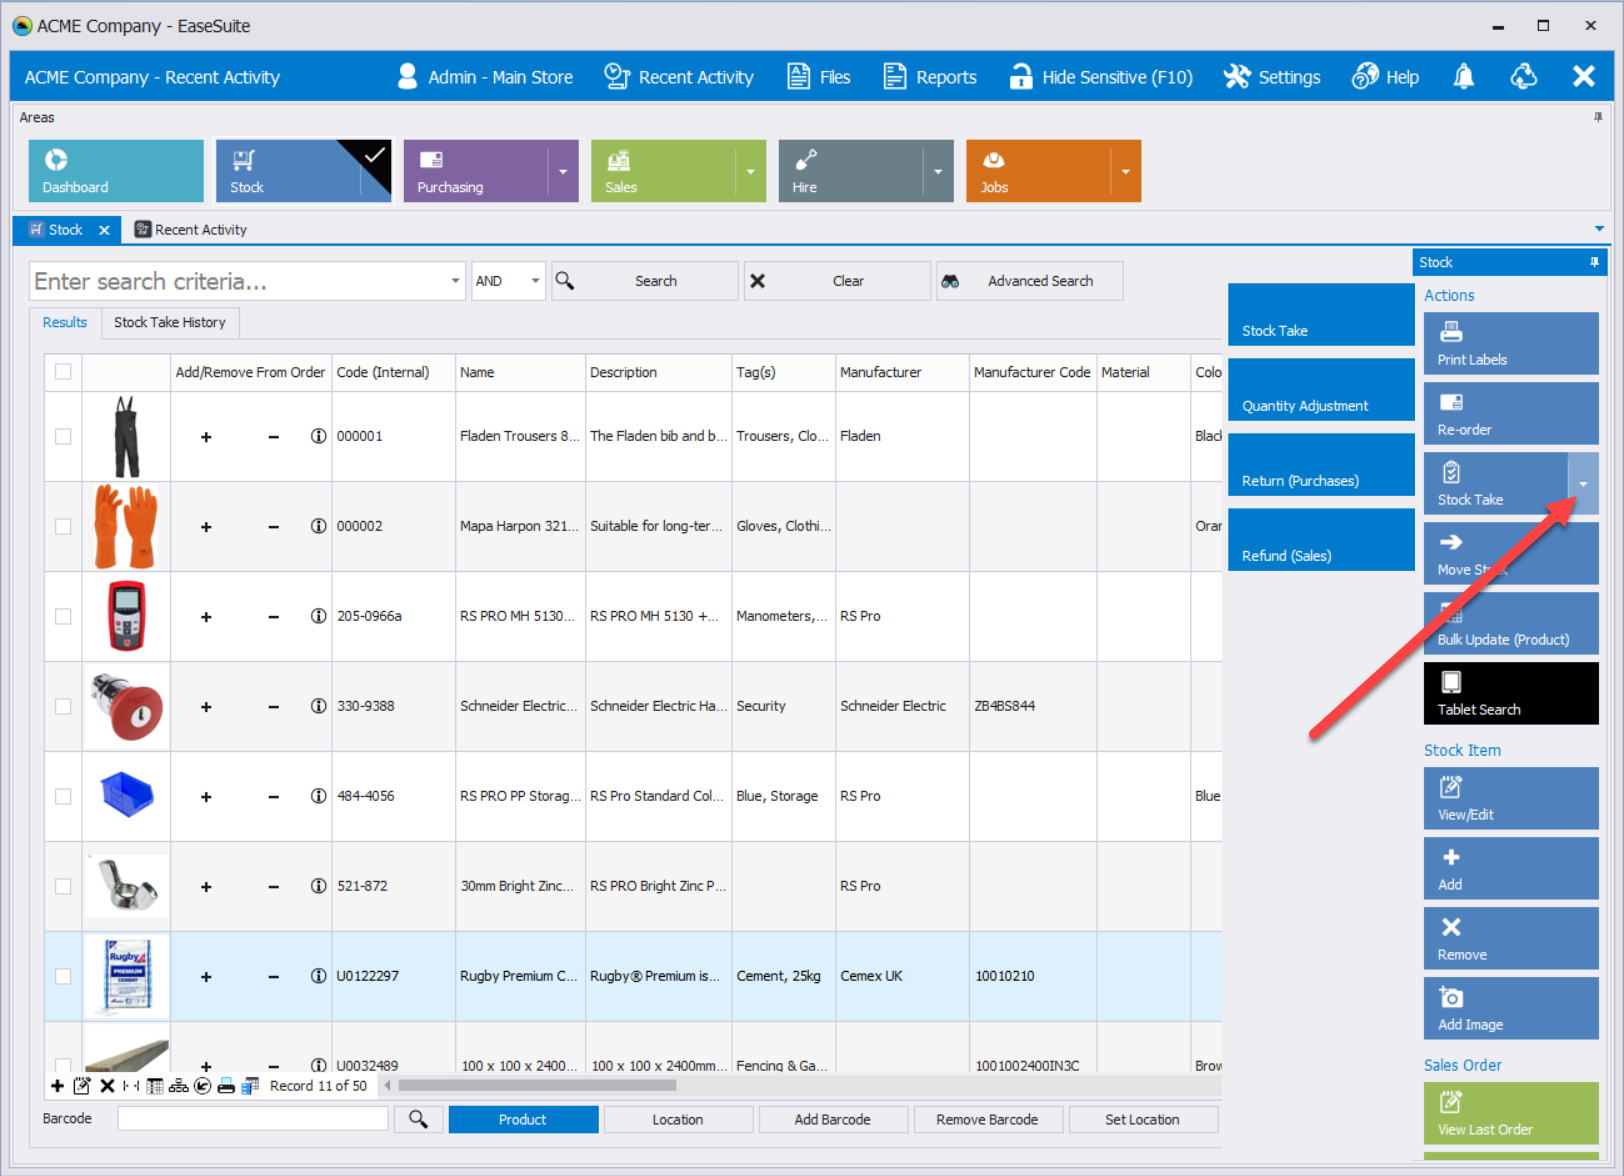
From the drop down menu 4 options are available.
- Stock Take: This is the regular Stock Take mode as would be accessed via the regular Stock Take button. Changes in this mode will be recorded in Recent Activity as a Stock Take entry type
- Quantity Adjustment: Changes made in this mode would be recorded in Recent Activity as a Quantity Adjustment entry type and not included in Stock Take reports.
- Return (Purchases): Any adjustment to stock quantity made in this mode will be recorded in Recent Activity as a Stock Returned entry type. Returns of Stock items can be created in a number of ways (see Purchase Order Returns). These methods give you various options about how the return affects Stock levels. This manual function here is for those occasions that fall outside of the regular. For when you just need to enter a change to Stock quantity manually and have it recorded as a return.
- Refund (Sales): Adjustments to stock quantity made in this mode will be recorded in Recent Activity as an Order Refunded entry type. Refunds of Sales can be created in a number of ways (see Refunding Sales Orders). These refunds give you options about how Stock Levels should be automatically affected by the return. This manual option here is for scenarios outside the regular return where for whatever reason a stock quantity adjustment needs to be made and recorded in Recent Activity as an Order Refunded entry type.
In all of these options the large, movable black window opens for searching and adjusting Stock quantities. It works exactly the same in these alternative modes as in regular Stock Take mode. The difference being the way the change in quantity is recorded in Recent Activity.