Help Topics
- EaseSuite
- Frequently Asked Questions / Troubleshooting
- General Application Features
- Stock Control and Replenishment
- Accounts Package Integration
- Quick Start Guides
- Mobile Guides
- Word Templates & Print Outs
- Concepts
- Hardware
- Workflow Case Studies
- Terminology
- Submitting Help Requests
- Feature Requests
- Web Shop Preparation Guide
Word Templates & Print Outs
- Templates Overview
- Downloading Templates
- Click … to edit a template.
- Default Template Notes
- Printer Notes
- Print Preview
- Placeholders
- Summary
- Sending SMS Texts
1. Templates Overview
All the print outs in the system are designed in Word for simplicity, since most users are familiar with Word. This allows you to easily make changes or add new as desired.
Each area (sales, purchasing, jobs etc.) can have a selection of templates. For sales, this can include things like sales/credit notes, delivery notes, quote templates, templates with and without prices etc., basically covering every variation of template you would ever need.
Within the system, these templates are converted on the fly to PDF for printing or email.
These templates are viewable in Settings > Templates and the system is usually bundled with several plus more are available to download. You'll see a list with name and type (the print preview area they are associated with).
.png)
Clicking + at bottom of list will let you add a new template, x delete. Clone Template can also be a quick way of cloning something similar then renaming and choosing a different file, carrying across the associated settings. Select Online Templates to open the Online Templates form.
2. Downloading Templates
Selecting Online Templates opens the Online Templates form.
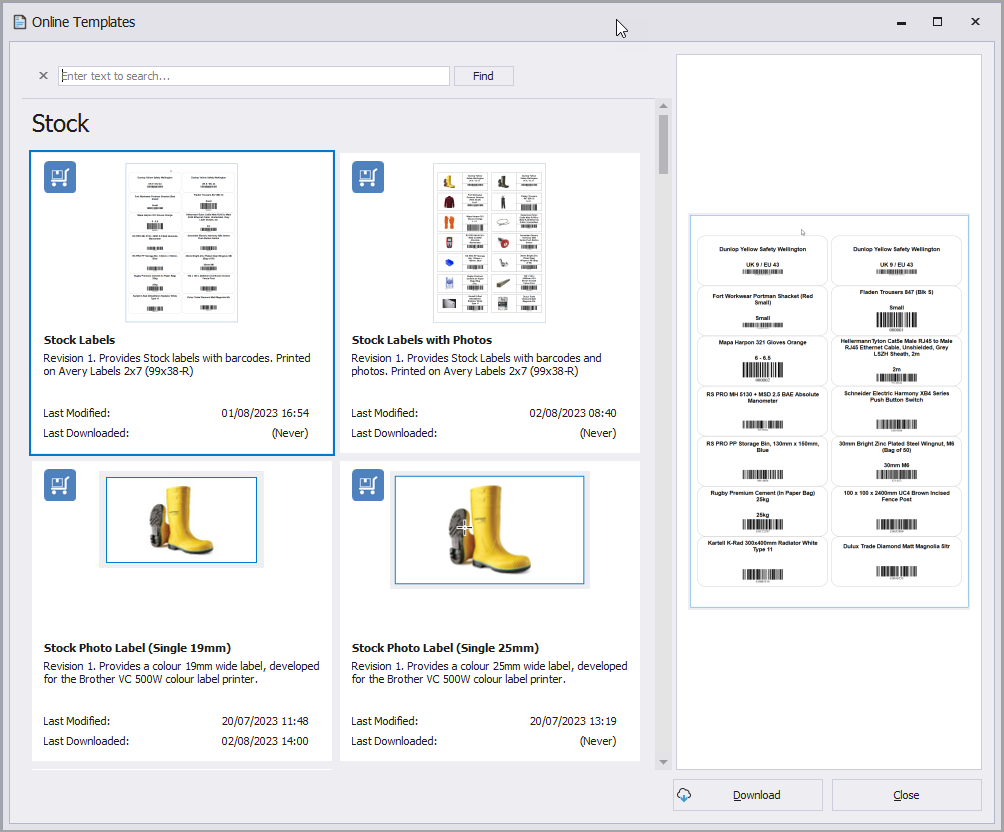
This shows you all the available templates and is updated regularly as new designs and revised versions become available.
Templates are shown grouped by type and give a brief overview of their intended function.
Selecting a template will show a preview example image on the right of the form.
Search text can be entered at the top to help you find what you're looking for.
Select Download (bottom right) when you have Selected the template you want. Don't worry if you already have this template installed on your system and are using it. This will not overwrite or alter any existing template on your system. If the template is already downloaded then downloading again will create and numbered new version of the template. Because you can edit and alter the template to your needs you may want several different versions of the same template that you will set up for slightly different purposes.
Templates are downloaded ready to go inside EaseSuite with all the settings edited and ready for you. As with all the templates you can edit the settings as shown below.
3. Click … to edit a template.
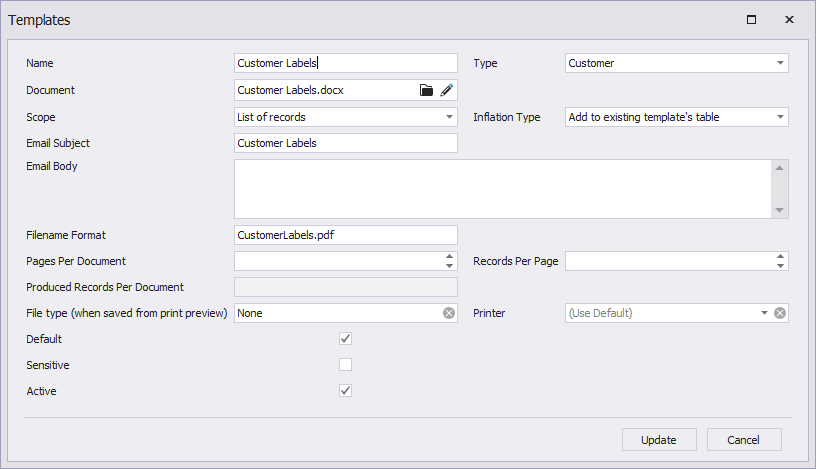
| Name | Friendly name for template when it appears in a list. |
| Document | The Word document. Click the folder icon to choose another template from the file system. Click edit (pencil) to edit and open it up in Word. Note edit the file in Word, don't try to edit it in Wordpad e.g. on a computer that doesn't have Word installed, that will screw it up on save and you'll need to restore it from backup. |
| Type | The area it should display in, in this case Customer. |
| Scope | List of records, single record. In this type is an avery label layout e.g. 3 x 6 labels on a page, and so we want list of records. As a general rule of thumb, if you want to list out records use List of records, if it is a single print out like a sales order, label for a label printer (one at a time printed on a page), you want single record. |
| Inflation Type | This refers to how the template uses tables. It can either find a row and clone it, or it can start cloning the entire table then start populating. If in doubt, find a template that has loosely the same layout and check this value. |
| Email Subject | When you email, this will be the subject. You can use placeholders here from the area (see Settings > General > Template placeholders for a list of those). The placeholders are set based on the current context. For a sales order for example, you might have {SOCode} or {CustomerName} in there which get substituted for the correct values when you go to email if you want those in the subject. |
| Email Body | Similar to previous, you can type in a body. e.g. Dear {CustomerContactName} and that will inject the correct contact name at time of print (if it is present for the customer of course). |
| Filename Format | When you attach it to an email, this is how the filename will be named. All files are in PDF format, so you want to end them in ".pdf" here (or you'll cause the end customer issues opening). And you've maybe guessed it, you can use placeholders here too. |
| Pages Per Document / Records Per Page / Produced Records Per Document | This relates to chopping up the data into multiple PDF documents, because if it's a big list and say avery labels, the huge PDF can negatively affect performance and sometimes the printer can't handle it. So generally used in troubleshooting cases. |
| File Type | You can choose a file type so when you click Save To Files from a print preview, it'll be added as a file of that type. If this is not set, it will ask. |
| Printer | See the next section Printer notes. |
| Default | If ticked, it'll be the initial template selected in the print preview, so best setting your most common one as the default. Other templates can still be switched to (bottom left). Note customers or suppliers can have their own specific template default when printing sales orders or purchase orders, and that is done from the print preview screen and there is a button to set to default for customer or supplier depending on content. Also see Default Template Notes below, as there are a few things that can determine the default. |
| Default For Status | For some types of templates (sales orders, purchase orders, jobs and hire) in single record mode, this can be selected and it means the template will be the default when the item to be printed is at that status. For example if Stock quote for a sales order template is selected here, this template becomes the default for it when printing an item of this status. This makes things a bit more automatic when there is certain templates for certain statuses and staff print. |
| Sensitive | Not available in sensitive mode (if a user is set to not view sensitive or the mode has been switched on Show/Hide Sensitive at the top is hide, this template won't be available). |
| Active | You can deactivate it and it won't be shown in the print preview. If you have too many, seasonal, or just building up a new template, you may wish to use this. Disabling can be better than deleting as their content may still be a useful reference point. |
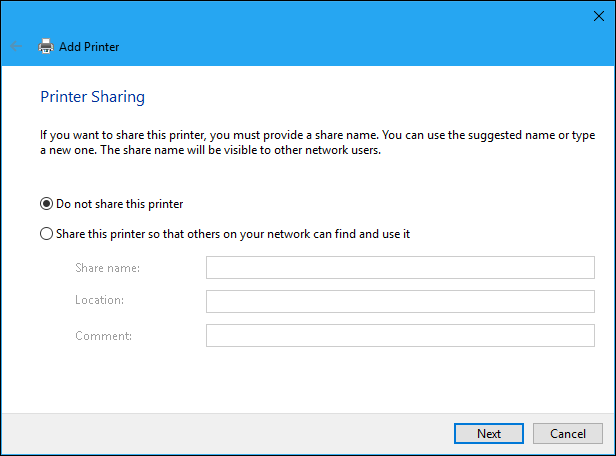
4. Default Template Notes
The default template that first shows in a print preview can be determined in several different ways, as touched on above.
Use cases for this is when you want the default to be different based on the item's status, for example when a sales order is in Quote status use a different template vs when it is Sent. The current building can also feed into this when you want different templates for different buildings.
The order when deciding what to show by default in the print preview is determined in the following order, and if one doesn't match it rolls onto the next.
- Template's Default For Status matches the item's status and the building code (Settings > Buildings) is at the end of the template's name with a hyphen, e.g. AnyTemplateName-Stores, where "Stores" is the building code.
- Template's Default For Status with status match on the current item (e.g. Stock quote)
- Template's name matches status and building (e.g. Stock quote-Stores), this is legacy (replaced by 1) but is still in for backwards compatibility.
- Template's name matches status only (e.g. Quote)
- Default ticked. Though down the list, this one is the most common when the others haven't been supplied, noting the previous 4 take priority over this when set.
- If no default is ticked, the first template in the list is used.
Note you always get the option to switch to other templates at the print preview stage.
5. Printer Notes
You'll notice each template can have a Printer assigned, this is generally important for: labels (specific label printers), when you have different print trays, or just different templates going to specific printers.
- Most of the time the printer can be left empty and in that case it reverts to Use Default, which uses the default printer set on the PC. Generally you want your default printer to be the most common one, but you can manipulate it per PC and the application will follow suit from the machine (i.e. for location specific). For example a sales counter's default might be different from an office's printer, in that case you can leave it at default and let the PC printer settings decide instead of the application. This can resolve complexity, i.e. just let it print to where the machine's default printer goes.
- If you need to target a specific printer (when multiple are in play), edit the record and type the exact printer name in per the name display in Printer properties (Start menu > type Printers and scanners, choose printer then Printer Properties).
- Each computer targeting the printer must have the local printer added and be named the same, with usually the same settings. In the afore mentioned printer properties type a consistent name if necessary. This can cover local printers e.g. the same model of label printer connected by USB on different computers (name it the same so the system can target) or network printers that are added. The system always goes by a central printer name from the template list, so the PCs each must be set up appropriately with that same printer name to catch the print out.
- Multi-tray printers: add multiple instances of each printer then edit Print properties preferences for each. On each instance choose a different default tray, then in the list above target the correct printer by name (give each a meaningful name). You are effectively duplicating the printer but with different settings, this makes it easy to target and once set up the settings don't need adjusted again.
- Similarly, if you want to earmark some print outs for colour, some for B&W, some for single sided, some for double sided, or any other combination of settings possible, then create as many printers as necessary then name appropriately and set the name in the list above. Repeat for each machine required.
- Label Printers: The same requirement to create multiple instances of a printer occurs when using a label printer that can fit different sizes of label paper. Eg. Brother VC-500. A unique instance of the printer is required for each size of label. See below for how to create instances of a printer.
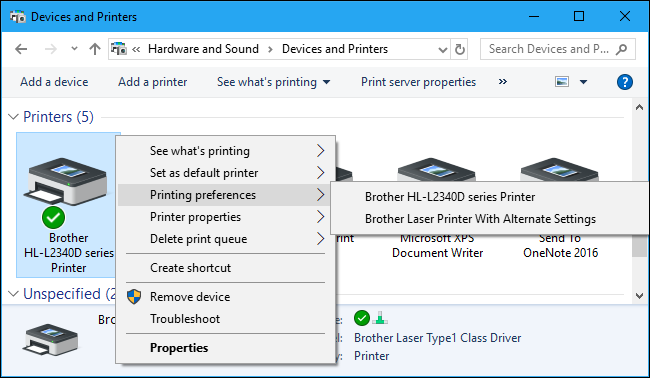
5.1 Duplicating a Printer In Windows
- You can install the same printer more than once in Windows, and each has its own settings. This section will guide you through the process.
- To manually install the printer a second time, you must know the port and driver the printer is using.
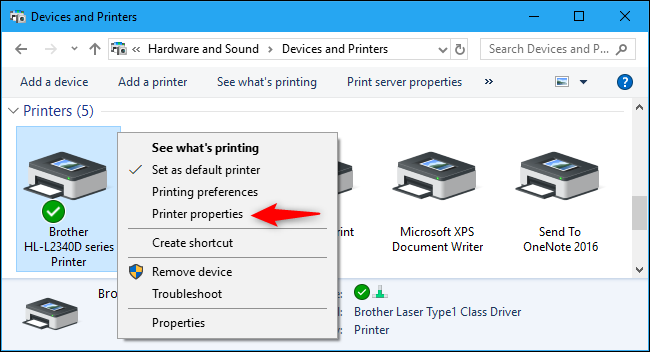
- To find this information, go to Control Panel > Hardware and Sound > Devices and Printers. Locate the printer you want to make a copy of, right-click it, and select “Printer Properties.”
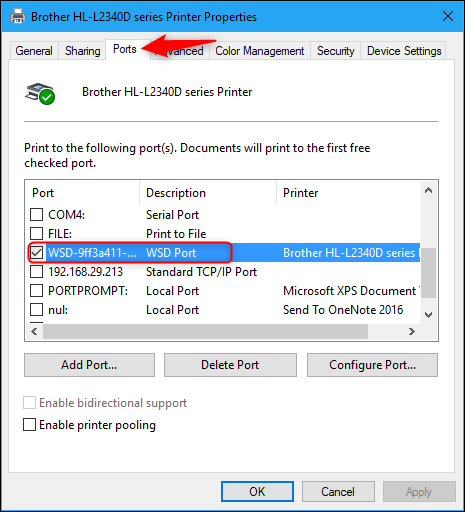
- Click the “Ports” tab and make a note of which printer port is selected.
- Click the “Advanced” tab and make a note of the name to the right of “Driver.”
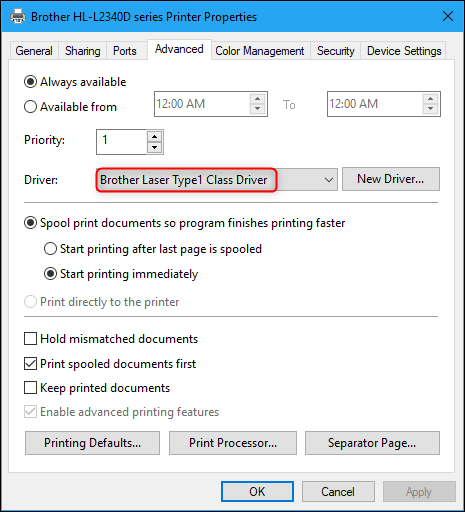
- Close the printer properties window by clicking "Cancel".
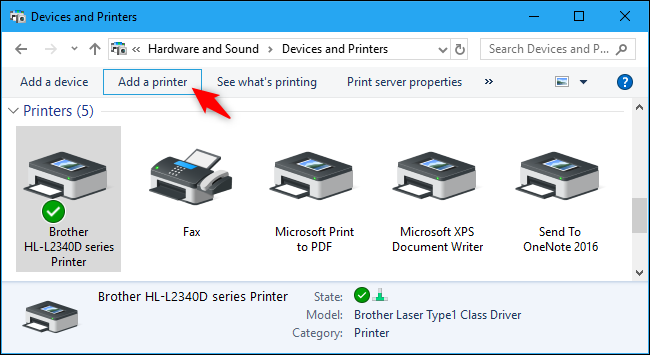
- You now have all the information you need to install the printer a second time. This creates a new virtual device in Windows, one that points at the same physical printer but has its own printing preferences.
To get started, simply click the “Add a Printer” button on the toolbar in the Devices and Printers window.
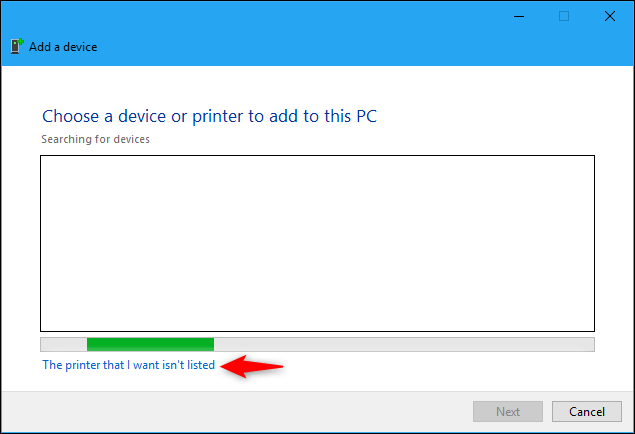
- Click “The printer that I want isn’t listed” to manually add a printer.
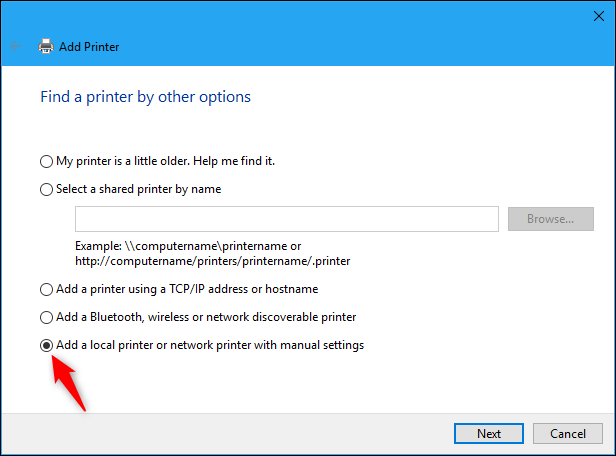
- Select “Add a local printer or network printer with manual settings” and click “Next.”
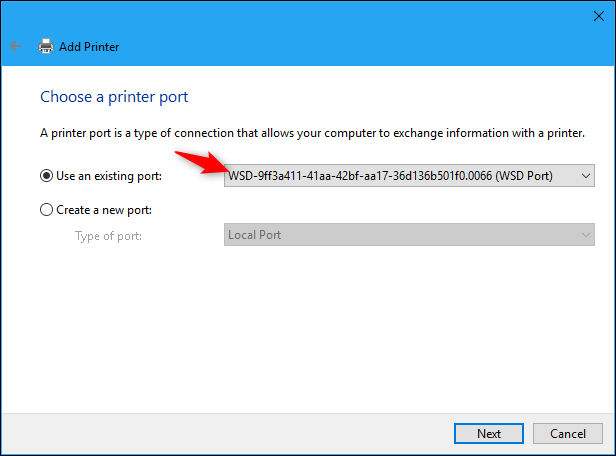
- Select “Use an existing port.” In the drop-down box, select the port your printer is using (you noted this down earlier) and click “Next.”
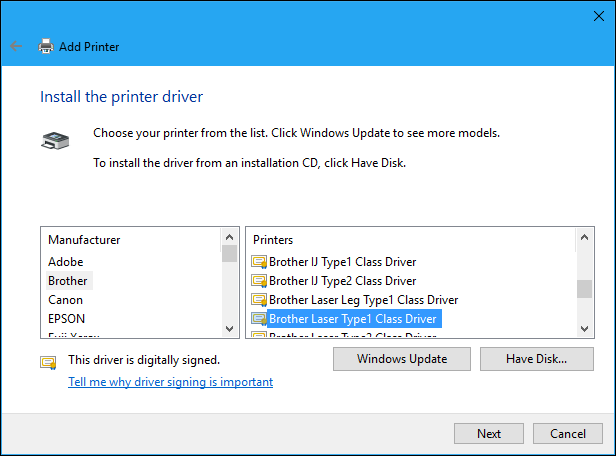
- Now select the driver your printer is already using, (this was the second thing you noted down earlier). You will need to select the make of your printer then the driver from the list. Once selected, click “Next.”
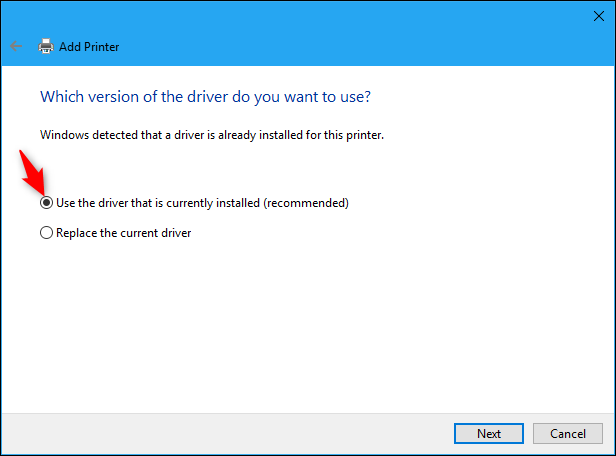
- Select “Use the driver that is currently installed (recommended)” and click “Next.”
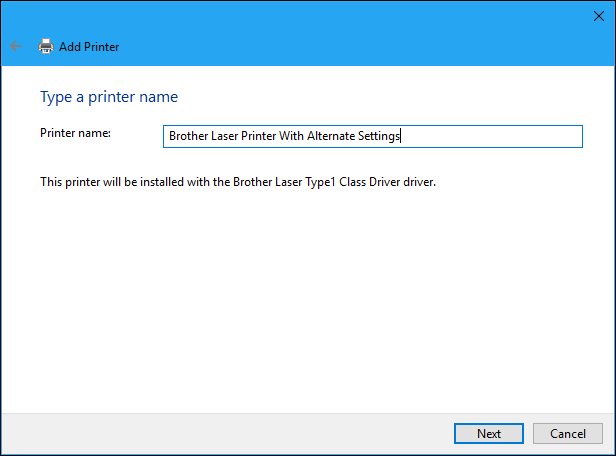
Enter a name for the printer and click “Next” to continue. Pick a name that helps you remember which physical printer and printing settings it will use. Eg. Brother Label 25mm.
- Finally, choose whether to set up printer sharing or not and click “Next.”
- You can click “Print a test page” to test the printer if you like. Click “Finish” when you’re done.
- Your new printer device will appear as an option in standard print dialogs. You can select the printer and click the “Preferences” button or right-click it and select “Printing Preferences” to assign different preferences to each device, and Windows will remember the settings separately.

- You can repeat this process as many times as you need to create versions of your printer with alternate settings.
- While the additional printers you add will show up as options in the Print dialog, they don’t appear normally in the Devices and Printers window, or in the new Settings > Devices > Printers and Scanners interface in Windows 10. Windows automatically combines them together in these printer management interfaces.
- You can still see the alternate printers from the printer configuration window, right-click the physical printer and you’ll see options for each installed printer device.
6. Print Preview
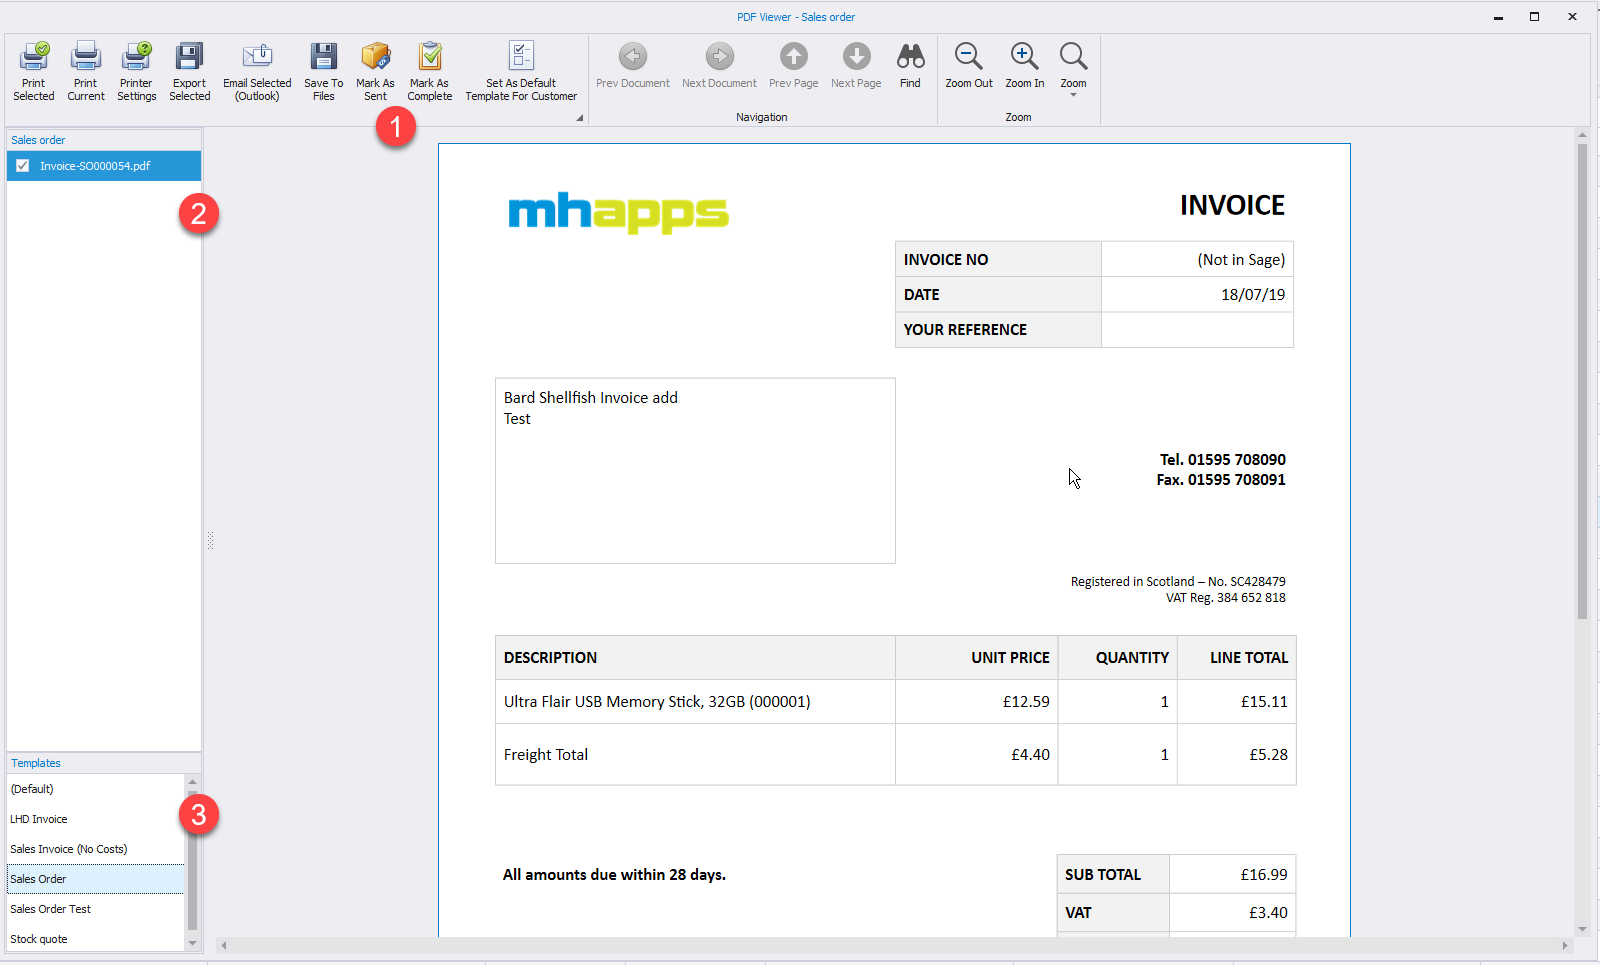
6.1 Button bar (1)
| Print Selected | Prints the selected documents in (2). |
| Print Current | Prints the shown document only. |
| Print Settings | Change some print settings on the fly for this print out (doesn't stick). |
| Export Selected | Allows you to export the selected in PDF format. |
| Email Selected (Outlook) | Opens Outlook and starts new email(s) using the Email Template settings described above. If multiple have been selected it will amalgamate where possible by email address. Sometimes our application can't get to Outlook, and when this happens Outlook may need to be closed/restarted first (which sometimes involves End Tasking it in Task Manager > Details > Outlook.exe). |
| Save To Files | This saves the selection as files to the Files area and associates that file with this item (sale, purchase, job etc.) for later reference. This can be useful if there is perhaps going to be movement in the item and you want to take snapshot of how it looks at a particular time before further changes are made. |
| Mark As Sent | Changes the item's status (sales order in this case) to sent. |
| Set As Default Template For Customer | Available for sales, purchases and jobs, you can make a template the default for when you print for a particular custom or supplier. This is for cases when they might have unique requirements. The other templates are available for selection too, but this appears as the default in this situation, overriding the default template described above. |
6.2 Document List (2)
If you selected more than one item in a search list before opting to Print / Email, they will all appear below and you can switch between them to preview.
6.3 Template List (3)
Select the desired template here (which lists your Word Templates described previously for this area) and the information will be transposed onto the desired template.
The default template (described above, either for the area or for a customer or supplier) is selected first.
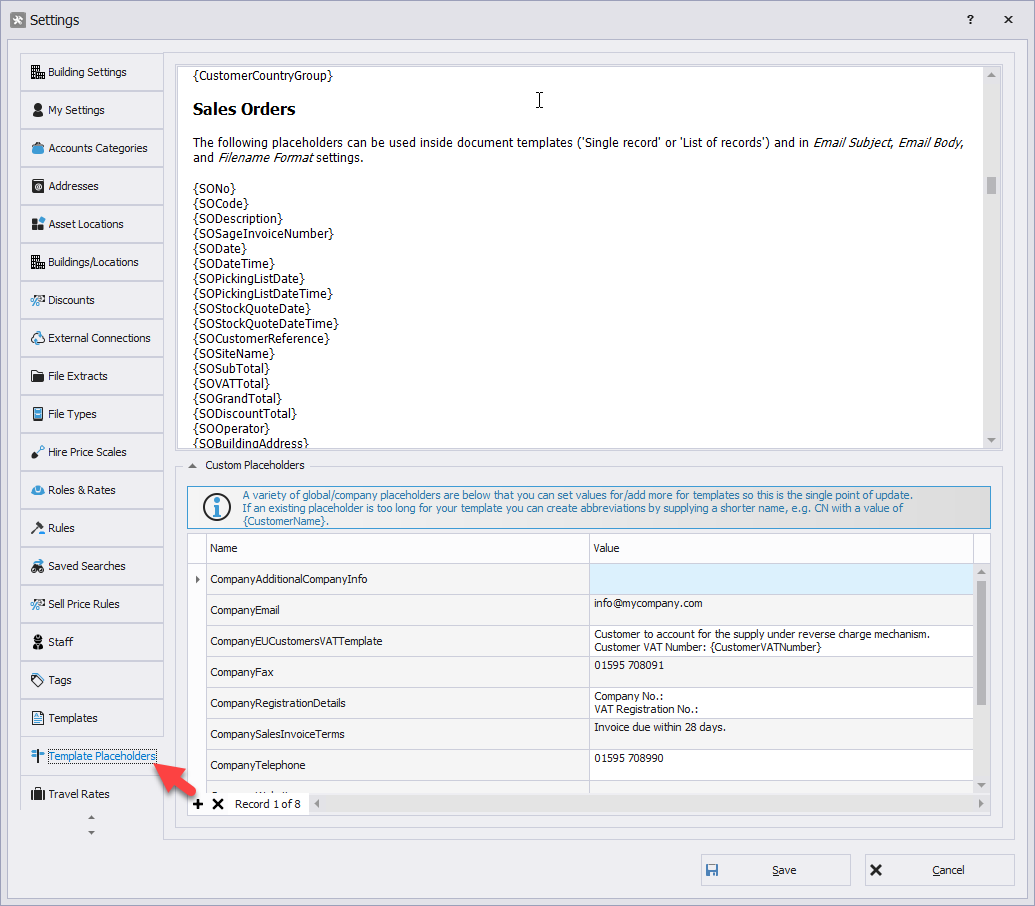
7. Placeholders
A key concept with out Word document templates is to place what we call placeholders in them. These are simply pieces of text like {CustomerName} surrounded with curly brackets {}. When you go to print, these are substituted with their corresponding correct value.
This is similar in concept to a Word mail merge if you are familiar with that, but note we don't use Word fields and opted to keep it simpler with straight forward text that is identified in these brackets. We've also extended some concepts like table manipulation as previously described on how data uses tables.
It is a good idea to reference Template Placeholders in General > Settings as you create or alter a template. This lists every single placeholder available for every single area/template type.
At the bottom you'll notice we have Custom Placeholders. These are global placeholders you can add and remove from the system. We recommend you add anything that is possibly changeable here. Say for example {CompanyTelephone}, it can be added here once here, but if you were to create 20 templates and manually typed in the phone number on each, you'd need to update 20 templates, whereas with this you just need to update the placeholder here once and since the documents contain {CompanyTelephone} instead, it will automatically reflect on all your templates.
There is an opportunity to get slightly creative here and specify seasonal offers that can be changed and that might highlight in a different colour on your template and be changeable when desired.
8. Summary
So all you have to do is create a new Word document, put some placeholders within it, then add a new record here with some details and attach it. That will then give you a new template for use in the system. Or you can edit an existing Word template easily.
See Word Template Design Tips for some tips when designing.
9. Sending SMS Texts
Each word template has an SMS Body field, which can be supplied with text that contain placeholders to form a common SMS message template. Some of the online templates have example text in there already that can be further customised.
The workflow of the system is to search out a selection of items, such as purchases, reservations (Print button on a purchase order in reservations tab), sales, staff (Settings), jobs, customers or suppliers for example, go to Print, then you'll notice on the print preview toolbar there is an SMS Message Recipients icon. This opens up a form allowing you to text all recipients involved. Some examples scenarios:
- When goods have arrived and you wish to notify recipients, you can do this from the purchase order reservations tab, or create the sales orders first, then do it from the sales orders area.
- You want to ad-hoc text a customer or group of customers for perhaps marketing or recall purposes. You can find the customer in the customer search area (perhaps by tag for groups) and go to Print to reach SMS sending. Finding by sales orders or jobs can also help get to a group of customers that have perhaps purchased an item.
- A new staff member has started and you wish to advise them of how to download the Timesheets app. Settings > General > Staff , select the staff member and print. Choose the Mobile Apps Instructions template and then the SMS button to text them abbreviated message with links they can click on their device. Note you may need to download this template (see online templates above), and you can also email the instructions.
9.1 Intial Setup
We use a provider called textmarketer. Visit https://textmarketer.co.uk to set up an account and purchase some SMS text credits for use by the system. You can buy them in batches of at least 1000 and they cost around 4.2p per text (£42 for 1000) at time of writing, though there are often discount/bulk offers. The credits never expire.
Once your textmarketer account is set up and complete, log in to the website, find Account Settings (top right), then choose API config and take note of the username and password listed.
In Settings > General > Company there is a setting SMS Service URL Format. This needs updated with your settings before text messages can be sent.
<username> - replace this with your username mentioned above.
<password> - replace this with your password mentioned above.
<shortcompanyname> - replace this with a short version of your company's name, this will appear in the from box. Note there is no from number with SMS messages sent, so they cannot be replied to and are for notification purposes.
Once you have done this, click the "..." button to open up a test form to allow you to test the settings work first by sending a text to yourself. If they do then you are good to go after that. If you are having problems then ensure the format is exactly as above.
Each time you send a text it will notify you of credits remaining.